Are you dreaming of a stunning wedding decoration that will wow your guests without breaking the bank? Making a balloon arch at home is easier than you think, and it adds a magical touch to your special day.
Imagine walking under a beautiful arch made of colorful balloons, crafted by your own hands. In this guide, you’ll discover simple steps and insider tips to create a perfect balloon arch that fits your wedding theme. Keep reading, and you’ll soon have a show-stopping decoration that makes your wedding truly unforgettable.

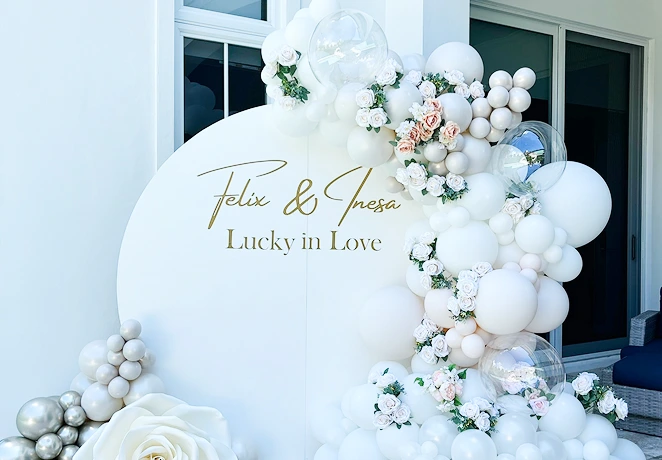
Credit: www.reddit.com
Materials Needed
Making a balloon arch for a wedding at home is fun and easy. You only need a few materials to get started.
Gather all the supplies before you begin. This will help your work go smoothly.
Types Of Balloons
Choose the right balloons for your arch. Different types make different looks and last times.
- Latex Balloons: These are common and come in many colors.
- Mylar Balloons: These are shiny and last longer but cost more.
- Round Balloons: Perfect for a classic balloon arch shape.
- Oval Balloons: Give a fuller and unique look to your arch.
- Confetti Balloons: Add sparkle with small pieces inside the balloon.
Additional Supplies
You need more than balloons to build a strong arch. These supplies help you put everything together.
- Balloon Pump: Makes inflating balloons easier and faster.
- Fishing Line or Balloon Tape: Holds balloons in place on the arch.
- Arch Frame or Wire: Gives shape and support to your arch.
- Scissors: For cutting tape and string.
- Command Hooks or Tape: To attach the arch to walls or doorways.
- Weights or Sandbags: Keep the arch stable if placed on the floor.
Choosing The Right Design
Making a balloon arch for a wedding at home is fun and creative. Picking the right design helps your arch look stunning and fit the celebration.
Focus on colors and shapes that match the wedding style. This guide helps you choose the best options for a beautiful balloon arch.
Color Schemes
Choosing the right colors is key for a wedding balloon arch. Pick shades that match the wedding theme and mood.
- Soft pastels like blush pink, mint, and cream create a romantic look.
- Classic white and gold add an elegant touch.
- Bright colors such as red, orange, and yellow bring energy and joy.
- Use two or three colors for a balanced and pretty arch.
- Match colors to the bride and groom’s style and venue.
Arch Shapes
The shape of the balloon arch changes the look of the wedding space. Choose a shape that fits the area and event style.
| Arch Shape | Description | Best For |
| Classic Semi-Circle | A smooth, half-circle arch that is simple and elegant. | Entrance or altar decoration |
| Asymmetrical | One side larger with varied balloon sizes for a modern look. | Photo backdrops |
| Double Arch | Two arches crossing or side by side for a grand effect. | Large venues or outdoor weddings |
| Square or Rectangular | Sharp corners creating a frame-like arch. | Modern weddings, framing doorways |
Preparing The Balloons
Creating a beautiful balloon arch starts with preparing the balloons carefully. Proper preparation makes the assembly easier and the arch last longer.
Focus on inflating the balloons correctly and choosing the right sizes for a balanced look.
Inflating Techniques
Use a hand pump or electric inflator to blow up the balloons. Avoid blowing them up by mouth to save time and energy.
- Inflate balloons slowly to prevent popping.
- Leave some space at the neck to tie knots easily.
- Check the balloon’s firmness; it should be tight but not stretched.
- Use a balloon sizer to keep all balloons uniform.
Balloon Sizes
Using different balloon sizes creates a fuller and more interesting arch. Mix large, medium, and small balloons.
| Balloon Size | Diameter (inches) | Suggested Use |
|---|---|---|
| Large | 16-18 | Base structure and focal points |
| Medium | 11-12 | Fill gaps and add volume |
| Small | 5-9 | Accents and decoration details |

Credit: www.youtube.com
Building The Frame
Creating a strong frame is important for a balloon arch. It holds the balloons in place and keeps the arch stable. You can build the frame using simple materials found at home.
This guide explains how to use PVC pipes or other supports to build your balloon arch frame. Both options are easy and affordable.
Using Pvc Pipes
PVC pipes are lightweight and flexible. They are great for making curved shapes like arches. You can buy PVC pipes at hardware stores.
To build the frame, cut two PVC pipes to the desired arch height. Connect them with a flexible PVC elbow or a piece of wire to shape the arch.
- Cut two equal-length PVC pipes
- Use PVC elbows or connectors to join pipes
- Secure connections with tape or glue
- Use a base or stakes to hold pipes upright
Alternative Supports
You can use other materials to build the frame if you do not have PVC pipes. These include metal rods, wooden dowels, or garden stakes.
Choose supports that are strong but easy to bend or connect. Make sure they can stand firmly on the ground or in weighted bases.
- Metal rods can be bent into arch shapes
- Wooden dowels are sturdy and lightweight
- Garden stakes work well in outdoor soil
- Use zip ties or tape to connect parts
- Stabilize the frame with heavy bases or weights
Assembling The Arch
Building a balloon arch requires careful assembly of the frame and balloons. This part of the process helps your arch hold its shape and look beautiful.
Focus on attaching balloons securely and creating clusters to fill the arch evenly. This guide will explain these key steps.
Attaching Balloons To Frame
Start by fixing the frame in place. Use a sturdy base or stand to keep it steady. Tie or clip the balloons along the frame using string or balloon tape. Make sure each balloon is tight to avoid slipping.
- Secure the frame to a flat surface.
- Tie balloons with string or use balloon tape.
- Attach balloons evenly along the frame.
- Check for loose balloons and tighten as needed.
- Work from one side to the other for balance.
Creating Balloon Clusters
Balloon clusters add volume and color to your arch. Group balloons in sets of three or four by tying their ends together. Use different sizes and colors to make the arch more interesting.
| Cluster Size | Number of Balloons | Purpose |
| Small | 3 | Fill small gaps in the arch |
| Medium | 4 | Add moderate volume and color |
| Large | 5 or more | Create focal points or corners |
Adding Decorative Touches
Decorating a balloon arch for a wedding at home is a creative task. Adding unique touches will make it stand out.
The right decorations can transform a simple arch into a stunning centerpiece. Let's explore some options.
Floral Accents
Flowers add elegance to any balloon arch. They bring natural beauty and softness.
Choose flowers that match the wedding theme. Fresh or artificial flowers can be used.
- Roses create a classic look
- Sunflowers add a cheerful touch
- Greenery like ivy adds texture
Lighting Options
Lighting can make the arch glow beautifully. It adds a magical effect, especially at night.
Use lights that are safe and easy to install. Battery-operated lights are a good choice.
- Fairy lights create a twinkling effect
- LED strips provide a bright shine
- Lanterns add a romantic glow
Tips For Longevity
Creating a balloon arch for a wedding at home can be fun. Keeping it looking fresh is important too. Here are some tips to help your balloon arch last longer.
These simple steps will ensure your decorations look great throughout the celebration.
Preventing Deflation
Balloons deflate faster in hot or cold weather. Keep them at room temperature. This will help maintain their shape and size.
Use high-quality balloons for longer-lasting arches. Inflating them properly is also crucial to prevent deflation.
- Choose thicker balloons for durability
- Inflate balloons to the recommended size
- Avoid over-inflating to prevent popping
Storage Advice
If you need to prepare the balloon arch in advance, store it correctly. This will keep it looking new on the wedding day.
Follow these storage tips to ensure your balloon arch remains in perfect condition.
- Keep the arch in a cool, dry place
- Avoid direct sunlight to prevent fading
- Cover it with a light sheet to avoid dust
Troubleshooting Common Issues
Making a balloon arch at home for a wedding can be fun but tricky. Some problems may happen during the process.
Knowing how to fix common problems helps keep your arch looking great and lasting through the event.
Fixing Popped Balloons
Balloons can pop due to sharp objects or too much air. Replace popped balloons quickly to keep the arch full.
Keep extra balloons ready in the same colors and sizes. Swap out popped balloons by tying new ones in the same spot.
- Remove any balloon pieces left on the arch
- Inflate new balloons to the same size
- Tie new balloons to the frame or cluster
- Check for nearby sharp objects and move them away
Maintaining Arch Stability
Balloon arches can wobble or fall if not stable. Use a strong base and secure the frame well.
Anchor the arch with weights or tape. Check the arch often during the event to adjust loose parts.
- Use heavy objects like water bottles as base weights
- Tape or tie the arch frame to walls or furniture
- Space balloons evenly to balance weight
- Fix any loose balloons or ties during setup

Credit: www.etsy.com
Frequently Asked Questions
How Do I Start Making A Balloon Arch For A Wedding?
Begin by selecting balloon colors that match the wedding theme. Inflate balloons to similar sizes. Use a sturdy frame or fishing line to attach them evenly.
What Materials Are Needed To Create A Wedding Balloon Arch?
You need balloons, balloon pump, fishing line or arch frame, balloon clips, and adhesive dots for securing balloons.
How Long Does It Take To Make A Balloon Arch At Home?
Typically, it takes 1-2 hours depending on the arch size and experience level.
Can I Reuse Balloons From A Wedding Balloon Arch?
No, balloons generally cannot be reused as they deflate and lose shape after the event.
Conclusion
Creating a balloon arch at home can make your wedding extra special. It adds color and joy to the celebration. Follow the simple steps carefully for the best results. Use good quality balloons and tools to avoid problems. Take your time and enjoy the process.
Your guests will love the beautiful decoration you made yourself. This easy project brings a personal touch to your big day. Try it and see how fun and rewarding it can be!