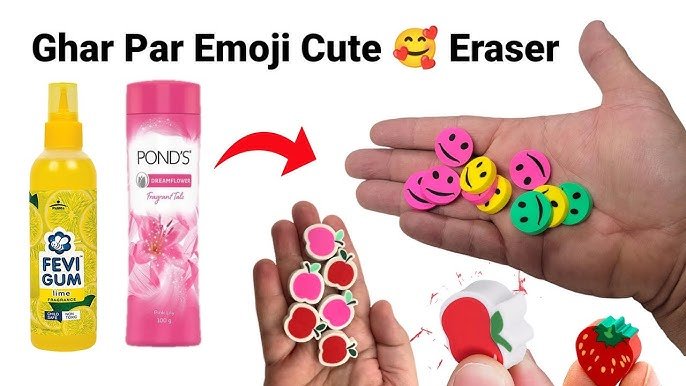
Have you ever run out of an eraser at the most inconvenient time? What if you could make your own eraser right at home without using clay?
Imagine having a quick, easy solution that saves you time and money. You’ll discover simple steps to create an effective eraser using everyday items you probably already have. Keep reading, and you’ll be amazed at how simple it is to fix mistakes without leaving your desk.
Your creativity and resourcefulness are about to get a big boost!

Credit: www.youtube.com
Materials Needed
Making an eraser at home without clay is easy and fun. You only need a few simple items.
These materials are common and safe to use. Let’s look at what you need.
White Glue
White glue acts as the base for the homemade eraser. It helps hold everything together.
Use regular school glue or craft glue for the best results.
Cornstarch
Cornstarch gives the eraser its soft texture. It mixes well with glue to create a rubbery feel.
You can find cornstarch in most kitchens or grocery stores.
Baby Oil Or Mineral Oil
Adding a small amount of baby oil makes the eraser smooth and flexible. It stops the eraser from cracking.
You can use baby oil or mineral oil based on what you have at home.
Food Coloring (optional)
Food coloring lets you add color to your eraser. This step is optional but fun for kids.
Use a few drops to get the desired color without making the mixture too wet.
Mixing Bowl And Spoon
You need a bowl to mix all the ingredients together. A spoon helps blend them smoothly.
Choose a bowl that is easy to clean and a spoon that won’t break when mixing.

Credit: www.youtube.com
Simple Eraser Recipes
Making an eraser at home is easy and fun. You only need a few simple ingredients. These recipes do not use clay.
Try these two methods to create your own eraser with items found around the house.
Using Glue And Cornstarch
This recipe uses white glue and cornstarch to form a soft, flexible eraser. It works well for small corrections on paper.
- Mix 2 tablespoons of white glue with 1 tablespoon of cornstarch in a bowl.
- Stir until the mixture becomes thick and dough-like.
- Knead the dough with your hands until smooth and no longer sticky.
- Shape the dough into a small block or any eraser shape you like.
- Let it dry for 24 hours to harden.
Using Toothpaste And Baking Soda
Toothpaste and baking soda combine to make a quick eraser. This method is great for a soft, easy-to-use eraser.
| Ingredient | Amount | Purpose |
| White toothpaste | 1 tablespoon | Acts as a binder and softener |
| Baking soda | 2 tablespoons | Gives texture and erasing ability |
Mix the ingredients well. Shape the mix into an eraser form. Let it dry for a few hours before using.
Step-by-step Instructions
Making an eraser at home without clay is simple and fun. You only need a few common ingredients.
This guide will help you create a soft eraser using household items. Follow the steps carefully.
Mixing Ingredients
Start by gathering the ingredients. You will need baking soda, white glue, and cornstarch.
Mix these ingredients well to get a smooth paste. This paste will form the base of your eraser.
- 2 tablespoons of baking soda
- 1 tablespoon of white glue
- 1 tablespoon of cornstarch
Shaping The Eraser
After mixing, knead the paste with your hands until it feels like dough. This makes it easy to shape.
Shape the dough into a small block or any design you like. Press firmly so it holds its shape.
- Use your fingers to shape the dough
- Make smooth edges for better use
- Keep the size small for easy handling
Drying And Curing
Place your shaped eraser on a clean surface. Let it dry for about 24 hours to harden properly.
After drying, test the eraser gently. If it feels soft, let it dry longer before use.
- Dry at room temperature
- Keep away from direct sunlight
- Wait until fully hard before use
Tips For Best Results
Making an eraser at home without clay is easy and fun. You only need a few simple ingredients.
Following some tips can help you get the best texture and long-lasting erasers.
Adjusting Texture
Texture is important for erasers to work well. You want it soft but firm enough to erase.
Try these ideas to get the right feel:
- Add small amounts of cornstarch to make the eraser firmer.
- Use a little baby oil or vegetable oil to soften the dough.
- Knead the mixture well to make it smooth and even.
- If the eraser feels sticky, add more starch and knead again.
- Test small pieces before making a full eraser.
Storage Suggestions
Good storage keeps your homemade erasers fresh and useful for longer.
Follow these tips to store erasers properly:
- Keep erasers in an airtight container or zip-lock bag.
- Store them in a cool, dry place away from sunlight.
- If erasers dry out, add a few drops of water and knead again.
- Do not leave erasers near heat sources to prevent melting.
- Label your storage container with the date made for reference.
Common Mistakes To Avoid
Making an eraser at home without clay is fun but needs care. Avoid mistakes to get a good eraser.
Some errors can make your eraser hard or crumbly. Learn what to watch out for.
Using The Wrong Glue
Not all glue types work well for erasers. White glue or craft glue is best.
Using super glue or hot glue can make the eraser too hard or sticky.
Adding Too Much Cornstarch
Cornstarch helps the eraser hold shape. Use it in small amounts only.
Too much cornstarch makes the eraser dry and crumbly, so it will break easily.
Not Mixing Ingredients Well
Mix glue and cornstarch until smooth. Clumps can cause uneven texture.
Poor mixing results in parts that do not erase cleanly or break apart.
Skipping The Drying Time
Let the eraser dry fully before use. Wet erasers fall apart or stick to paper.
Patience is key. Drying can take several hours or overnight for best results.
Using The Wrong Tools
Use clean bowls and spoons to mix ingredients. Dirty tools affect the texture.
Avoid metal spoons that react with glue. Plastic or wooden tools work better.

Credit: www.youtube.com
Frequently Asked Questions
How Can I Make An Eraser Without Clay At Home?
You can use simple ingredients like glue, cornstarch, and baking soda. Mix them until you get a dough-like consistency. Shape it, let it dry, and your homemade eraser is ready to use. This method is safe, easy, and requires no clay.
What Ingredients Are Needed For Homemade Erasers Without Clay?
Common ingredients include white glue, cornstarch, baking soda, and water. These create a moldable, rubbery texture similar to store-bought erasers. You can also add food coloring for customization. All ingredients are easily available in most kitchens.
Is Homemade Eraser Durable Without Using Clay?
Homemade erasers made without clay are moderately durable. They work well for light pencil marks and minor corrections. However, they may wear out faster than commercial erasers. Proper drying and storage can help improve their lifespan.
Can I Customize The Color Of Erasers Made Without Clay?
Yes, you can add food coloring or acrylic paint to the eraser mixture. Mix the colors thoroughly to achieve your desired shade. This allows you to create personalized erasers that look fun and unique.
Conclusion
Making an eraser at home without clay is simple and fun. You only need a few easy ingredients. This DIY project saves money and helps you learn new skills. Try different shapes and colors to personalize your eraser. It’s a great way to recycle small scraps too.
Keep your workspace clean and follow the steps carefully. Enjoy creating something useful with your own hands. Give it a try today and see the results yourself!