Setting up your home theater system can feel confusing at first. You might wonder where to start or worry about making mistakes with the wiring.
But what if you could learn a simple, step-by-step way to connect everything perfectly? Imagine sitting back and enjoying crystal-clear sound and stunning picture, all because you took control of your setup. This guide will walk you through how to wire your home theater system easily, so you get the best experience without the stress.
Keep reading, and you’ll have your system wired like a pro in no time.
Credit: www.theaterseatstore.com
Planning Your Setup
Wiring a home theater system needs careful planning. Good preparation saves time and avoids mistakes.
Think about each part of your system and how they will connect. This helps to get the best sound and look.
Choosing The Right Components
Select parts that match your room size and budget. Components include speakers, receiver, and display.
- Pick a receiver with enough channels for your speakers
- Choose speakers that fit your room's size
- Use a high-quality HDMI cable for video and audio
- Consider a subwoofer for better bass
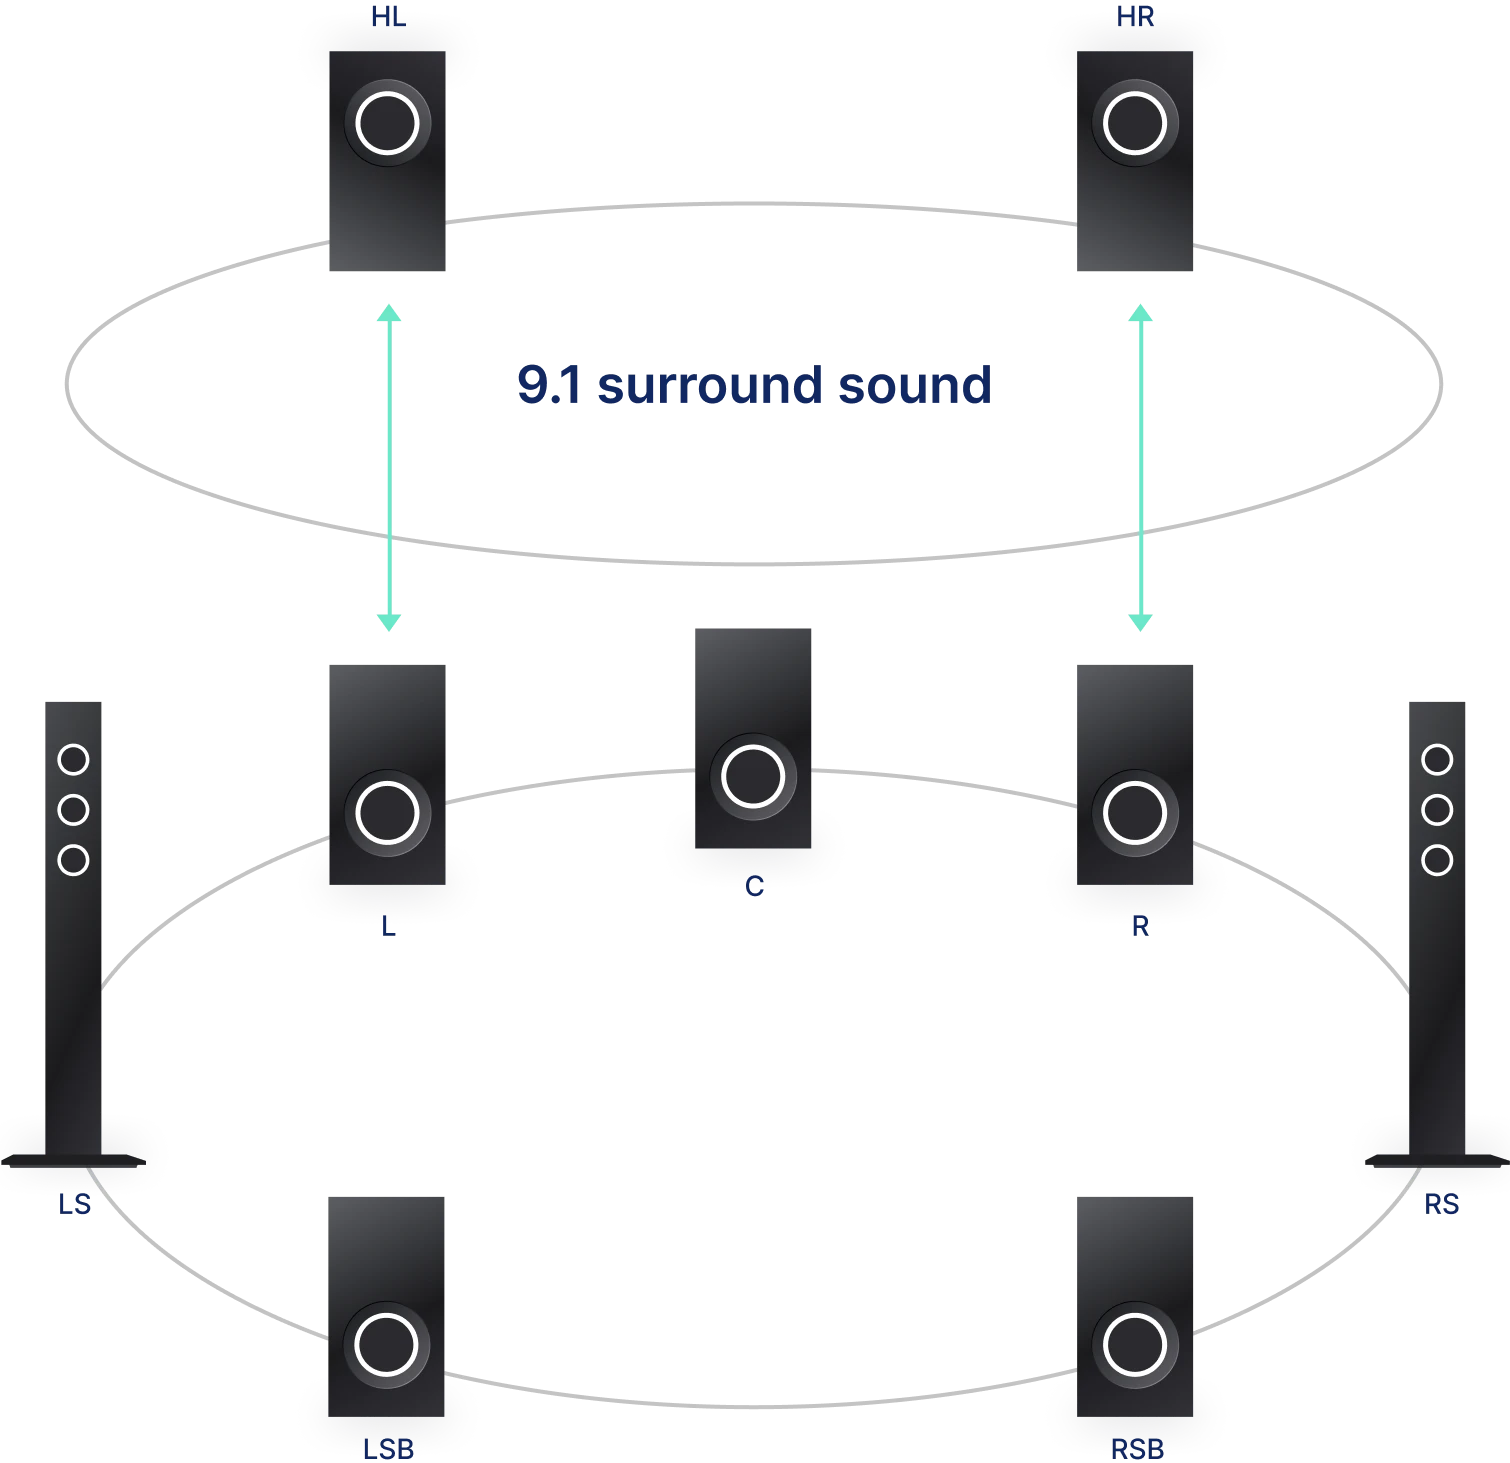
Determining Speaker Placement
Place speakers to create a surround sound effect. Proper spots improve audio quality.
| Speaker Type | Ideal Location |
| Front Left and Right | On each side of the TV, at ear level |
| Center | Directly above or below the TV |
| Surround Left and Right | Beside or slightly behind seating area |
| Subwoofer | Near a wall or corner for strong bass |
Mapping Cable Routes
Plan where cables will run to keep the area tidy and safe. Avoid tight bends and long runs.
Use this checklist for cable planning:
- Measure distance from components to speakers
- Mark cable paths along walls or under carpets
- Use cable ties or clips to organize wires
- Keep power cables separate from audio cables
Gathering Tools And Materials
Wiring a home theater system needs the right tools and materials. Getting these ready saves time and makes the job easier.
Good preparation helps avoid mistakes and keeps your setup neat and safe.
Essential Wiring Tools
You need some basic tools to connect your home theater wires well. These tools help cut, strip, and organize cables.
- Wire cutters to trim cables to size
- Wire strippers to remove cable insulation
- Screwdrivers for securing connectors
- Measuring tape to check cable lengths
- Label maker or tape to mark wires
- Cable ties to bundle wires neatly
Selecting Quality Cables
Good cables improve sound and picture quality. Choose cables made for home theater use to avoid problems.
Look for cables with strong shielding and thick conductors. These reduce interference and signal loss.
- Speaker wires with at least 16-gauge thickness
- HDMI cables rated for high speed
- Optical cables for clear audio signals
- RCA cables with gold-plated connectors
- Ethernet cables for smart device connections
Safety Gear And Accessories
Safety gear protects you from injury while wiring. Accessories help keep your workspace clean and organized.
Use safety glasses and gloves to protect your eyes and hands. Keep a flashlight handy for dark spots.
- Safety glasses to protect eyes
- Work gloves for hand protection
- Flashlight or headlamp for visibility
- Cable clips and mounts to secure wires
- Electrical tape to cover exposed wires
- Extension cords for power access
Preparing The Room
Setting up your home theater system starts with preparing the room. This step helps you place all equipment correctly and safely.
Careful preparation avoids problems during wiring and ensures a clean, organized installation.
Clearing Installation Area
Remove furniture and objects near the installation site. This gives you space to work and prevents damage.
- Clear the floor and walls around the setup area.
- Move fragile items to a safe place.
- Ensure good lighting for better visibility.
- Keep tools and materials within reach.
Marking Wall And Floor Paths
Plan cable routes on walls and floors before installation. Mark paths to avoid mistakes and keep wires hidden.
| Path Location | Purpose | Tools Needed |
|---|---|---|
| Along baseboards | Hide speaker and power cables | Measuring tape, pencil |
| Behind furniture | Conceal wires from view | Painter’s tape, marker |
| Ceiling corners | Run projector or surround sound wires | Chalk line, level |
Ensuring Power Outlet Accessibility
Check power outlets near your setup. Proper access helps connect all devices safely without stretching cords.
Use this checklist to prepare power outlets:
- Locate outlets within 6 feet of your equipment.
- Confirm outlet condition and voltage rating.
- Plan for surge protectors or power strips if needed.
- Avoid overloading a single outlet with many devices.
- Consider adding new outlets if current ones are insufficient.
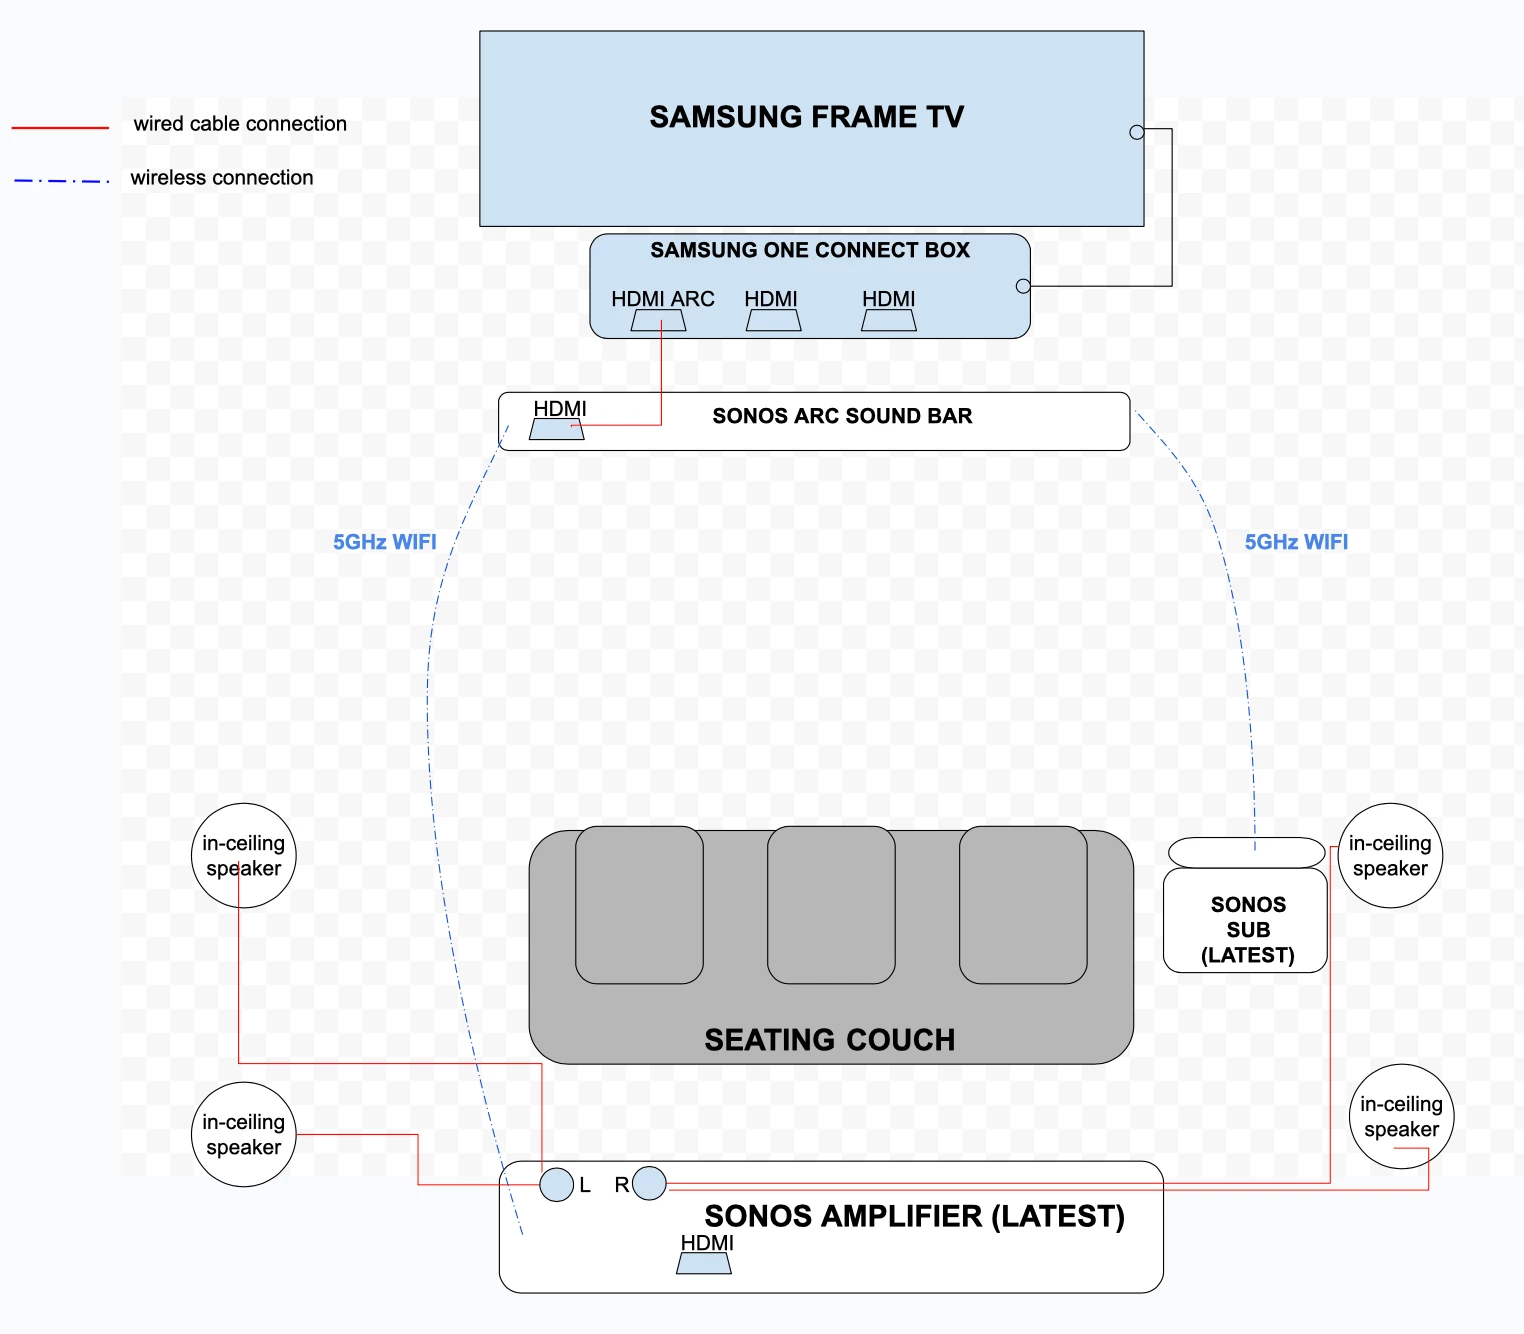
Credit: en.community.sonos.com
Running Speaker Wires
Running speaker wires is an important part of setting up a home theater system. Proper wiring helps you get the best sound quality from your speakers.
It is important to plan the wire path carefully. This keeps your setup neat and avoids damage to the cables over time.
Measuring And Cutting Cables
Measure the distance from your receiver to each speaker. Add extra length for bends and corners.
Cut the cables to the right length. Avoid cutting too short or leaving too much slack.
- Use a tape measure to get accurate lengths
- Allow 10% extra wire for flexibility
- Use wire cutters to make clean cuts
Hiding Wires In Walls And Floors
Hiding wires inside walls or under floors keeps your home theater neat. It also protects wires from damage.
Use fish tape or wire pullers to guide cables through walls. Make sure to check local building codes before drilling.
- Plan the wire route before installation
- Use wall plates for clean wall exits
- Keep wires away from power cables to avoid interference
Securing And Labeling Cables
Secure cables with clips or ties to prevent tripping and damage. Keep wires organized and tight along walls or baseboards.
Label each wire near the speaker and receiver. Labels help you identify cables easily during setup or future changes.
- Use cable clips every few feet
- Label both ends of each wire with speaker names
- Use colored tape or tags for quick ID
Connecting Components
Wiring a home theater system needs care to get the best sound and picture. Correct connections make your system work smoothly.
This guide explains how to connect the main parts of your home theater system safely and clearly.
Wiring The Receiver
The receiver is the heart of your home theater system. It sends audio and video signals to your devices.
Use HDMI cables to connect your video sources like Blu-ray players and game consoles to the receiver. Make sure each cable is fully inserted.
- Connect HDMI output from the source to HDMI input on the receiver
- Use labeled inputs to keep track of devices
- Power off devices before connecting cables
Hooking Up Speakers
Speakers create the surround sound experience. Connect them to the receiver with speaker wires.
Match the positive (+) and negative (-) terminals on both the speaker and receiver. Use color-coded wires or labels to avoid mistakes.
- Strip about half an inch of insulation from each wire end
- Insert wires into the receiver’s speaker terminals firmly
- Connect the other end to the matching speaker terminals
- Place speakers in their correct positions for best sound
Linking Subwoofers And Other Devices
Subwoofers add deep bass to your sound system. Connect them using an RCA or dedicated subwoofer cable.
Other devices like streaming boxes or CD players can connect through HDMI, optical, or analog cables depending on your receiver.
- Use the subwoofer output on the receiver to connect the subwoofer
- Choose the right cable type for each device
- Double-check connections before turning on the system
Testing The System
Once your home theater system is set up, testing is important. This ensures everything works perfectly.
Testing involves checking connections and adjusting sound settings. It's vital for an optimal viewing experience.
Checking Connections
Make sure all wires are secure. Loose connections can cause problems.
Check if every component is plugged into the correct port. This prevents sound and picture issues.
- Ensure HDMI cables are firmly connected
- Check speaker wires for tight connections
- Verify power cables are plugged in
Adjusting Sound Settings
Sound settings can greatly affect your experience. Adjust them to suit your room.
Use the remote or menu to change settings. Balance the sound for clear audio.
- Set bass and treble to your preference
- Adjust volume levels for each speaker
- Try different sound modes for best results
Troubleshooting Common Issues
Problems may arise even after setup. Troubleshooting helps fix them.
Follow these steps if you face common issues. This can save time and effort.
- No sound: Check mute settings and connections
- Poor picture: Verify HDMI cable and resolution settings
- Device not working: Restart and check power supply
Maintaining Your Setup
Keeping your home theater system in great shape ensures long-lasting enjoyment. Regular maintenance is key to a seamless experience.
Let's explore some practical tips to maintain your setup effectively, focusing on inspections, upgrades, and longevity.
Regular Cable Inspections
Inspecting cables regularly prevents signal issues and potential damage. Cables can become loose or wear out over time.
- Check for frayed or exposed wires
- Ensure all connections are secure
- Replace any damaged cables immediately
Upgrading Components
Upgrading components keeps your system compatible with new technology. It also enhances your viewing and listening experience.
| Component | Upgrade Frequency |
| Receiver | Every 5-7 years |
| Speakers | Every 10 years |
| HDMI Cables | Every 2-3 years |
Tips For Longevity
Simple habits can extend the life of your home theater system. Follow these tips to maximize its lifespan.
Keep your system dust-free using a soft cloth. Avoid placing components in direct sunlight or near heat sources. Use surge protectors to prevent electrical damage.

Credit: www.theaterseatstore.com
Frequently Asked Questions
How Do I Connect Speakers To A Home Theater System?
Connect speakers using speaker wire, matching positive and negative terminals. Ensure secure connections for clear sound and avoid signal loss.
What Cables Are Needed For Home Theater Wiring?
You need HDMI, speaker wire, and power cables. HDMI handles video and audio, while speaker wire connects speakers to the receiver.
Can I Wire A Home Theater System Myself?
Yes, with basic tools and instructions, DIY wiring is possible. Follow the manual carefully to avoid mistakes and ensure safety.
Where Should I Place Speakers For Best Sound?
Place front speakers at ear level, center speaker above or below TV. Surround speakers go beside or behind seating for immersive sound.
Conclusion
Wiring a home theater system can seem hard at first. Take your time and follow each step carefully. Use the right cables and connect them to the correct ports. Check all connections before turning on the system. Test the sound and picture to make sure everything works well.
With patience, your home theater will bring great entertainment. Enjoy movies, music, and games with clear sound and sharp visuals. Simple setup leads to many hours of fun at home.