Are you ready to make your amaryllis bulbs bloom longer and look healthier? Waxing your amaryllis bulbs at home is a simple trick that can protect them and boost their growth.
Imagine enjoying vibrant flowers that last, all because you took a few easy steps. You’ll learn exactly how to wax your amaryllis bulbs yourself, using materials you probably already have. Keep reading—you’ll discover a quick, effective way to care for your bulbs that will make your garden or home shine.
Why Wax Amaryllis Bulbs
Waxing amaryllis bulbs helps protect them during storage and transport. It creates a thin layer that keeps moisture inside the bulb.
This method also helps the bulb stay healthy and strong until you are ready to plant it at home.
Benefits Of Waxing
Waxing amaryllis bulbs offers several key benefits that improve their condition and handling.
- Prevents the bulb from drying out too quickly.
- Reduces the chance of mold and fungal infections.
- Helps the bulb stay firm and less fragile.
- Makes bulbs easier to store for longer periods.
- Protects against damage during shipping.
Effect On Blooming
Waxing can influence how amaryllis bulbs bloom after planting. It controls moisture and protects the bulb’s energy.
| Waxing Effect | Blooming Result |
| Good moisture retention | Stronger, healthier flowers |
| Protection from rot | More blooms per bulb |
| Reduced bulb damage | Longer bloom life |
| Slow moisture loss | Better root development |
Materials Needed
Waxing amaryllis bulbs helps keep them fresh for a longer time. You can do this at home with simple materials.
Gather the right supplies before you start. This guide lists the types of wax and other items you will need.
Types Of Wax
Choose a wax that protects the bulb without harming it. Some waxes work better for plants.
- Paraffin wax – common and easy to use
- Beeswax – natural and gentle on bulbs
- Microcrystalline wax – flexible and sticky
- Carnauba wax – plant-based and hard
Additional Supplies
Besides wax, you need some tools to apply it and protect your workspace. Prepare these items before starting.
| Supply | Purpose |
| Double boiler or melting pot | To melt the wax safely |
| Brush or sponge | For applying wax on the bulb |
| Newspaper or plastic sheet | Protects your work area |
| Gloves | Keep your hands clean and safe |
| Timer or clock | Track wax setting time |
| Old towel or cloth | Dry the bulbs before waxing |
Preparing The Bulbs
Waxing amaryllis bulbs helps them bloom beautifully indoors. Preparing the bulbs correctly is key. This guide covers how to select healthy bulbs and clean them for waxing.
Taking time to prepare your bulbs well will improve their growth and flower quality. Follow the simple steps below to get started.
Selecting Healthy Bulbs
Choose bulbs that are firm and free from soft spots or mold. Avoid bulbs with cracks or shriveled areas. Healthy bulbs store energy needed for strong blooms.
- Pick bulbs that feel heavy for their size
- Look for smooth skins without blemishes
- Avoid bulbs with dark or wet spots
- Check that bulbs are free of mold or mildew
- Choose bulbs with intact roots if possible
Cleaning Process
Cleaning bulbs removes dirt and bacteria before waxing. Handle bulbs gently to avoid damage. Use mild solutions for washing and drying.
| Cleaning Step | Method | Purpose |
| Remove Soil | Brush off dirt carefully | Prevents contamination |
| Wash Bulbs | Use lukewarm water with mild soap | Removes remaining debris |
| Disinfect | Soak in diluted bleach solution (1 part bleach to 10 parts water) for 5 minutes | Kills bacteria and fungi |
| Dry | Pat dry with soft cloth and air dry completely | Prevents rot during waxing |

Credit: gardenuity.com
Waxing Process
Waxing amaryllis bulbs is a fun project to do at home. It adds a decorative touch and makes them easy to care for.
Follow these simple steps to wax your amaryllis bulbs effectively.
Melting The Wax
Melting wax is the first step in the waxing process. Use a double boiler for safety. Keep the temperature low to prevent burning.
- Place wax in the top pot of the double boiler.
- Stir occasionally until the wax is fully melted.
- Ensure the water in the bottom pot does not touch the wax container.
Dipping Technique
With the wax melted, it's time to dip the bulbs. Hold the bulb by the tip. Dip it into the wax smoothly.
Ensure full coverage by rotating the bulb while dipping. Repeat the process if needed.
Drying Tips
Drying is crucial for a smooth wax finish. Let the bulbs dry in a cool, dry place.
| Location | Drying Time |
| Indoor shelf | 24 hours |
| Balcony | 18 hours |
| Garage | 20 hours |
Aftercare For Waxed Bulbs
Waxing amaryllis bulbs helps protect them and extend their bloom time. Proper care after waxing is important to keep the bulbs healthy. Follow simple steps to care for your waxed amaryllis bulbs at home.
Aftercare focuses on planting, watering, and light. These help the bulbs grow strong and bloom beautifully.
Planting Instructions
Plant waxed bulbs in well-draining soil. Do not cover the bulb fully with soil. Leave the top third above the soil for better growth. Use a pot with drainage holes to prevent water buildup.
- Choose a pot slightly larger than the bulb
- Fill the pot with loose, well-draining soil
- Place the bulb with roots downward
- Cover the bulb base with soil, leaving the top exposed
- Press soil gently but do not compact it
Watering And Light Needs
Water waxed bulbs carefully. They need moisture but not too much. Amaryllis bulbs grow best in bright, indirect light. Avoid direct sunlight that can burn the leaves.
| Care Aspect | Instructions |
| Watering | Water lightly when top inch of soil feels dry |
| Light | Place in bright, indirect sunlight |
| Temperature | Keep between 60°F and 70°F (15°C - 21°C) |
| Humidity | Average room humidity is fine |
Troubleshooting Common Issues
Waxing amaryllis bulbs at home can bring some challenges. Learning how to fix these issues helps keep your bulbs healthy and beautiful.
We will look at common problems like wax cracks and mold or rot. Understanding these will help you succeed in waxing your bulbs.
Dealing With Wax Cracks
Wax cracks can occur when the wax layer is too thin or uneven. This can leave the bulb exposed to air and moisture.
To fix cracks, melt a small amount of wax. Apply it over the cracked area carefully with a brush.
- Ensure the wax is warm but not too hot
- Apply a thick enough layer to cover cracks
- Check the bulb regularly for new cracks
Preventing Mold And Rot
Mold and rot can develop if the bulb is too moist. It's important to prevent this to keep the bulb healthy.
Store the waxed bulb in a dry, cool place. Avoid areas with high humidity or direct sunlight.
- Check the bulb weekly for any signs of mold
- Ensure wax covers the bulb completely
- Use a fungicide spray if mold appears
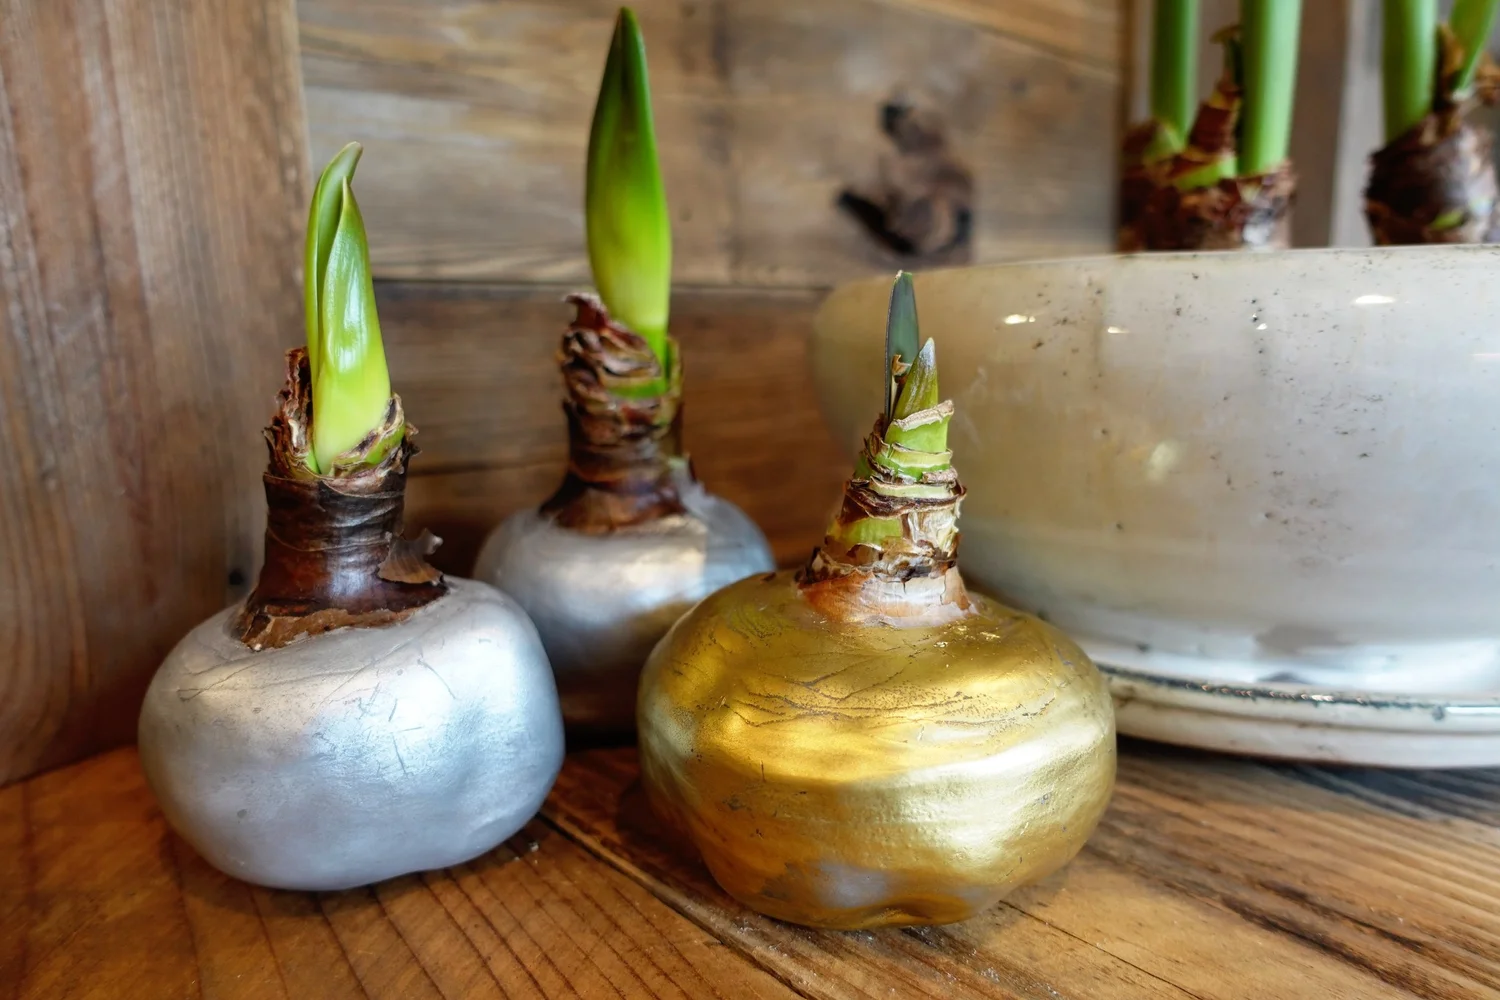
Enhancing Bloom Appearance
Waxing amaryllis bulbs can make their blooms look more vibrant and fresh. It helps the flowers keep a shiny and smooth surface.
This process is simple and done at home to improve the flower’s appearance. It adds a decorative touch that lasts longer.
Color Options
You can choose many colors to wax your amaryllis bulbs. Each color gives a different look to the blooms.
Popular colors include red, white, and green to match the natural flower shades. You can also pick bright colors for a bold effect.
- Classic red for a rich, deep bloom
- Soft white for a clean, elegant look
- Green shades to highlight leaves and stems
- Bright colors like blue or purple for a unique style
Creative Wax Designs
Wax can be used to create patterns on amaryllis flowers. Stripes, dots, or swirls add an artistic touch.
Using tools like small brushes or toothpicks helps make clean lines. You can mix colors to form interesting designs.
- Use thin lines for delicate details
- Apply dots for a playful look
- Make swirls to add movement and flow
- Combine colors for a layered effect

Credit: www.reddit.com

Credit: www.thesill.com
Frequently Asked Questions
How Do I Wax Amaryllis Bulbs At Home?
To wax Amaryllis bulbs, melt paraffin wax until liquid. Dip the bulb quickly, then let it dry. This seals moisture and protects the bulb during storage. Waxing helps prevent rot and extends bulb life for future blooms.
Why Should I Wax Amaryllis Bulbs Before Storing?
Waxing Amaryllis bulbs prevents moisture loss and rot during storage. It creates a protective barrier, keeping bulbs firm and healthy. This process improves bulb longevity and ensures strong growth and flowering when replanted.
Can I Use Any Wax To Coat Amaryllis Bulbs?
Paraffin wax is best for coating Amaryllis bulbs. Avoid scented or colored waxes, as they may harm the bulb. Use pure, food-grade paraffin wax for safe and effective protection.
When Is The Best Time To Wax Amaryllis Bulbs?
Wax Amaryllis bulbs after flowering and when leaves die back. This timing ensures bulbs are dormant and ready for storage. Waxing at this stage preserves bulb vitality until the next planting season.
Conclusion
Waxing amaryllis bulbs at home keeps them healthy and vibrant. The process is simple and saves money. You only need a few supplies and a little patience. Wax creates a protective layer that helps bulbs last longer. Try this method to enjoy beautiful blooms year after year.
Care for your bulbs with gentle waxing. Watch your garden grow with stronger, brighter flowers. Give it a try and see the difference yourself.