Is your bathroom vanity looking dull or outdated? Restaining it can bring back its shine and give your whole bathroom a fresh new look without spending a fortune.
You might think it’s a tough job, but with the right steps, you can do it yourself and get professional-looking results. In this guide, you’ll learn exactly how to restain your bathroom vanity, from prepping the surface to applying the perfect finish.
Ready to transform your space and impress everyone who walks in? Let’s dive in and make your vanity the highlight of your bathroom!
Choosing The Right Stain
Restaining your bathroom vanity can change its look completely. Picking the right stain is very important for a good finish.
The stain you choose affects color, protection, and how the wood shows. Think about these factors before starting.
Types Of Stains
There are many types of wood stains. Each type has different looks and uses.
- Oil-Based Stains:Deep color and good protection. Takes longer to dry.
- Water-Based Stains:Dries fast and cleans easily. Colors may be brighter.
- Gel Stains:Thick and easy to control. Good for vertical surfaces.
- Varnish Stains:Combine stain and finish. Protects wood well.
Color Selection Tips
Pick a color that suits the size and light in your bathroom. Dark colors make a space feel smaller.
Test stain on a hidden spot before applying it all over. This helps you see the real color on your wood.
- Choose lighter stains for small bathrooms.
- Use darker stains for large or well-lit rooms.
- Consider wood grain and how the color shows it.
- Check stain color under bathroom lighting.
Matching Existing Decor
Your stain should blend well with other bathroom items. Think about colors of tiles, walls, and fixtures.
Pick a stain that complements your style. Neutral colors fit most decors and give a clean look.
- Match stain tone with bathroom hardware like faucets.
- Use warm stains with warm wall colors.
- Cool stains work well with modern, white spaces.
- Keep stain color consistent with other wooden elements.
Gathering Necessary Tools
Restaining a bathroom vanity needs the right tools. Getting these tools first makes the job easier.
Using the correct tools helps you work safely and finish faster.
Essential Supplies
You will need some supplies to prepare and restain your vanity. These include materials for cleaning, sanding, and staining.
- Sandpaper or sanding sponge (medium and fine grit)
- Wood stain in your chosen color
- Paintbrush or foam brush for applying stain
- Wood cleaner or mild soap and water
- Lint-free cloths for wiping and cleaning
- Wood conditioner (optional, for better stain absorption)
- Clear sealant or topcoat (to protect the finish)
Safety Gear
Protecting yourself is important during this project. Stains and sanding dust can irritate skin and lungs.
- Gloves to protect your hands from chemicals
- Safety goggles to keep dust and stain out of your eyes
- Dust mask or respirator to avoid breathing dust and fumes
- Old clothes or apron to keep stains off your clothes
Workspace Setup
Setting up your workspace well helps you work safely and comfortably. You need good light and ventilation.
- Choose a well-ventilated area to avoid fumes build-up
- Cover your work surface with a drop cloth or newspaper
- Set up a sturdy table or workbench to hold the vanity
- Keep all your tools and supplies within reach
- Make sure there is enough light to see details clearly
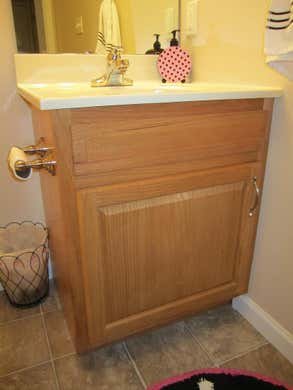
Preparing The Vanity Surface
Preparing the bathroom vanity surface is key to a smooth restaining job. Clean and smooth surfaces help the stain stick well.
Proper preparation includes cleaning, removing hardware, sanding, and fixing any damage. These steps make the vanity ready for restaining.
Cleaning And Removing Hardware
Start by cleaning the vanity to remove dirt and oils. Use a mild cleaner and a soft cloth for best results.
Remove all hardware like knobs, handles, and hinges. This stops damage and helps you reach all areas easily.
- Use a screwdriver to remove screws carefully
- Store hardware in a safe place
- Clean the surface with soap and water or a gentle cleaner
- Dry the surface completely before sanding
Sanding Techniques
Sanding smooths the wood and removes old finish. Use medium-grit sandpaper to start and fine-grit to finish.
Sand along the wood grain to avoid scratches. Use a sanding block for flat areas and detail sanders for corners.
- Begin with 120-grit sandpaper for old finish
- Switch to 220-grit for a smooth surface
- Wipe dust with a damp cloth between sanding steps
- Wear a mask to avoid dust inhalation
Repairing Imperfections
Check the vanity for dents, scratches, or holes. Fix small damage before restaining to get a clean look.
Use wood filler for holes and deep scratches. After it dries, sand the area smooth again.
- Apply wood filler with a putty knife
- Let it dry fully as per instructions
- Sand repaired spots with fine-grit sandpaper
- Clean dust before starting to stain

Credit: www.ftworthrefinishing.com
Applying The Stain
Applying stain to your bathroom vanity is a key step in giving it a fresh look. This process changes the wood’s color and protects it.
Choosing the right method and following the steps carefully will help you get a smooth finish. Let’s explore the application methods and drying times.
Choosing Application Methods
You can apply stain using different tools. Each tool gives a different look and ease of use. Pick one based on your skill and the vanity size.
- Brush:Offers control and works well on detailed areas.
- Cloth:Good for wiping on stain evenly for a smooth finish.
- Sponge:Absorbs stain well and works on flat surfaces.
- Spray:Covers large areas quickly but needs careful masking.
Step-by-step Staining Process
Follow these steps to apply stain correctly. Taking your time prevents blotches and uneven color.
- Clean the vanity surface to remove dust and dirt.
- Sand the wood lightly for better stain absorption.
- Use your chosen tool to apply the stain in the direction of the wood grain.
- Wipe off excess stain with a clean cloth after a few minutes.
- Let the first coat dry before applying a second one if needed.
Drying Times
| Stain Type | Drying Time | Notes |
| Oil-Based | 6 to 8 hours | Longer drying, deeper color |
| Water-Based | 1 to 2 hours | Faster drying, lighter color |
| Gel Stain | 4 to 6 hours | Thicker, good for vertical surfaces |
Adding Protective Finish
After restaining your bathroom vanity, add a protective finish. This helps keep the wood safe from water and daily wear.
Choosing and applying the right finish improves the vanity's look and durability.
Types Of Finishes
There are many finishes to protect your vanity. Each offers different looks and protection levels.
- Polyurethane:Very durable and water-resistant. Good for bathrooms.
- Varnish:Offers a shiny finish and strong protection.
- Lacquer:Dries fast and gives a smooth, glossy surface.
- Shellac:Natural finish, less water-resistant but easy to repair.
- Oil Finish:Enhances wood grain but needs regular reapplication.
Application Tips
Prepare your vanity well before applying the finish. Clean and sand the surface for best results.
Apply thin, even coats with a good brush or cloth. Avoid thick layers to prevent drips and bubbles.
- Work in a well-ventilated area to help drying.
- Follow the finish maker’s instructions carefully.
- Sand lightly between coats to keep the surface smooth.
- Wear gloves to protect your skin.
Curing Duration
Curing time is the period the finish takes to harden fully. It is different from drying time.
Allow enough curing time before using the vanity to avoid damage to the finish.
- Polyurethane usually cures in 24 to 48 hours.
- Varnish may take 2 to 3 days to cure.
- Lacquer cures quickly, often within a few hours.
- Shellac cures in about 24 hours but is less durable.
- Oil finishes need longer time and multiple applications.

Credit: www.miraclemethod.com
Reassembling The Vanity
After staining your bathroom vanity, it's time to reassemble it. This step ensures everything fits and functions well.
Take care to reattach parts correctly. This helps the vanity look its best.
Reattaching Hardware
Start by gathering all hardware pieces. Make sure nothing is missing.
- Handles and knobs
- Hinges
- Screws
Use a screwdriver to attach the handles and knobs. Ensure they are tight.
Final Touches
Check that all parts are secure. Wipe the vanity with a clean cloth.
Look for any missed spots or uneven stains. Touch them up as needed.
Maintenance Advice
Keep your vanity looking fresh with regular cleaning. Use a mild cleaner and soft cloth.
Check the hardware monthly. Tighten any loose screws.
- Avoid harsh chemicals
- Clean spills quickly
- Inspect hardware regularly

Credit: maggiemcgaugh.com
Frequently Asked Questions
How Do I Prepare A Bathroom Vanity For Restaining?
Start by removing all hardware and cleaning the surface. Sand the vanity to remove old finish. Wipe dust with a damp cloth before applying stain.
What Type Of Stain Works Best For Bathroom Vanities?
Use a water-based or oil-based stain designed for wood. Water-based dries faster, oil-based offers deeper color and durability.
How Long Should I Wait Between Stain Coats?
Wait 4 to 6 hours between coats. Drying time depends on stain type and room humidity.
Can I Use Polyurethane After Staining My Vanity?
Yes, apply polyurethane for protection. Use a water-based poly for a clear finish and oil-based for durability.
Conclusion
Restaining your bathroom vanity brings fresh life to your space. It saves money compared to buying new furniture. The process needs patience and care to get good results. Use the right tools and follow each step closely. Clean and prepare the surface before applying stain.
Let each coat dry fully for the best finish. A well-restained vanity improves your bathroom’s look and feel. Small changes can make a big difference in your home. Try this project to enjoy a renewed bathroom style.