Imagine transforming a plain wall into a stunning piece of art that brings nature right into your room. You don’t need to be a professional artist to paint a beautiful tree on your wall.
With simple steps and a little creativity, you can create a calming and unique space that reflects your style. If you’ve ever wanted to add a personal touch to your home that catches the eye and sparks conversation, this guide is exactly what you need.
Ready to turn your blank wall into a natural masterpiece? Let’s dive in and make your vision come alive!
Choosing The Right Wall
Painting a tree on a wall can bring nature indoors. Picking the right wall helps your artwork stand out.
Some walls work better than others. Think about wall size, texture, and light before you start.
Selecting A Suitable Surface
Choose a wall that is smooth and clean. Rough surfaces can make painting hard and uneven.
Walls with good lighting show your tree design clearly. Avoid walls with too much direct sunlight.
- Pick a flat, smooth wall
- Avoid walls with cracks or holes
- Check if the wall gets even light
- Choose a wall with enough space for your tree
Preparing The Wall
Clean the wall before painting. Dust and dirt stop paint from sticking well.
Fill holes and cracks with wall filler. Sand the wall smooth after it dries for a perfect surface.
- Wash the wall with soap and water
- Use filler to fix cracks or holes
- Sand the wall for a smooth finish
- Let the wall dry completely before painting

Credit: www.joannaperrymurals.co.uk
Gathering Materials
Painting a tree on your wall is a fun project. You need the right materials to make it look good.
Getting everything ready before you start saves time and helps you work smoothly.
Essential Paints And Brushes
Choose paints made for walls to get good results. Acrylic paints work well and dry fast.
Use different brushes for details and big areas. This helps you paint the tree clearly.
- Matte or satin acrylic paints in green, brown, and other natural colors
- Flat brushes for large areas and background
- Round brushes for branches and details
- Small detail brushes for leaves and fine lines
Additional Tools And Supplies
Besides paints and brushes, some tools make painting easier and cleaner.
Prepare your wall and protect the area to avoid messes and mistakes.
- Painter’s tape to mark edges and protect other wall parts
- Drop cloth or old sheets to cover floors and furniture
- Pencil or chalk to sketch the tree outline
- Palette or plate for mixing paint colors
- Water container to clean brushes
- Paper towels or rags for wiping brushes and spills
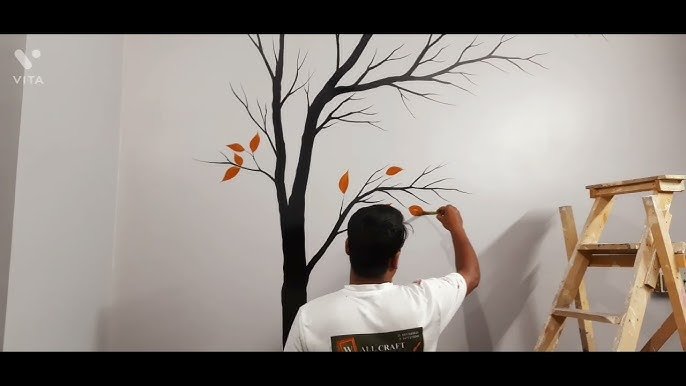
Sketching The Tree Design
Sketching the tree design is the first step to paint a tree on your wall. It helps you plan the shape and size of the tree.
Start with a light pencil sketch so you can change it if needed. This step makes painting easier and neater.
Drawing Basic Shapes
Begin by drawing simple shapes to form the tree’s main parts. Use circles, ovals, and lines for the trunk and branches.
These shapes act as a guide for the full design. Keep your lines light and clear to adjust later.
- Draw a vertical line for the trunk.
- Add oval shapes for the leafy parts.
- Use curved lines for branches.
- Make the shapes bigger or smaller to fit your wall space.
Adding Details
After basic shapes, add small details to make the tree look real. Draw leaves, bark texture, and small branches.
Use short, light strokes for bark and leaf veins. Add more branches to fill the tree shape.
- Sketch leaf shapes inside the ovals.
- Add lines for bark texture on the trunk.
- Draw thin branches extending from main ones.
- Erase any extra lines to clean the sketch.

Credit: www.youtube.com
Painting The Trunk And Branches
Painting the trunk and branches gives the tree its strong, natural look. Use the right colors and techniques to make them stand out on the wall.
Start with simple shapes and build texture and depth as you go. This guide helps you paint a realistic tree trunk and branches.
Base Colors And Textures
Choose a base color that matches the tree you want to paint. Browns, grays, and even hints of green can work well. Use a large brush to cover the trunk and main branches evenly.
- Mix different shades of brown for a natural look
- Apply the paint in vertical strokes to mimic bark
- Add small dabs of lighter color for texture
- Use a sponge or dry brush to create rough patches
- Let the base layer dry before adding details
Creating Depth With Shadows
Shadows give the trunk and branches a three-dimensional feel. Paint shadows on the sides that face away from the light source.
| Shadow Area | Color to Use | Brush Technique |
| Under branches | Dark brown or gray | Soft blending with a small brush |
| Crevices in bark | Deep brown or black | Thin lines with a fine brush |
| Trunk edges | Medium brown | Feather strokes to soften edges |
Adding Leaves And Foliage
Painting leaves and foliage adds life to your tree mural. It helps the tree look full and natural. Using the right colors and techniques makes a big difference.
Focus on colors and shapes to create realistic leaves. Layering different shades and strokes can bring depth and texture to your wall art.
Choosing Leaf Colors
Pick leaf colors that match the tree type and season. Use shades of green for spring and summer leaves. For autumn, mix in yellows, oranges, and reds.
- Light green for new leaves
- Dark green for mature leaves
- Yellow and orange for fall leaves
- Brown for dried or old leaves
- Mix colors to add variety
Techniques For Realistic Leaves
Use different brush strokes to paint leaves. Start with a base layer of large shapes. Add smaller leaf details on top for texture. Use dots and short lines to mimic leaf veins.
| Technique | Description |
| Layering | Paint base colors first, then add details |
| Dry Brush | Use a dry brush for rough leaf edges |
| Stippling | Dot paint to create leaf texture |
| Directional Strokes | Brush strokes follow leaf shape |

Credit: www.youtube.com
Finishing Touches
Painting a tree on your wall can change your room's look. After the main painting, add finishing touches to make it stand out.
These touches include highlighting and shading, as well as sealing your artwork. These steps will make your tree look realistic and last longer.
Highlighting And Shading
Highlighting and shading give your tree depth. Use a lighter color for highlights. This makes parts of the tree look like they are catching light.
Shading uses darker colors. Apply them where shadows naturally fall. This adds dimension to the tree.
- Use a small brush for precise shading.
- Blend colors softly to avoid harsh lines.
- Check your light source direction.
Sealing The Artwork
Sealing your painted tree protects it from damage. A clear sealant keeps colors bright and prevents fading.
Choose a sealant suitable for wall paint. Apply evenly over the entire tree. This step ensures your artwork stays beautiful for years.
- Use a spray sealant for even coverage.
- Allow the sealant to dry completely.
- Check for any missed spots once dry.
Maintenance Tips
Painting a tree on your wall adds charm to any room. Keeping it looking fresh takes some care. Simple maintenance helps the artwork last longer and stay bright.
This guide covers two important parts: cleaning the painted wall and touching up over time. Both steps keep your tree mural beautiful.
Cleaning The Painted Wall
Dust and dirt can dull your painted tree. Cleaning it gently keeps the colors clear. Use mild methods to avoid damage.
- Use a soft, dry cloth to remove dust regularly.
- If needed, dampen a cloth with water and mild soap.
- Test the cleaning solution on a small corner first.
- Gently wipe the surface without scrubbing hard.
- Dry the wall with a clean, dry cloth after cleaning.
Touching Up Over Time
Over time, small chips or fading may appear. Touching up keeps the mural vibrant. Match the original paint colors for best results.
| Issue | Fix |
| Small chips | Use fine brush to apply matching paint |
| Fading color | Apply a fresh coat of paint on affected areas |
| Peeling paint | Sand lightly, then repaint the spot |
| Stains | Clean gently, then touch up as needed |
Frequently Asked Questions
What Materials Do I Need To Paint A Tree On The Wall?
You need acrylic paints, brushes of various sizes, painter’s tape, a pencil, and a drop cloth. These materials help create clean lines and protect your floor. Choose colors based on your room’s theme for a cohesive look.
How Do I Start Painting A Tree On The Wall?
Begin by sketching the tree outline lightly with a pencil. Start painting the trunk and branches first using a medium brush. Let each layer dry before adding details like leaves or texture.
What Techniques Make Tree Painting More Realistic?
Use layering and shading techniques to add depth. Vary brush strokes to mimic bark and leaf texture. Blend colors gradually for natural transitions. These methods enhance realism and visual interest.
How Can I Protect My Painted Tree Mural?
Apply a clear acrylic sealer once the paint fully dries. This protects against dust, moisture, and fading. Choose a matte or glossy finish based on your style preference.
Conclusion
Painting a tree on the wall can brighten any room. It adds a touch of nature inside your home. With simple steps, anyone can create this art. Take your time and enjoy the process. Mistakes are part of learning and improving.
Use colors that fit your style and space. This project brings creativity and calm to your day. Try it yourself and see the difference. A painted tree can make your wall special. Start now and watch your wall come alive.