Have you ever wanted to create your own colorful, flexible clay right at home? Making polymer clay yourself is easier than you think—and it opens up a world of creative possibilities.
Imagine crafting unique jewelry, fun decorations, or personalized gifts without spending a lot of money. In this guide, you’ll discover simple steps to make polymer clay using ingredients you might already have. Ready to unleash your creativity and save money?
Let’s dive in and make your own polymer clay today!

Credit: www.youtube.com
Materials Needed
Making polymer clay at home is simple and fun. You only need a few materials to start. The ingredients are easy to find.
Gathering the right tools helps you shape and bake the clay correctly. Let’s look at what you need.
Basic Ingredients
You will need some basic ingredients to make your own polymer clay. These form the base and give the clay its texture and flexibility.
- Polyvinyl chloride (PVC) powder
- Plasticizer (such as phthalates or alternative softeners)
- Fillers like kaolin or chalk powder
- Color pigments or acrylic paint for coloring
- Mineral oil to soften the clay
- Optional: talcum powder to reduce stickiness
Tools And Equipment
Using the right tools makes mixing and shaping polymer clay easier. You also need equipment for baking the clay safely at home.
| Tool | Purpose |
| Mixing bowl | To combine ingredients thoroughly |
| Measuring spoons | For accurate ingredient amounts |
| Plastic gloves | Protect your hands from stains and chemicals |
| Rolling pin | To flatten and smooth the clay |
| Oven or toaster oven | Bake the clay to harden |
| Non-stick baking sheet | Prevent clay from sticking during baking |
| Sharp knife or clay cutter | Shape and trim the clay pieces |

Credit: www.youtube.com
Preparing The Workspace
Making polymer clay at home needs a clean and organized workspace. A tidy area helps you work safely and keeps your clay free from dirt.
Before you start, prepare your space well. This makes your crafting easier and more enjoyable.
Choosing A Clean Surface
Pick a flat surface that is easy to clean. Avoid porous materials like wood that can trap dust and oils.
- Use a glass or ceramic tile for a smooth workspace
- Clean the surface with soap and water before use
- Dry the area completely to avoid moisture mixing with clay
- Clear away any dust, crumbs, or debris
Protecting Your Area
Protect your table or desk from stains and scratches during clay work. Use simple items to keep your area safe.
| Material | Benefit |
|---|---|
| Wax paper | Prevents clay from sticking to surfaces |
| Plastic mat | Easy to clean and reusable |
| Old newspaper | Disposable and absorbs small messes |
| Silicone mat | Non-stick surface and heat resistant |
Step-by-step Clay Making
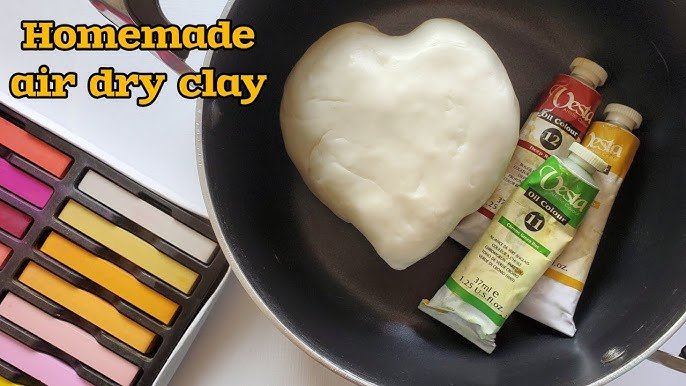
Making polymer clay at home is fun and simple. You only need a few ingredients and some time. Follow these steps to create your own clay for crafts.
This guide shows you how to mix ingredients, knead the clay, and add color. Each part is easy to do with common items.
Mixing Ingredients
Start by mixing the main ingredients to create the clay base. Use the right amounts for the best texture.
- Measure 1 cup of white glue.
- Add 1 cup of cornstarch.
- Mix the glue and cornstarch in a bowl.
- Pour in 2 tablespoons of baby oil.
- Stir until the mixture is smooth.
Kneading The Clay
Knead the clay well to make it soft and even. This step is important for good results.
| Action | Details |
|---|---|
| Start | Take the mixed dough from the bowl |
| Work | Press and fold the dough with your hands |
| Check | Stop when the dough feels smooth and no longer sticky |
| Rest | Let the dough rest for 10 minutes before use |
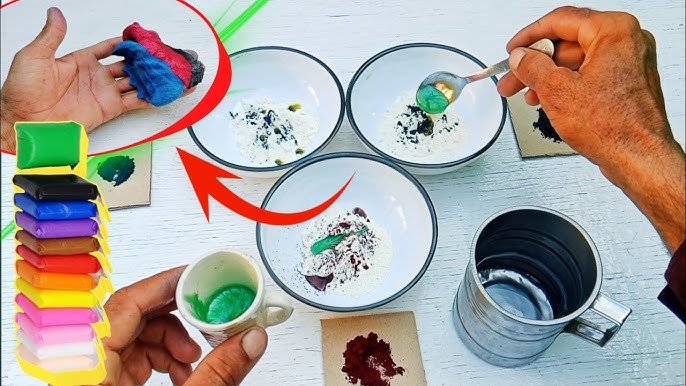
Adding Color
Add color to your clay to make it bright and fun. Use safe coloring materials made for crafts.
- Choose liquid food coloring or acrylic paint.
- Add a few drops to the clay piece.
- Knead the clay to mix the color evenly.
- Add more color if needed, but do it slowly.
- Use gloves to avoid staining your hands.
Conditioning The Clay
Conditioning polymer clay is a key step before shaping it. It makes the clay soft and easy to work with.
Proper conditioning also helps prevent cracks and breaks during crafting and baking.
Softening Techniques
Start by breaking the clay into small pieces. This helps it warm up faster.
Use your hands to knead the clay. Push, fold, and roll it until it feels soft.
- Warm the clay by rubbing it between your palms
- Use a pasta machine to roll the clay thin and even
- Try a small amount in the microwave for a few seconds to soften it
- Mix old and new clay to improve texture and softness
Avoiding Cracks
Cracks appear if the clay is too dry or not conditioned well. Keep the clay moist and soft.
Work slowly and gently to avoid stressing the clay. Use even pressure when shaping or rolling.
- Store unused clay in an airtight container
- Condition clay fully before shaping
- Thin parts may need extra support or thicker clay around them
- Use a small amount of clay softener if the clay feels too hard
Storing Homemade Clay
Making polymer clay at home is fun and rewarding. Proper storage is important to keep it usable.
Store your homemade clay correctly to maintain its quality. Learn how to use suitable containers and understand its shelf life.
Proper Containers
Use airtight containers to store polymer clay. This prevents it from drying out.
Plastic containers with tight lids are great for storing clay. Glass jars with seals also work well.
- Choose containers that are easy to open and close.
- Label containers with the date and color of the clay.
- Keep different colors in separate containers to avoid mixing.
Shelf Life Tips
Homemade polymer clay can last for several months. Proper storage helps maintain its quality.
Check your clay regularly for signs of drying or hardening. If the clay feels too stiff, knead it to restore softness.
- Store clay in a cool, dry place away from sunlight.
- Inspect the clay every month to ensure it remains soft.
- If clay hardens, add a few drops of mineral oil to soften it.
Crafting Ideas
Polymer clay is a versatile material for creating beautiful crafts. It is easy to work with and can be used to make a variety of items at home. Let's explore some crafting ideas.
Whether you are a beginner or an experienced crafter, polymer clay offers endless possibilities. From simple projects to advanced techniques, there is something for everyone.
Simple Projects For Beginners
Beginners can start with easy projects like making beads or small sculptures. These projects help you understand the basics of working with polymer clay.
Working on simple projects builds confidence. It also allows you to experiment with different colors and shapes.
- Create colorful beads for necklaces
- Sculpt small animals or shapes
- Make simple keychains
Advanced Techniques
Advanced techniques involve more detailed work. You can try creating intricate jewelry or detailed figurines. These projects require more skill and patience.
Using advanced techniques, you can blend colors and add textures. This helps create realistic and detailed pieces.
- Blend colors for gradient effects
- Use molds for detailed designs
- Add textures with tools for realism
Baking And Finishing
Baking polymer clay is the key to hardening it. After baking, finishing gives your piece a polished look.
Follow safe baking steps and finish your work with sealing or polishing for the best results.
Curing Clay Safely
Polymer clay must bake at the right temperature. Too hot can burn it, too cool leaves it soft.
- Preheat your oven to the temperature on the clay package.
- Place your clay piece on a clean baking sheet or tile.
- Bake for the time recommended, usually 15-30 minutes per 1/4 inch thickness.
- Do not use a toaster oven; home ovens work best.
- Let the clay cool fully before handling.
Ovens vary, so use an oven thermometer to check the exact heat. Avoid breathing in fumes by baking in a well-ventilated area.
Sealing And Polishing
Sealing protects your clay and adds shine. Polishing smooths and brightens the surface.
| Method | Purpose | How to Do It |
| Glossy Sealer | Adds shine and protection | Brush or spray thin layers; let dry fully |
| Matte Sealer | Protects without shine | Apply thin coats with a brush; air dry |
| Buffing | Polishes surface to smooth shine | Use a soft cloth or buffing wheel gently |
| Sanding | Removes bumps before sealing | Wet sand with fine sandpaper, then dry |
Test sealers on a small clay piece first. Avoid using nail polish as it can yellow or peel.

Credit: www.youtube.com
Troubleshooting Common Issues
Making polymer clay at home can be fun but sometimes problems appear. Sticky clay and cracks are common issues. Fixing these problems helps you create smooth and strong clay pieces.
This guide shows easy ways to solve these problems. Follow the tips to improve your clay making experience.
Fixing Sticky Clay
Sticky clay is hard to work with and can stick to your tools or hands. It usually means the clay is too soft or has too much moisture.
- Lightly dust your hands and workspace with cornstarch or baby powder.
- Knead the clay well to warm it up and make it less sticky.
- Add a small amount of dry clay powder to absorb extra moisture.
- Wrap the clay in plastic wrap and chill it in the fridge for 10-15 minutes.
- Avoid adding too much liquid or oil to the clay.
Dealing With Cracks
Cracks appear when clay dries too fast or is too dry. They can ruin your project if not fixed early.
| Cause | Solution |
| Clay too dry | Condition clay with a small amount of clay softener or mix in some fresh clay. |
| Drying too fast | Cover your project with a damp cloth while working and avoid direct sunlight. |
| Thin parts crack easily | Make parts thicker or blend thin edges with your fingers before baking. |
| Not enough kneading | Knead clay thoroughly to ensure even moisture distribution. |
Frequently Asked Questions
What Ingredients Are Needed To Make Polymer Clay At Home?
You need white glue, cornstarch, and baby oil to make polymer clay. Mix equal parts glue and cornstarch, then add baby oil gradually. Stir until the dough forms and is no longer sticky.
How Long Does Homemade Polymer Clay Last?
Homemade polymer clay lasts for several weeks if stored properly. Keep it in an airtight container to prevent drying. Avoid exposure to direct sunlight and extreme temperatures for best results.
Can Homemade Polymer Clay Be Baked In A Regular Oven?
No, homemade polymer clay cannot be baked like commercial clay. It air-dries and hardens naturally over 24 to 48 hours. Baking may cause cracking or melting since it lacks heat-curing chemicals.
Is Homemade Polymer Clay Safe For Kids?
Yes, homemade polymer clay is safe for kids when made with non-toxic ingredients. Always supervise children during use and avoid ingestion. Wash hands after handling to ensure safety.
Conclusion
Making polymer clay at home is simple and fun. You only need a few basic ingredients. Mix, knead, and shape your clay with ease. This craft lets you create unique items anytime. Save money by making clay yourself. Enjoy the process and experiment with colors.
Share your handmade creations with friends and family. Keep practicing to improve your skills. Start your polymer clay journey today!