Have you ever wondered how a simple light bulb works or wished you could create one yourself? Making a light bulb at home is easier than you think, and it’s a fun way to understand the basics of electricity and light.
Imagine the satisfaction of turning on a bulb that you built with your own hands. You’ll discover step-by-step instructions that anyone can follow. Ready to light up your curiosity and learn something new? Keep reading, and by the end, you’ll have your very own homemade light bulb shining bright.

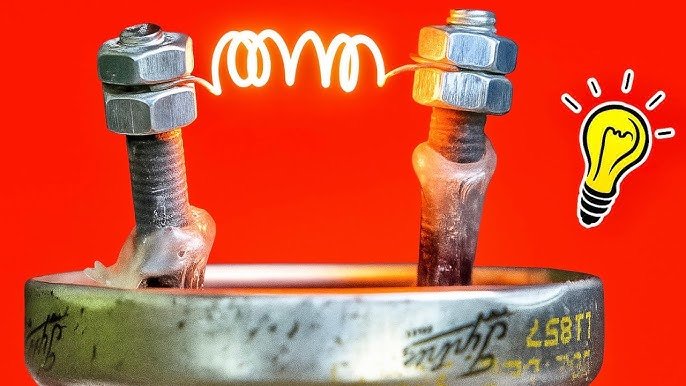
Credit: www.youtube.com
Materials Needed
Making a light bulb at home is a fun science project. You need some basic materials to start.
Gather all supplies before you begin. This helps the process go smoothly and safely.
Basic Supplies
You will need a few common items to create your light bulb. These materials help form the bulb and filament.
- Glass jar or clear light bulb shell
- Thin tungsten wire or steel wool
- Battery (9V works well)
- Electrical tape
- Two metal wires or paper clips
- Wire cutters or scissors
- Sandpaper
Safety Equipment
Safety is important when working with electricity and glass. Use the right equipment to protect yourself.
| Equipment | Purpose |
| Safety goggles | Protect eyes from glass shards |
| Heat-resistant gloves | Handle hot wires safely |
| Protective apron | Keep clothes safe from sparks |
| Well-ventilated area | Prevent inhaling fumes |
Preparing The Filament
The filament is the part of the light bulb that produces light. You need to prepare it carefully for your homemade bulb to work well.
This section explains how to choose the right wire and shape the filament properly.
Choosing The Right Wire
Pick a wire that can get hot without melting or breaking. It must be thin but strong enough to hold its shape.
- Tungsten wire is best because it can handle high heat.
- Nickel-chromium wire also works but is less common.
- Avoid copper or aluminum wire because they melt easily.
- Use wire with a diameter of about 0.1 mm to 0.3 mm.
Shaping The Filament
The filament must be shaped into a coil. This shape helps it glow brightly and last longer.
| Step | How to Shape |
|---|---|
| 1 | Cut wire about 10 cm long. |
| 2 | Wrap wire around a pencil to form a tight coil. |
| 3 | Remove coil carefully from the pencil. |
| 4 | Make sure coils are evenly spaced and not touching. |
Assembling The Bulb
Making a light bulb at home is a delicate process. It requires careful assembly to ensure the bulb works well and lasts long.
This guide covers the main steps for putting the bulb together. Focus on the glass enclosure and filament installation.
Constructing The Glass Enclosure
The glass enclosure protects the filament and keeps air out. You need to shape and seal it tightly for the bulb to function.
- Heat a glass tube until it is soft and bendable.
- Form a small bulb shape at one end by blowing gently.
- Seal the other end after inserting the filament support wires.
- Make sure the glass is clear and free of cracks.
- Let the glass cool slowly to avoid breaking.
Installing The Filament
The filament is the part that glows when electricity passes through it. Proper installation is key to a working bulb.
| Material | Purpose | Notes |
| Tungsten wire | Filament | Thin and strong, resists high heat |
| Support wires | Hold filament in place | Must be rigid and heat resistant |
| Lead-in wires | Connect filament to power source | Should be well insulated |
Attach the filament to the support wires carefully. Connect lead-in wires to the filament ends. Check all connections are tight and secure.
Sealing And Wiring
Making a light bulb at home needs careful sealing and wiring. These parts keep the bulb safe and working well.
This guide covers how to create an airtight seal and how to connect the electrical leads properly.
Creating An Airtight Seal
Seal the bulb to stop air from entering. Air can burn the filament quickly. Use a strong, heat-resistant glue or clay.
Make sure the seal covers all edges where glass and base meet. Let it dry fully before testing the bulb.
- Clean the surfaces before sealing
- Apply glue or clay evenly
- Press parts together firmly
- Allow enough time for drying
Connecting Electrical Leads
Attach the wires to the filament ends carefully. Use thin copper wires for good connection and flexibility.
Fix the wires to the bulb base. Make sure the connections do not touch each other to avoid short circuits.
- Strip wire ends for better contact
- Wrap wires tightly around filament legs
- Solder connections for strength (optional)
- Check for loose or touching wires
Testing The Bulb
After making your light bulb, you need to test if it works. Testing shows if the bulb lights up properly.
Testing also helps find any problems in the bulb or circuit before using it.
Setting Up The Circuit
Connect the bulb to a power source using wires. Make sure the connections are tight and secure.
Use a battery or low voltage power supply. Attach one wire to the bulb’s base and another to its filament.
- Connect one wire from the power source’s positive terminal to the bulb base.
- Connect the other wire from the bulb filament to the power source’s negative terminal.
- Check all wires for good contact and no loose ends.
Troubleshooting Common Issues
If the bulb does not light, check the circuit carefully. Some common problems may stop it from working.
Look for broken wires, loose connections, or a dead battery. Also, check if the filament inside the bulb is intact.
- Make sure the power source has enough voltage.
- Check that wires are connected to the correct parts of the bulb.
- Replace wires if they are damaged or broken.
- Use a new battery if the old one is empty.
- Inspect the bulb filament for any breaks or burns.

Credit: www.thesun.co.uk
Tips For Success
Making a light bulb at home can be a fun experiment. It teaches basic science and creativity. Follow these tips for a better result.
Ensure you have all the materials ready before starting. This will make the process smooth and enjoyable.
Improving Filament Longevity
A strong filament makes your light bulb last longer. Choose a durable material for the filament.
Make sure the filament is evenly shaped. This helps in reducing stress points where it might break.
- Use thin metal wire for the filament
- Bend the wire carefully to avoid weak spots
- Test the filament before using it in the bulb
Enhancing Light Brightness
For a brighter bulb, focus on the filament's placement. The right position can increase brightness.
Ensure the bulb is airtight. This prevents the filament from burning out quickly.
| Use a glass jar as the bulb |
| Seal the jar with a rubber stopper |
| Position the filament in the center |

Credit: www.youtube.com
Frequently Asked Questions
How Can I Make A Light Bulb At Home Safely?
To make a light bulb at home safely, use low-voltage materials and avoid flammable substances. Handle glass carefully and work in a well-ventilated area. Follow instructions step-by-step to prevent accidents and ensure proper assembly.
What Materials Are Needed To Make A Homemade Light Bulb?
You need a glass jar or bulb, a thin tungsten filament or steel wool, a battery, and connecting wires. Additionally, use tape and pliers to secure parts. These basic materials help create a simple working light bulb at home.
How Does A Homemade Light Bulb Work?
A homemade light bulb works by passing electric current through the filament. The filament heats up and produces light due to resistance. The glass container prevents the filament from burning out quickly by limiting oxygen exposure.
Can A Homemade Light Bulb Last Long?
Homemade light bulbs typically have a short lifespan due to fragile materials and lack of vacuum sealing. The filament burns out faster than commercial bulbs. Proper handling and using quality materials can slightly extend its working time.
Conclusion
Making a light bulb at home is fun and educational. You learn how electricity and light work together. This simple project shows science in action. It also encourages creativity and problem-solving skills. You only need a few materials to start.
Remember to stay safe and careful during the process. Try different designs to see what works best. This hands-on activity can inspire more experiments. Give it a try and enjoy the bright results.