

Have you ever dreamed of baking bread or cooking pizza with the rich, smoky flavor that only a clay oven can give? What if you could build one yourself, right in your backyard, without spending a fortune?
Making a clay oven at home is easier than you think, and it can transform your cooking experience. In this guide, you’ll discover simple steps to create your own oven using basic materials. By the end, you’ll be ready to impress your family and friends with delicious, homemade meals cooked to perfection.
Keep reading to unlock the secrets of crafting your very own clay oven!
Materials Needed
Building a clay oven at home requires a few simple materials. These materials help create a strong and heat-resistant oven.
Knowing what to gather before you start saves time and effort during construction.
Choosing The Right Clay
Clay is the main material for your oven. It must hold heat well and dry without cracking.
Look for clay that is natural and free from large stones or roots.
- Red or brown clay works best
- Test clay by making a small ball and letting it dry
- A good clay ball should dry hard but not crumble
Additional Supplies
You need some extra supplies to mix and support the clay oven.
These supplies help improve the strength and shape of your oven.
- Sand to mix with clay and reduce cracking
- Straw or dry grass to add strength and insulation
- Water to make the clay mix workable
- Bricks or stones for the oven base
- Plastic sheet to cover the oven while drying
Tools Required
Simple tools help you shape and build the oven more easily.
You do not need many tools, just basic ones for mixing and shaping.
- A shovel or hoe for mixing clay and sand
- A bucket for carrying water and materials
- A trowel or small spade for shaping the clay
- A wire mesh or old screen to support the clay dome
- A level or straight edge to check surfaces

Selecting A Location
Choosing the right spot is key to building a clay oven at home. The location affects safety, convenience, and oven performance.
Think about space, surroundings, and weather before starting your project. A good site makes building easier and safer.
Safety Considerations
Safety is the top priority when picking a place for your clay oven. Keep the oven away from flammable materials like wood or dry leaves.
- Choose a flat, stable surface to prevent tipping or cracking.
- Keep the oven at least 10 feet away from buildings and trees.
- Make sure there is good airflow to avoid smoke buildup.
- Check local rules about outdoor fires and ovens.
- Have a fire extinguisher nearby during and after construction.
Ideal Outdoor Spaces
Outdoor spots that get sunlight and are sheltered from strong winds work best. Avoid low areas where water collects.
| Space Type | Pros | Cons |
| Patio | Flat surface, close to kitchen | Limited space, possible smoke issues |
| Backyard | Plenty of room, good ventilation | May need leveling, further from home |
| Garden Corner | Quiet area, natural shade | May attract insects, uneven ground |
| Driveway | Hard surface, easy access | Traffic hazards, heat reflection |
Preparing The Clay
Making a clay oven at home starts with preparing the clay properly. Good clay is strong and easy to shape.
Using the right clay mix helps your oven last longer and cook better.
Mixing Techniques
Mix clay with sand and water to get the right texture. The sand stops the clay from cracking as it dries.
Start by breaking the clay into small pieces. Add sand in a ratio of about 2 parts clay to 1 part sand.
- Use clean, fine sand for a smooth mix
- Add water slowly while mixing
- Mix by hand or with a stick until even
- Keep mixing until the clay feels like dough
Testing Clay Consistency
Check the clay by rolling it into a ball. It should hold its shape without cracking.
If the ball cracks or breaks, add more water and mix again. If it feels too sticky, add more sand.
- Roll a small ball of clay
- Press it gently with your thumb
- Look for cracks or dry spots
- Adjust water or sand as needed
Building The Oven Base
The oven base is the foundation of your clay oven. It must be strong and level to support the weight of the oven.
Good preparation of the base ensures your oven lasts longer and works well.
Designing The Foundation
Choose a flat area to build the oven base. Make sure the ground is firm and dry.
Use concrete or sturdy wood to create a solid foundation. The base should be at least 12 inches high.
- Clear the area of grass and debris
- Level the ground using a shovel and a level tool
- Build a wooden frame to hold the concrete
- Pour concrete and let it dry for 24-48 hours
Layering Bricks And Insulation
Start by laying firebricks on the base. These bricks handle high heat and protect the oven floor.
Add insulation under and around the bricks. This keeps the heat inside the oven for better cooking.
- Place a layer of sand or gravel for drainage
- Lay a board of insulation material, like perlite or vermiculite
- Put firebricks on top, fitting them tightly together
- Use clay or mortar to seal any gaps between bricks
Constructing The Oven Dome
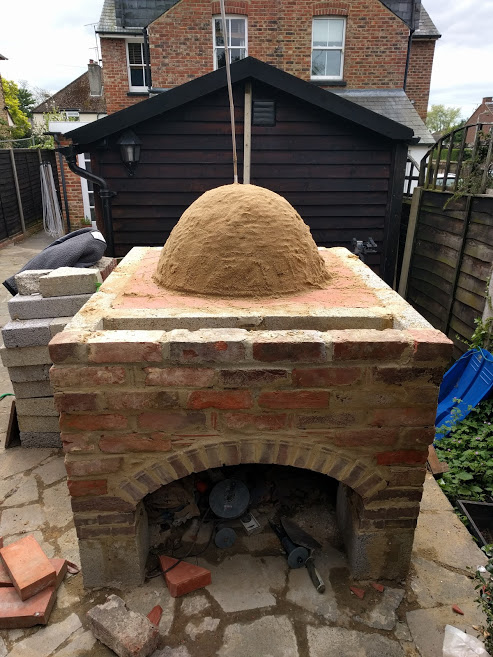
Building the oven dome is a key step in making a clay oven at home. The dome holds heat well and helps cook food evenly.
You will shape the dome carefully and add ventilation for proper airflow. These parts ensure your oven works efficiently.
Shaping The Dome
Start by making a strong clay mixture with sand and water. Use a round mold or build a sand form to shape the dome.
Press the clay mixture evenly over the mold. Make the walls thick enough to hold heat but not too heavy.
- Create a smooth dome shape without cracks
- Keep the thickness about 4 to 6 inches
- Let the clay dry slowly to avoid breaking
Adding Ventilation
Add a small hole near the base of the dome for air to enter. This hole helps the fire burn well.
Place a chimney or vent hole at the top of the dome. This lets smoke escape and keeps the oven safe to use.
- Base air hole keeps the fire alive
- Top vent removes smoke and hot air
- Both vents improve oven temperature control

Drying And Curing
Creating a clay oven at home is an exciting project. Proper drying and curing are key steps for a successful build.
These steps help your oven last longer and work better. Let's explore how to dry and cure your clay oven.
Drying Timeframe
After building, your clay oven needs time to dry. This process can take several days to weeks, depending on the weather and thickness of the clay.
- Check the weather forecast to avoid rain during drying.
- Ensure good airflow around the oven for faster drying.
- Consider using a tarp to protect the oven from unexpected showers.
Avoiding Cracks
Cracks can form if the oven dries too quickly or unevenly. There are steps you can take to minimize cracking.
- Keep the oven shaded during intense sun.
- Moisture control is crucial; mist with water if needed.
- Apply a layer of wet cloth over the surface to slow down drying.
Firing Up The Oven
Firing up a clay oven for the first time is exciting. It marks the beginning of many delicious meals. It's important to follow the right steps to ensure success.
Starting the oven properly helps in achieving the perfect temperature. This ensures the clay does not crack. Let's explore how to do it effectively.
Initial Firing Process
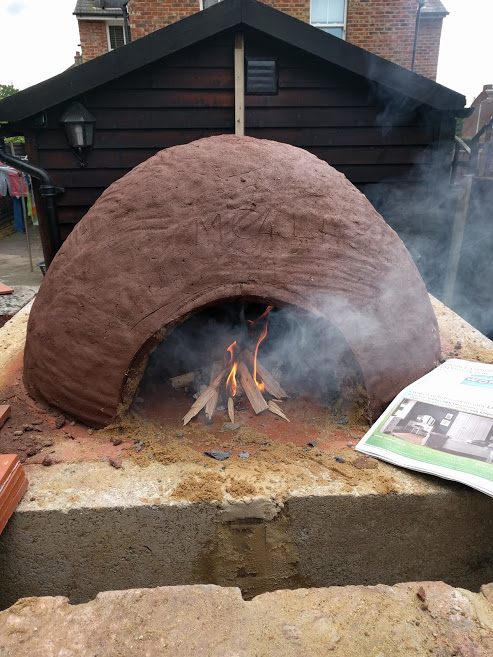
The initial firing process is crucial for curing the clay. Begin with small, dry pieces of wood. Gradually add more wood to increase the heat.
Monitor the temperature closely. Make sure it rises slowly to avoid damage. Patience is key during this stage.
- Start with a small fire
- Use dry wood for better results
- Increase heat gradually
- Observe the oven for any cracks
Maintaining Temperature
Keeping the right temperature is important for cooking. Add wood as needed to maintain a steady heat.
A consistent temperature ensures even cooking. Use a thermometer to check the heat levels regularly.
- Add wood to maintain heat
- Check temperature with a thermometer
- Ensure even heat distribution
- Adjust wood placement if needed
Tips For Effective Use
Using a clay oven at home can give your food a unique flavor. It also needs care and proper cooking methods.
Follow these tips to cook well and keep your oven in good shape for a long time.
Cooking Techniques
Start by heating the oven slowly to avoid cracks. Use dry wood or charcoal for a steady heat.
- Light the fire at the center and let it burn for 30 minutes.
- Push the embers to the sides to create space for cooking.
- Place your food inside and close the oven door to keep heat in.
- Check food often to avoid burning.
- Use long-handled tools to add or move food safely.
Cleaning And Maintenance
Keep your clay oven clean to last longer and work better. Remove ash after each use and avoid water on hot surfaces.
| Task | Frequency | Method |
|---|---|---|
| Remove ash | After every use | Use a metal scoop or brush |
| Check for cracks | Monthly | Inspect and patch with clay mix |
| Cover oven | When not in use | Use a cloth or tarp to protect from rain |
Frequently Asked Questions
How Long Does It Take To Build A Clay Oven At Home?
Building a clay oven typically takes 2 to 4 days. This depends on drying time and oven size. Proper drying ensures durability and prevents cracks during use.
What Materials Are Needed For A Homemade Clay Oven?
You need clay soil, sand, straw, water, bricks, and a sturdy base. These materials create a strong, heat-retentive oven perfect for baking.
Can I Use My Clay Oven For Baking Bread?
Yes, a clay oven is excellent for baking bread. It retains heat evenly, producing crispy crusts and soft interiors in your loaves.
Is A Clay Oven Safe For Indoor Use?
Clay ovens are generally designed for outdoor use. Indoor use requires proper ventilation to avoid smoke buildup and fire hazards.
Conclusion
Building a clay oven at home can be a fun and useful project. It saves money and lets you cook tasty food outdoors. You only need simple materials and some patience. Take your time shaping the oven and let it dry well.
Soon, you will enjoy warm, fresh bread or pizza made by your own oven. This project brings a sense of pride and joy. Try it and see how rewarding it feels.






