Setting up your own home theater can transform movie nights into unforgettable experiences. But before you enjoy crystal-clear sound and stunning visuals, you need to get the wiring right.
If you’ve ever felt overwhelmed by cables and connectors, you’re not alone. This guide will walk you through how to install home theater wiring step-by-step, so you can avoid common mistakes and get perfect audio and video signals every time.
Ready to make your space a true entertainment hub? Keep reading, and you’ll have your home theater wired like a pro in no time.
Planning Your Wiring Setup
Installing home theater wiring needs good planning. This helps avoid problems later.
Think about where to place wires and speakers before you start. This saves time and effort.
Choosing The Right Location
Pick a location that fits your room size and layout. Avoid spots near power lines or heat sources.
Look for places with easy access to power outlets. This makes wiring easier and safer.
Mapping Speaker Placement
Decide where each speaker will go before running wires. Good placement improves sound quality.
Place front speakers at ear level and surround speakers slightly above. Make sure wires can reach all spots.
- Center speaker below or above the TV
- Front left and right speakers at equal distance
- Surround speakers on side or back walls
- Subwoofer near a corner for better bass
Selecting Cable Types
Choose cables made for home theater use. They handle high sound quality and last long.
Look for cables with good shielding to reduce noise. Check the length to avoid tight pulls or extra slack.
- Use speaker wire with at least 16 gauge thickness
- HDMI cables for video and audio signals
- Coaxial or optical cables for surround sound
- Consider cable management tools to keep wires tidy

Credit: www.reddit.com
Gathering Tools And Materials
Installing home theater wiring requires the right tools and materials. Getting everything ready helps the job go smoothly.
Before starting, gather all the necessary items. This saves time and avoids interruptions.
Essential Tools List
Having the right tools makes wiring easier and safer. Basic tools cover most tasks in home theater installation.
- Wire strippers for removing insulation
- Screwdrivers (flathead and Phillips)
- Drill with various bits
- Fish tape for pulling wires through walls
- Measuring tape to measure distances
- Level to keep wiring straight
- Utility knife for cutting cables
- Electrical tape for securing connections
- Voltage tester to check power
- Wire cutters for trimming wires
Recommended Wiring Materials
Choosing the right wiring materials ensures good sound and video quality. Use cables that fit your home theater needs.
- Speaker wires (14 or 16 gauge recommended)
- HDMI cables for video and audio signals
- Coaxial cables for cable TV or antenna
- CAT5e or CAT6 cables for networked devices
- Wall plates and connectors for neat installations
- Conduit tubing to protect wires inside walls
- Wire labels to mark each cable
Preparing The Room
Setting up your home theater wiring starts with preparing the room. Proper preparation helps avoid problems during installation. It also makes sure cables run cleanly and safely.
Focus on clearing space and planning where cables will go. This makes the entire process smoother and faster.
Clearing And Measuring Space
First, clear the area where you want to install the home theater system. Remove furniture and obstacles to have enough working room. Measure the space to know how much cable you will need.
- Move furniture away from walls and corners
- Clear floor space for tools and equipment
- Measure wall lengths and distances between components
- Note locations of power outlets and devices
Marking Cable Paths
Mark where cables will run along walls, floors, or ceilings. Use tape or chalk to draw cable lines. This helps avoid crossing wires and keeps cables hidden.
| Location | Marking Tool | Notes |
| Wall baseboards | Painter’s tape | Easy to remove and visible |
| Ceiling corners | Chalk line | Clear and straight lines |
| Floor edges | Masking tape | Marks safe cable routes |
Running The Wires
Running wires for a home theater system requires careful planning. You must make sure the cables reach each device without damage. Proper wire management helps keep the setup neat and safe.
This guide covers drilling and fishing cables, avoiding interference, and securing wires safely. Follow these tips to install wiring efficiently and safely.
Drilling And Fishing Cables
Drilling holes lets you pass wires through walls or floors. Use the right drill bit size to avoid damaging cables. Fishing cables through tight spaces may require special tools like fish tape or wire pullers.
- Mark where the cables will run before drilling.
- Drill clean holes to prevent wire damage.
- Use fish tape to pull cables through walls.
- Protect cables with conduit if possible.
- Check for pipes or electrical lines before drilling.
Avoiding Interference
Interference can cause poor signal quality in audio and video. Keep speaker wires away from power cables to reduce noise. Use shielded cables if interference is a problem in your area.
| Type of Cable | Distance from Power Lines | Notes |
| Speaker Wire | At least 12 inches | Reduce hum and buzz |
| HDMI Cable | At least 6 inches | Use shielded cables |
| Coaxial Cable | At least 12 inches | Minimize signal loss |
Securing Wires Safely
Secure wires to avoid tripping hazards and damage. Use cable clips, ties, or raceways to hold wires in place. Avoid tight bends that can break the wires inside.
- Use plastic cable clips on walls and baseboards.
- Bundle cables with Velcro ties, not tight zip ties.
- Keep cables off the floor where possible.
- Label cables for easy identification later.
- Check cables regularly for wear and tear.
Connecting Speakers And Components
Setting up home theater wiring enhances your audio experience. Learn how to connect speakers and components easily.
Follow these simple steps to ensure your home theater system performs at its best.
Identifying Connection Points
It's important to locate all the connection points on your devices. These are usually marked with labels to guide you.
- Find the audio output ports on your amplifier.
- Locate the input ports on each speaker.
- Check the labels for left and right channels.
Properly Attaching Speaker Wires
Connecting speaker wires correctly ensures good sound quality. Follow these steps to attach wires safely.
Use the correct gauge wire for your setup. Thicker wires are better for longer distances.
- Strip the wire ends to expose the metal.
- Attach the red wire to the positive terminal.
- Connect the black wire to the negative terminal.
| Wire Gauge | Distance |
| 16-gauge | Up to 30 feet |
| 14-gauge | Up to 50 feet |
| 12-gauge | Over 50 feet |
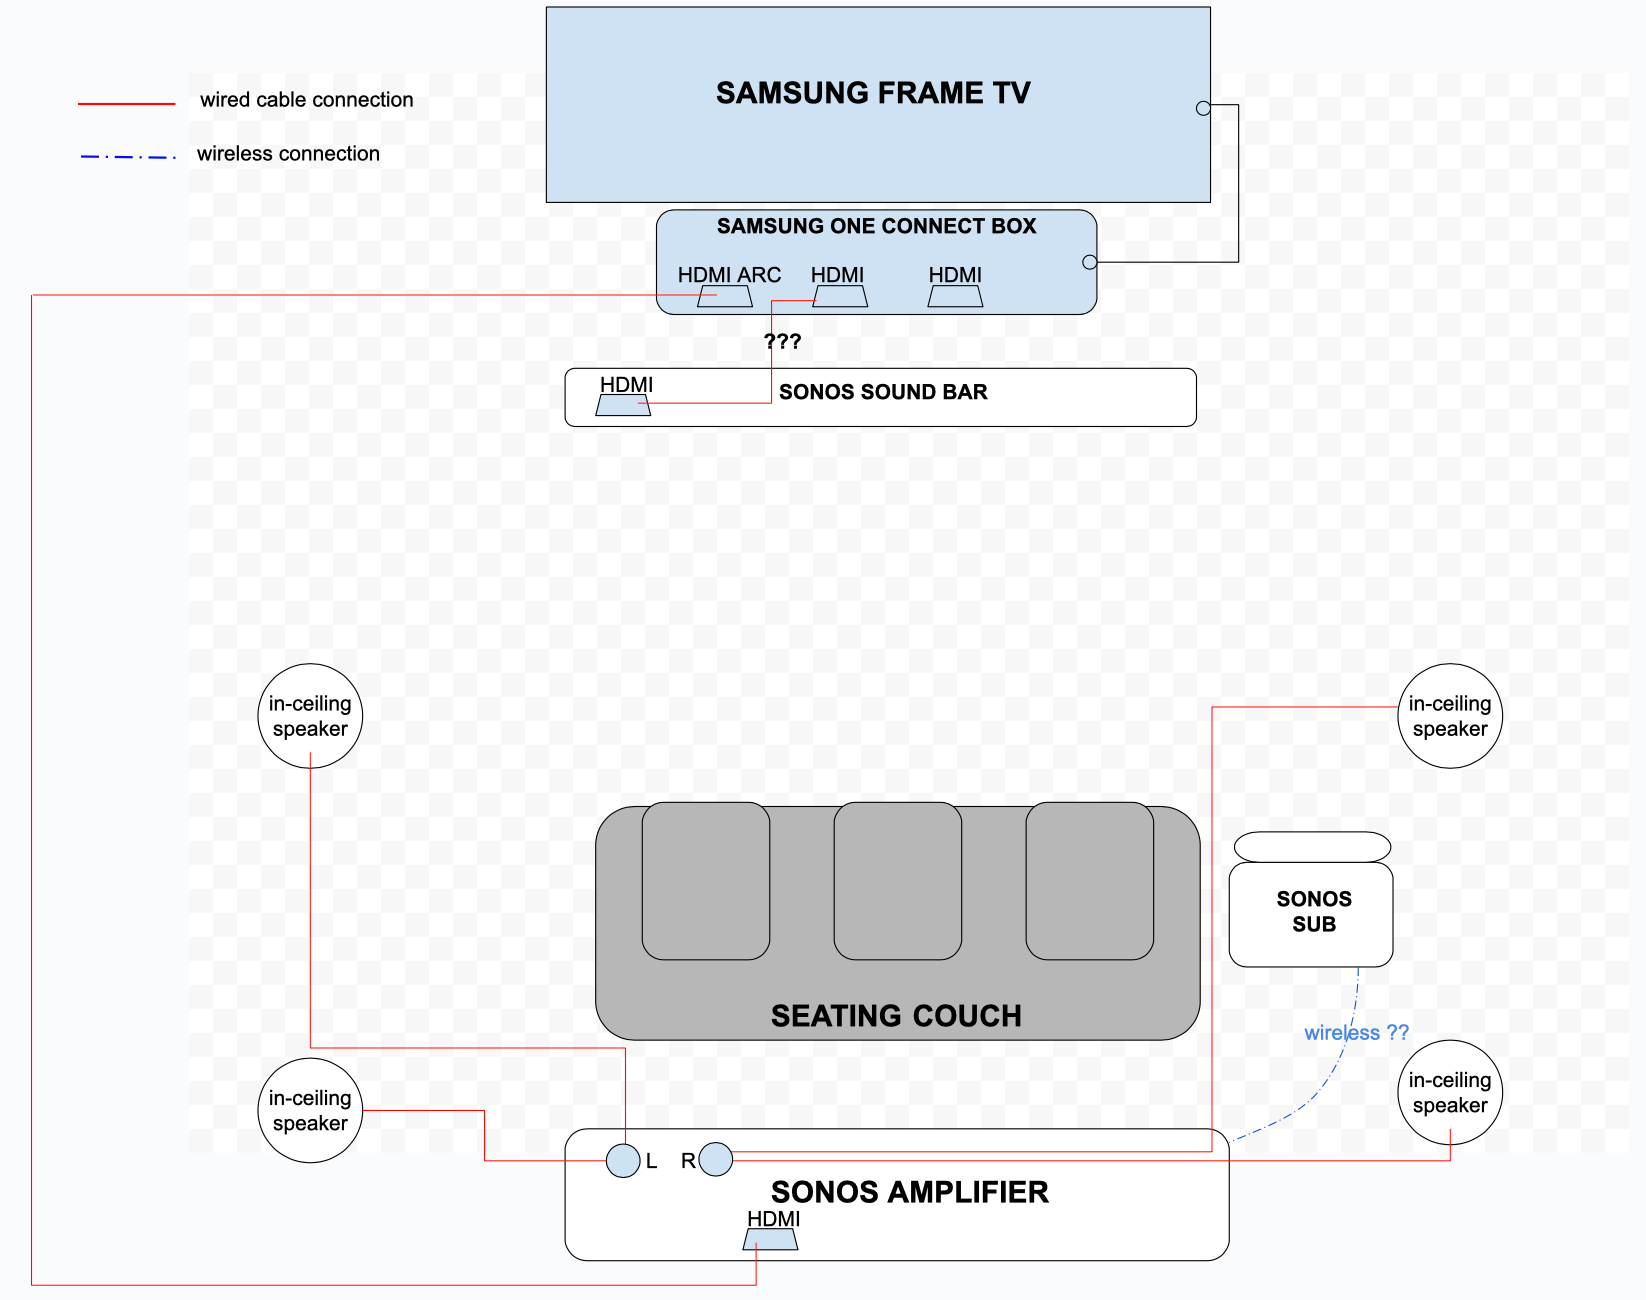
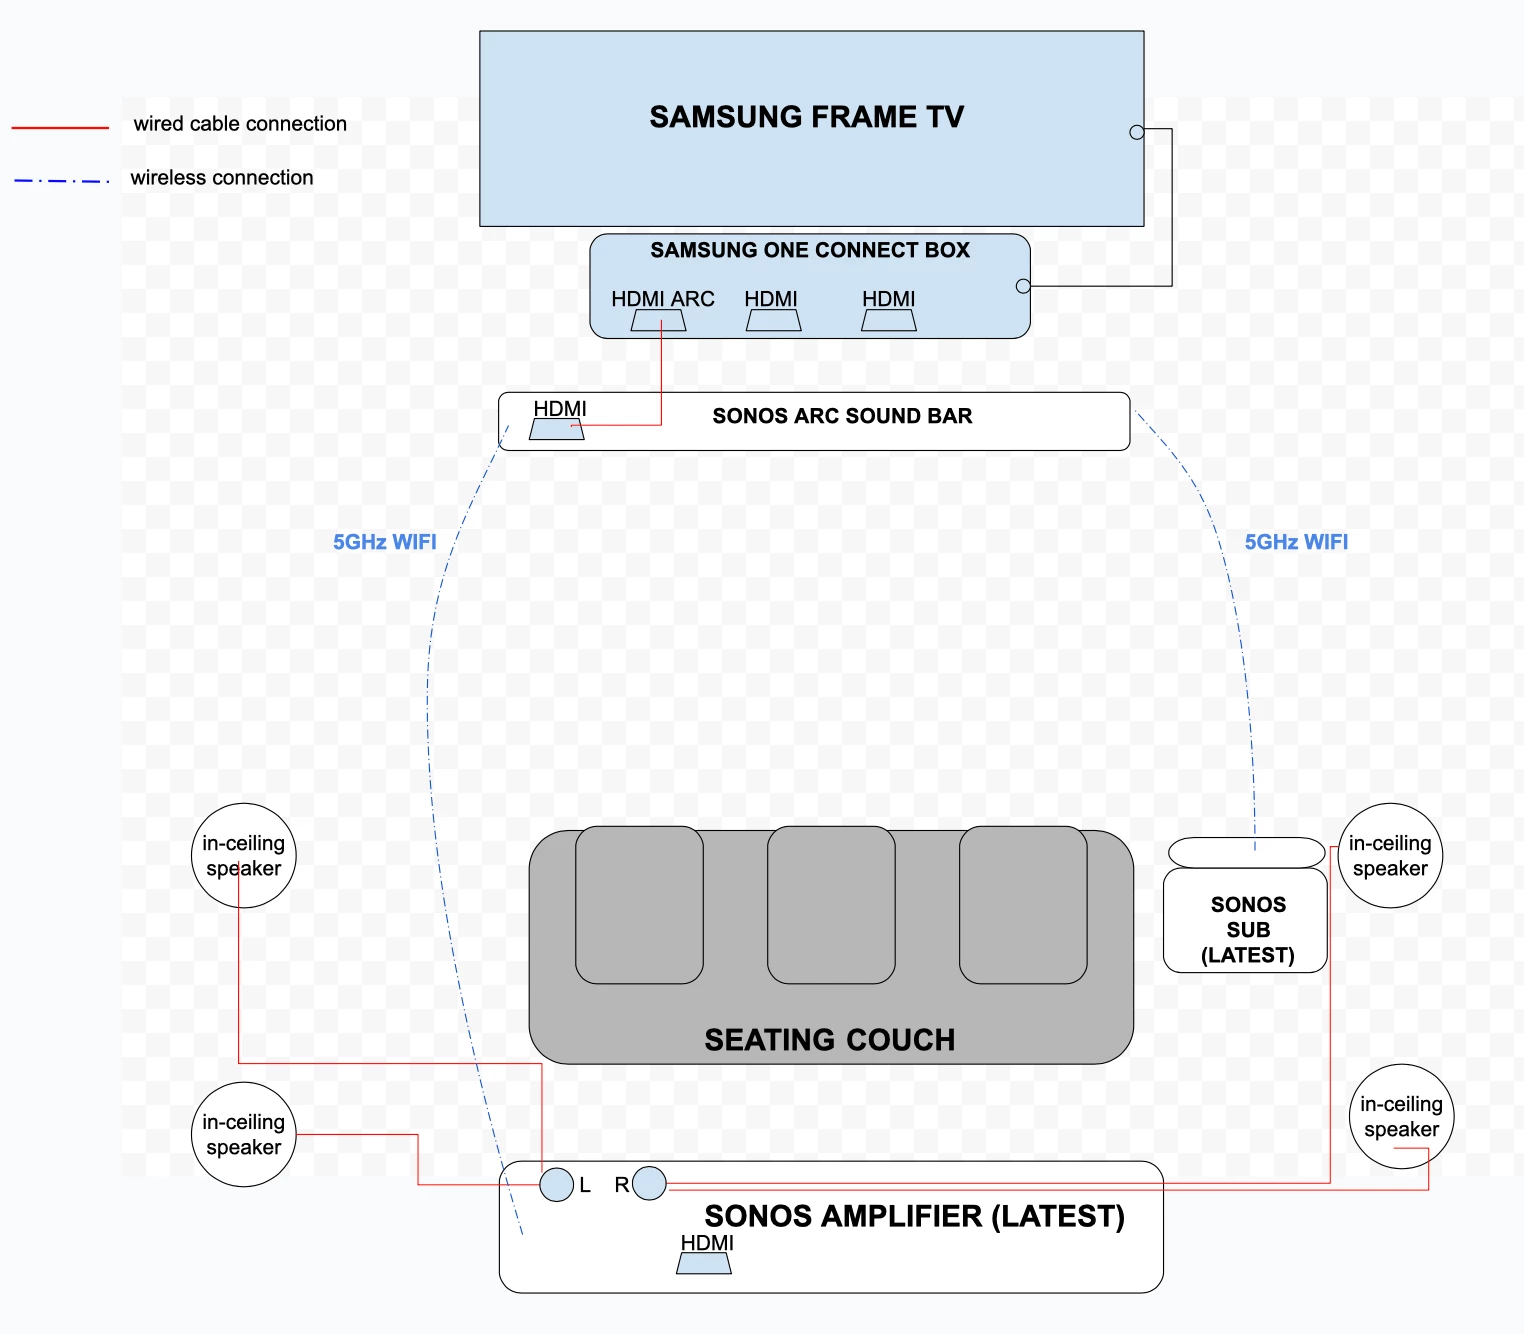
Credit: en.community.sonos.com
Testing And Adjusting Sound
After installing your home theater wiring, it is important to test the sound. This ensures all speakers work properly. Adjusting sound helps get the best audio experience.
Check connections and calibrate audio settings carefully. This makes your system perform well in your room.
Checking Connections
Start by inspecting all speaker wires and cables. Make sure each wire is plugged into the correct port. Loose connections cause poor sound or no sound.
Look for any damaged or frayed cables. Replace any wires that show wear. Test each speaker one by one to confirm it plays sound.
- Check that positive and negative wires match the terminals
- Ensure cables are firmly connected to the receiver and speakers
- Test each speaker by playing audio through it
- Fix or replace any faulty cables immediately
Calibrating Audio Settings
Use your receiver’s setup menu to adjust sound levels. Set speaker distances and volume to balance sound. This helps create clear and even audio.
Many receivers have a microphone for automatic calibration. Place it at your listening spot. Let the system measure and adjust sound settings.
- Set speaker size and crossover frequency
- Adjust speaker volume to match each speaker
- Use equalizer settings to improve bass or treble
- Test different audio modes for the best sound
Tips For Maintenance And Upgrades
Maintaining your home theater wiring is crucial for optimal performance. Regular checks and planning can save time and money.
With these tips, you can ensure your system remains efficient and ready for future upgrades.
Routine Wire Inspection
Checking your wires regularly can prevent unexpected issues. Look for signs of wear and tear.
- Inspect wires for any visible damage.
- Ensure connections are secure and tight.
- Check for any interference or static.
Planning Future Expansions
Thinking ahead about expansions can make your home theater more versatile. Consider future needs and technology changes.
Use a structured approach for expansions:
- Identify additional devices you might add.
- Consider the space needed for new wiring.
- Plan for potential technology updates.
| Component | Expansion Need |
| Speakers | Additional Surround Sound |
| Projector | High-Resolution Upgrade |
| Receiver | More HDMI Ports |
Credit: www.avsforum.com
Frequently Asked Questions
What Tools Are Needed For Home Theater Wiring Installation?
You need a wire stripper, drill, fish tape, screwdriver, and measuring tape. These tools help you run wires safely and neatly through walls and ceilings.
How Do I Plan Wiring For A Home Theater System?
Measure your room and decide speaker and component locations. Plan wire routes to avoid obstacles and ensure easy access for future upgrades.
What Type Of Cables Are Best For Home Theater Wiring?
Use high-quality HDMI, speaker wire (16-14 gauge), and coaxial cables. These provide clear signal transmission and support high-definition audio and video.
Can I Install Home Theater Wiring Myself?
Yes, with basic DIY skills and proper tools, you can install wiring. Follow safety guidelines and manufacturer instructions to avoid damage or hazards.
Conclusion
Installing home theater wiring is easier than it seems. Plan your layout carefully before starting the work. Use the right tools and follow safety steps. Take time to connect wires properly for the best sound. Test your system after installation to ensure it works well.
A neat setup helps your room look tidy and organized. Enjoy clear audio and an improved movie experience at home. Your effort will bring hours of fun and comfort. Simple steps make a big difference in home theater quality.