

Have you ever wanted to create beautiful clay pieces but felt held back because you don’t have a kiln? What if you could fire your clay at home without needing expensive equipment?
Imagine turning your handmade creations into sturdy, lasting art right in your own space. You’ll discover simple, practical ways to fire clay without a kiln. Whether you’re a beginner or just looking for new techniques, these easy methods will help you bring your pottery to life.
Keep reading to unlock the secrets of firing clay at home and start creating like a pro today!
Choosing The Right Clay
Firing clay at home without a kiln is possible with the right materials. Choosing the right clay is very important. It affects the success of your project and the final look.
Some clays work better at low temperatures or in alternative firing methods. Knowing the right clay helps you avoid cracks and breakage.
Types Suitable For Home Firing
Not all clay types can handle home firing methods. Choose clay that matures at lower temperatures. Air-dry clay and oven-bake clay are common choices for home projects.
- Air-dry clay: dries hard without firing but is less durable
- Polymer clay: cures in a regular oven at low heat
- Low-fire earthenware clay: can be fired in a small electric kiln or alternative setups
- Raku clay: designed for raku firing, which uses alternative heat sources
Clay Preparation Tips
Prepare your clay well to get good results. Remove air bubbles by kneading or wedging. This prevents cracks during firing.
Keep your clay moist but not too wet. Cover unused clay with plastic to stop drying. Cut clay into smaller pieces for even drying and firing.
- Knead clay to remove air pockets
- Store clay in airtight containers
- Use plastic wrap to keep clay moist
- Cut large clay pieces into smaller parts

Safety Precautions
Firing clay at home without a kiln can be done safely. You must follow key safety steps to protect yourself and your space.
Understanding safety precautions lowers risks and ensures a better firing experience.
Protective Gear
Wear the right gear to keep safe from heat and dust during firing.
- Use heat-resistant gloves to protect your hands.
- Wear safety goggles to shield your eyes from sparks or debris.
- Put on a dust mask to avoid inhaling fine clay particles.
- Choose long sleeves and pants to cover your skin from burns.
Ventilation Needs
Good airflow is crucial to avoid harmful fumes and smoke while firing clay.
| Ventilation Tip | Reason |
| Work outdoors or in a well-ventilated garage | Prevents buildup of smoke and fumes |
| Use a fan to increase air circulation | Keeps air fresh and safe |
| Avoid firing near windows that open to living spaces | Stops smoke from entering your home |
| Check local rules about outdoor firing | Ensures compliance with safety laws |
Pit Firing Method
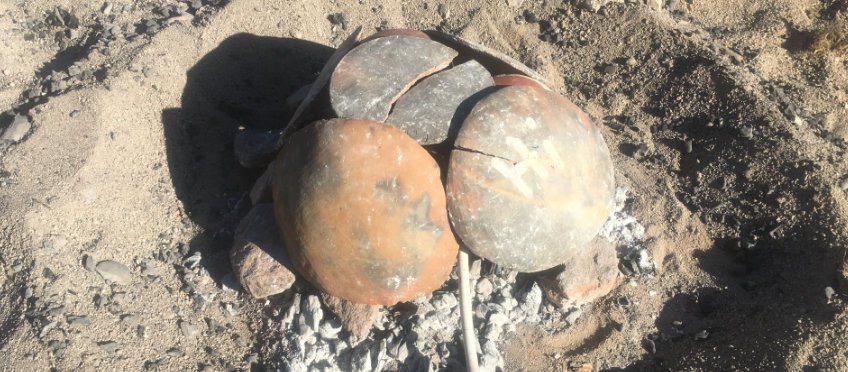
Pit firing is an old way to fire clay without using a kiln. You use a small hole in the ground as a fire pit.
This method works well for pottery and small clay projects. It gives the clay a unique look with natural colors and marks.
Materials Required
You need some basic materials to start pit firing at home. These items help create the fire and protect your clay pieces.
- Clay objects, dried and ready to fire
- A metal or plastic sheet to cover the pit
- Shovel to dig the pit
- Firewood, charcoal, or dried sticks for fuel
- Combustible materials like dried leaves or sawdust
- Protective gloves and safety glasses
- Water bucket for safety
Step-by-step Process
Follow these steps to fire your clay using the pit firing method. Each step is simple and safe.
- Dig a pit about 2 feet deep and wide enough for your pieces.
- Place a layer of combustible materials at the bottom of the pit.
- Arrange your clay pieces carefully on top of the layer.
- Add more combustible materials around and over the pieces.
- Light the fire using matches or a lighter.
- Cover the pit with a metal or plastic sheet to control air flow.
- Watch the fire as it burns but keep a safe distance.
Firing Duration And Cooling
The firing process takes several hours. It depends on the size of the pit and the amount of fuel used.
After the fire dies, let the clay cool down slowly. Do not remove the pieces until they are cool to touch.
- Firing lasts about 4 to 6 hours.
- Cooling time can take 12 to 24 hours.
- Slow cooling helps prevent cracks in the clay.
Using A Home Oven
Firing clay at home without a kiln is possible using a regular oven. This method works best for small clay pieces and low-fire clay.
It is important to follow the right steps and temperature settings to avoid damaging your clay or oven.
Temperature Settings
Use a low temperature to avoid cracking or burning the clay. Most home ovens reach up to 500°F (260°C), which is enough for low-fire clay.
Heating the clay slowly helps prevent cracks. Set the oven to 200°F (93°C) first, then increase it gradually.
- Start at 200°F (93°C) for 30 minutes
- Increase to 250°F (121°C) for 30 minutes
- Raise to 300°F (149°C) for 1 hour
- Do not exceed 500°F (260°C)
Limitations And Tips
Home ovens cannot reach the high temperatures of kilns. This limits the types of clay you can use and the hardness of your pieces.
To protect your oven and clay, place the pieces on a baking tray and avoid sudden temperature changes.
- Use air-dry or low-fire clay only
- Heat clay slowly to avoid cracks
- Place clay on a ceramic or metal tray
- Do not use your oven for food after firing clay
- Allow clay to cool in the oven before removing
Tandoor Or Bbq Grill Firing
Firing clay at home without a kiln is possible using a tandoor or a BBQ grill. These tools can reach high temperatures needed to harden clay. This method works well for small projects and pottery pieces.
Using a tandoor or BBQ grill requires careful setup and firing techniques. Understanding these steps helps avoid cracks and breaks in the clay. This guide explains how to prepare and fire your clay safely.
Setup Instructions
Start by cleaning your tandoor or BBQ grill to remove ashes and debris. Make sure the grill is stable and placed on a flat surface. Prepare your clay pieces by drying them completely before firing.
Arrange the clay pieces on a fireproof surface inside the grill. Use materials like fire bricks or ceramic tiles to protect the clay from direct flames. Keep enough space between pieces for even heat circulation.
- Clean the grill or tandoor well
- Place fireproof base inside
- Arrange dry clay with space between pieces
- Keep grill lid ready to control heat
Firing Techniques
Light the fire gradually to avoid sudden heat on the clay. Start with small flames and increase temperature slowly over 1 to 2 hours. This helps prevent cracks caused by thermal shock.
Keep the grill covered to maintain steady heat. Aim for a temperature of 800 to 1000 degrees Fahrenheit. Hold the temperature for 1 to 3 hours depending on the clay thickness.
- Light fire slowly and increase heat
- Keep grill lid closed during firing
- Maintain 800-1000°F temperature
- Fire for 1 to 3 hours based on clay size
- Let clay cool down inside the grill before removing
Alternative Heating Sources
Firing clay at home can be a fun and creative process. You don't always need a kiln to fire your clay projects. Alternative heating methods can help you achieve great results.
Explore different heating sources that can be used at home. These options are accessible and often more affordable for beginners.
Using A Torch
A torch is a handy tool for firing small clay pieces. It provides direct and intense heat. Always use the torch in a well-ventilated area.
Move the flame evenly across the clay surface. This helps to avoid cracking or breaking the piece. Practice on test pieces to improve your technique.
- Wear protective gear for safety
- Ensure the flame does not stay in one spot
- Keep the torch moving constantly
Solar Firing Options
Solar firing uses the sun's energy to heat clay. It is an eco-friendly method that works best in sunny climates.
Create a solar oven with foil and a clear cover. It traps the sun's rays and heats the clay slowly. This method is great for small and thin pieces.
| Advantages | Drawbacks |
| Environmentally friendly | Weather dependent |
| Cost-effective | Slow process |
Finishing Touches After Firing
After firing your clay pieces at home, you need to give them a final touch. This step makes your work look smooth and protects it.
Cleaning and smoothing remove rough spots. Sealing and glazing add shine and strength.
Cleaning And Smoothing
Start by brushing off any dust or loose particles with a soft brush. Use fine sandpaper to smooth out rough edges gently.
- Use a damp cloth to wipe away dust after sanding.
- Be careful not to sand too hard, or you may damage the piece.
- If cracks appear, fill them with a clay slip or putty and let dry.
Sealing And Glazing
Sealing your clay helps protect it from water and dirt. Glazing adds color and a glossy surface.
| Sealant Type | Use | Dry Time |
| Clear Acrylic Spray | Indoor items | 30 minutes |
| Waterproof Sealer | Outdoor use | 1 hour |
| Glossy Glaze | Decorative shine | 2 hours |
| Matte Finish | Natural look | 2 hours |

Troubleshooting Common Issues
Firing clay at home can be tricky. Without a kiln, problems can happen. Let's talk about some common issues.
We will look at cracking, warping, and uneven firing. These tips can help you fix these problems.
Cracking And Warping
Clay can crack or warp when drying. This happens if it's too thick or dries too fast.
Keep your clay pieces uniform in thickness. Let them dry slowly and evenly in a cool place.
- Use a damp cloth to cover pieces while drying
- Turn pieces regularly for even drying
- Make sure no drafts hit the clay
Uneven Firing
Uneven firing can cause parts of the clay to be weaker. This happens when the heat is not uniform.
To fix this, use a pit or barrel for firing. It helps spread heat evenly around the clay.
- Place small pieces in the center for better heat distribution
- Use a thermometer to check temperatures
- Cover the pit with materials that hold heat, like bricks

Frequently Asked Questions
What Materials Are Needed To Fire Clay At Home?
You need air-dry clay or low-fire clay, a heat source like a BBQ or oven, and proper ventilation. Safety gear like gloves and a mask helps protect you. These materials allow safe and effective firing without a kiln.
Can I Use A Regular Oven To Fire Clay?
Yes, you can use a regular oven for low-fire clay or air-dry clay. Ensure the temperature does not exceed the clay’s limit, usually around 200-250°C (392-482°F). Avoid high temperatures that can damage your oven or clay pieces.
How Long Does Home Firing Clay Take?
Home firing times vary from 1 to 3 hours depending on the method and clay type. Slow heating prevents cracking, so increase temperature gradually. Cooling should also be slow to avoid damage.
Is Firing Clay Without A Kiln Safe?
Firing clay without a kiln is safe if done carefully with proper heat control and ventilation. Avoid open flames near flammable materials. Always monitor your setup to prevent accidents and damage.
Conclusion
Firing clay at home without a kiln is possible and fun. You only need simple tools and patience. This method lets you create art without expensive equipment. Be careful with heat and safety throughout the process. Each attempt teaches you something new.
Keep practicing and enjoy your handmade clay pieces. Making pottery can be a relaxing hobby anyone can try. Start small, stay safe, and watch your ideas come alive.






