

Have you ever wanted to add a personal touch to your stainless steel items? Etching stainless steel at home is easier than you think, and it lets you create unique designs that stand out.
Whether you’re customizing a gift or giving new life to an old piece, this simple process can turn ordinary metal into something truly special. Keep reading, and you’ll discover step-by-step how to safely and effectively etch stainless steel right in your own space.
Your creativity is just one guide away from becoming reality!

Materials Needed
Etching stainless steel at home requires specific materials. These help you achieve clean and precise designs safely.
Gathering the right items before starting makes the process smoother and more effective.
Choosing The Right Stainless Steel
Select stainless steel that is smooth and clean. Avoid pieces with coatings or paint. The best types are 304 or 316 grades because they etch well.
- Choose flat sheets or objects with a smooth surface
- Avoid stainless steel with heavy scratches or rust
- Use 304 or 316 stainless steel for easier etching
Essential Tools And Supplies
| Item | Purpose |
| Stencil or masking tape | To create your design on steel |
| Etching cream or ferric chloride | To chemically etch the steel surface |
| Plastic brush | To apply etching cream evenly |
| Protective gloves | To protect your hands from chemicals |
| Plastic or glass container | To hold etching solution safely |
| Cleaning supplies (soap, water, cloth) | To prepare and clean the steel |
Safety Gear
Safety is important when etching. Use gear to protect your skin and eyes from harmful chemicals and sharp edges.
- Wear chemical-resistant gloves
- Use safety goggles to protect your eyes
- Work in a well-ventilated area
- Have a first aid kit nearby
Preparing The Surface
Etching stainless steel at home needs a clean and smooth surface. Proper preparation ensures the etching looks clear and lasts long.
Cleaning and protecting areas not to be etched helps create a neat design. Follow these steps to prepare the metal well.
Cleaning And Degreasing
Remove dirt, oil, and grease before etching. These can block the etching solution and ruin the design.
Use a clean cloth and a mild cleaner or rubbing alcohol. Wipe the entire surface until it feels dry and clean.
- Wear gloves to avoid adding oils from your hands
- Use a lint-free cloth for best results
- Repeat cleaning if the surface still feels slippery
Masking And Stenciling
Cover parts of the steel you do not want to etch. Use masking tape or a stencil to protect these areas.
Secure the stencil tightly to prevent the etching solution from bleeding under the edges. This keeps your design sharp.
- Choose a stencil material that sticks well but removes cleanly
- Press down edges firmly to block etching liquid
- Use painter’s tape for clean masking lines
Etching Techniques
Etching stainless steel at home can be a fun project. You can create designs with different techniques.
Each method offers unique results. Choose based on materials you have and the design you want.
Using Ferric Chloride
Ferric chloride is a popular choice for etching. It's effective and widely available.
Ensure you have safety gear. Gloves and goggles protect you from splashes.
- Mix ferric chloride with water in a 1:1 ratio.
- Apply the solution to the stainless steel.
- Rinse thoroughly after etching to stop the reaction.
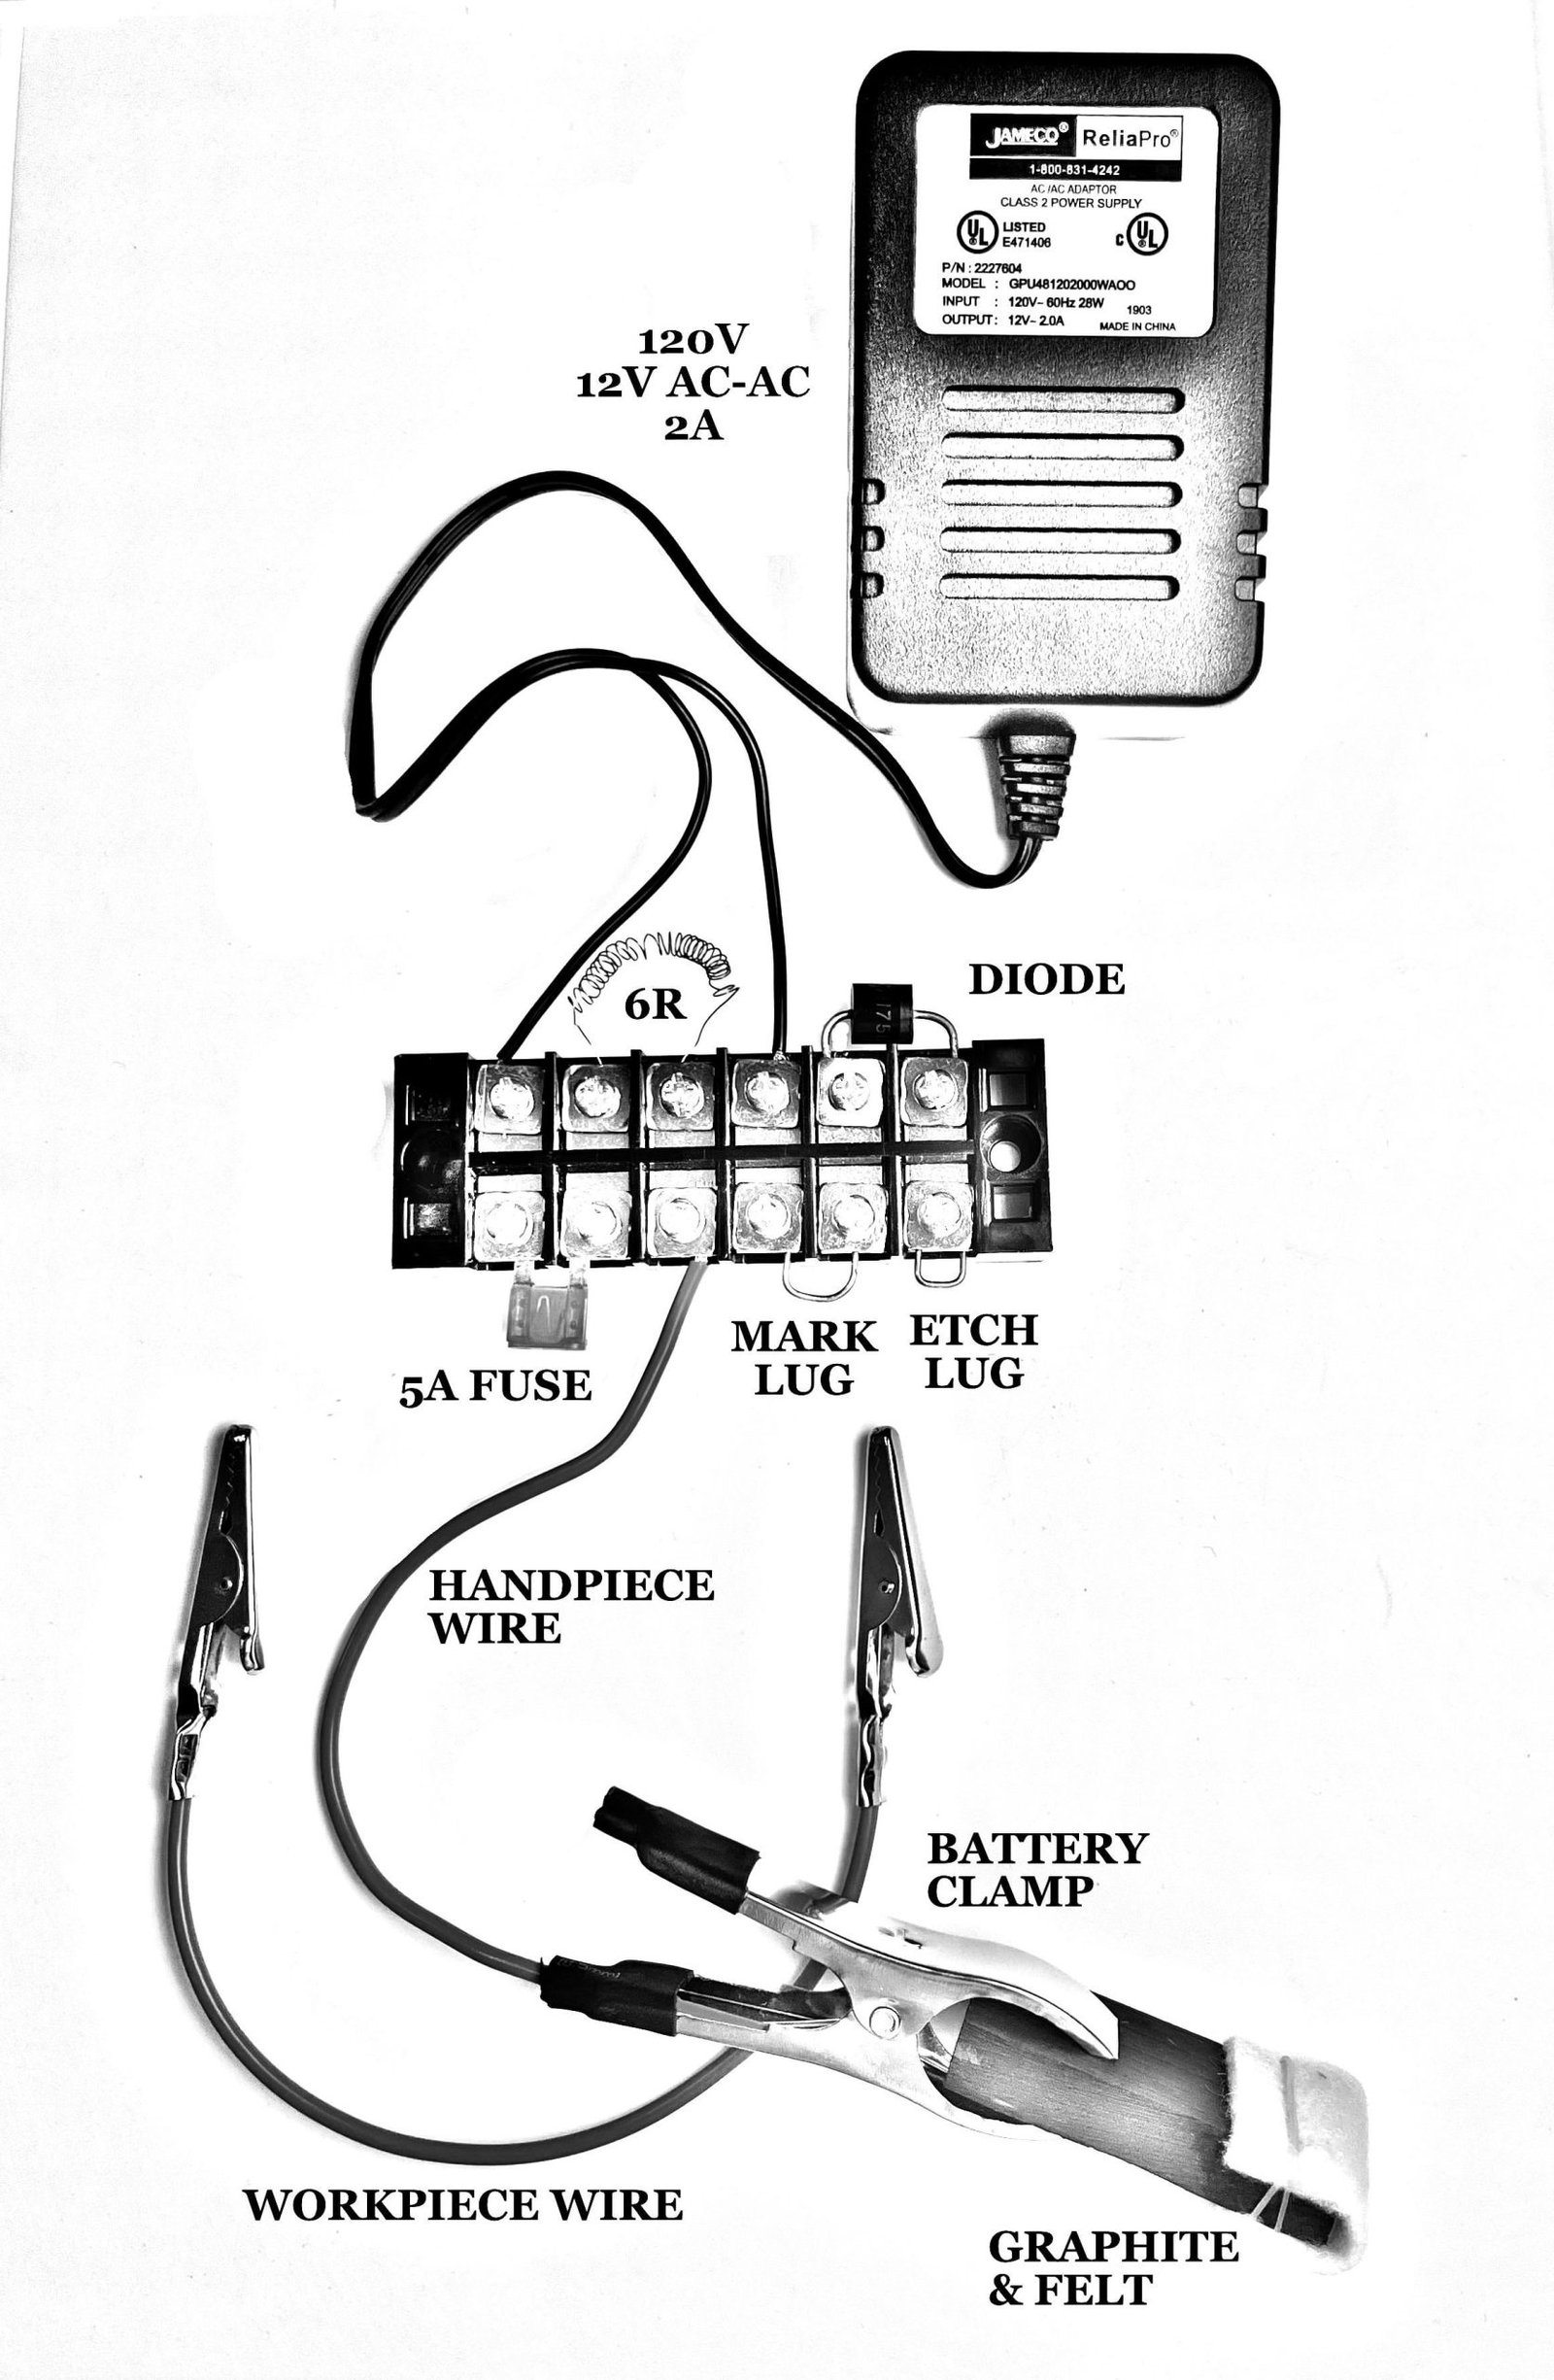
Electrolytic Etching Method
This method uses electricity and a saltwater solution. It's precise and less messy.
You need a power source, like a battery. Connect it to the stainless steel.
- Make a saltwater solution for conductivity.
- Attach a wire from the positive terminal to the steel.
- Submerge in solution and turn on the power.
Alternative Etching Solutions
Vinegar and salt can also etch stainless steel. It's a safer and eco-friendly option.
This method is slower but safer for beginners. It works well for simple designs.
- Mix vinegar and salt until the salt dissolves.
- Apply the mixture to the stainless steel.
- Let it sit for several hours, then rinse.

Step-by-step Etching Process
Etching stainless steel at home can create unique designs. This process uses simple tools and chemicals.
Follow these steps carefully to achieve a clear and safe etch on your metal surface.
Setting Up Your Workspace
Prepare a clean, well-ventilated area before starting. Wear gloves and eye protection for safety.
- Cover your work surface with plastic or newspaper.
- Gather all materials: stainless steel piece, etchant, brushes, and water.
- Keep a first aid kit nearby in case of accidents.
Applying The Etchant
Apply the etching solution carefully to your stainless steel surface. Use a brush or cotton swab for detail.
| Material | Recommended Etchant | Application Method |
| Stainless Steel | Ferric Chloride | Brush or dip |
| Protective Mask | Not needed | Wear at all times |
| Gloves | Not needed | Wear at all times |
Monitoring The Etch Depth
Check the metal often to avoid over-etching. The process usually takes 10 to 20 minutes.
- Look for the design to become more visible.
- Wipe small areas gently to see depth.
- Stop etching once the desired depth is reached.
Rinsing And Finishing
Rinse the steel under running water to remove all etchant. Dry it with a soft cloth.
Finish by polishing the surface for shine. Use fine steel wool or a metal polish product.
Troubleshooting Tips
Etching stainless steel at home can be tricky. Small mistakes can affect the final look. This guide helps you fix common problems.
Use these tips to improve your etching results. Learn how to avoid errors and get cleaner designs.
Common Mistakes To Avoid
Many beginners make simple errors that ruin their etching. Avoid these to save time and materials.
- Not cleaning the steel surface well before etching
- Using too strong or too weak an etching solution
- Leaving the etching solution on for too long or too short
- Skipping safety gear like gloves and eye protection
- Applying uneven pressure when placing the stencil
Fixing Uneven Etching
Uneven etching looks unprofessional. It happens when the solution does not contact the steel evenly.
| Cause | Fix |
| Uneven stencil application | Press stencil firmly and evenly on steel |
| Old or weak etching solution | Use fresh solution mixed as instructed |
| Steel surface not clean | Clean with alcohol or degreaser before etching |
| Etching time too short | Increase time slightly, checking often |
Improving Precision
Precise etching creates clear designs. Follow these tips to improve accuracy.
- Use high-quality, laser-cut stencils for sharp edges
- Secure the stencil with painter’s tape to avoid movement
- Apply the etching solution with a small brush for control
- Work in good lighting to see details clearly
- Practice on scrap steel before etching your final piece
Creative Ideas For Projects
Etching stainless steel at home lets you create unique, personal items. You can decorate gifts, make art, or build useful tools.
This guide shows ideas for different project types you can try with simple etching techniques.
Personalized Gifts
Etching adds a special touch to gifts by adding names, dates, or designs. This makes your gift stand out and feel more thoughtful.
- Engrave names on keychains or jewelry
- Add special dates to stainless steel water bottles
- Create custom designs on phone or laptop cases
- Make engraved bookmarks or money clips
Decorative Items
Use etching to make beautiful decorations for your home. Stainless steel can hold detailed patterns and last a long time.
| Item | Design Idea | Use |
| Wall Art | Abstract patterns or nature scenes | Hang on walls |
| Coasters | Geometric shapes or monograms | Protect furniture |
| Candle Holders | Floral or lace patterns | Create ambiance |
| Picture Frames | Simple lines or borders | Highlight photos |
Custom Tools And Accessories
Etching helps mark your tools or create custom parts. It adds style and makes your gear easy to identify.
Try these ideas for tools and accessories:
- Mark your name or logo on hand tools
- Etch measurements or scales on rulers and squares
- Personalize knife handles or multi-tools
- Design custom belt buckles or zipper pulls

Frequently Asked Questions
What Materials Are Needed To Etch Stainless Steel At Home?
You need stainless steel, etching cream or ferric chloride, a resist material, gloves, and safety glasses. Prepare a clean workspace and stencil design for best results.
How Long Does It Take To Etch Stainless Steel?
Etching usually takes 10 to 30 minutes, depending on depth desired. Monitor progress frequently to avoid over-etching or uneven patterns.
Is Etching Stainless Steel Safe For Beginners?
Yes, with proper safety gear and instructions, beginners can safely etch stainless steel. Always work in a ventilated area and handle chemicals carefully.
Can I Use Household Acids To Etch Stainless Steel?
Household acids are generally too weak or unsafe for stainless steel etching. Use commercial etching solutions designed specifically for metal.
Conclusion
Etching stainless steel at home is simple with the right steps. Always use safety gear to protect yourself. Clean the metal well for a clear design. Follow the instructions carefully and take your time. Practice on scrap pieces before starting your main project.
Enjoy creating unique patterns and designs on steel. This skill adds a personal touch to your items. Keep experimenting to improve and find new ideas. You can make gifts or decorate tools easily. Etching steel can be fun and rewarding for anyone.






