Setting up your home theater system can feel tricky, especially when it comes to connecting it to your receiver. But it doesn’t have to be confusing or frustrating.
Imagine sinking into your favorite movie with crystal-clear sound and powerful surround effects—all from the comfort of your living room. You’re just a few simple steps away from making that happen. In this guide, you’ll discover exactly how to connect your home theater system to your receiver quickly and easily, so you can start enjoying an amazing audio experience right now.
Keep reading, and you’ll see how straightforward it really is.

Credit: www.youtube.com
Choosing The Right Receiver
Choosing the right receiver is important for your home theater system. The receiver connects all devices and powers your speakers.
A good receiver matches your speakers and supports all your inputs and outputs. It also offers features you need.
Matching Receiver Power To Speakers
Check the power rating of your speakers before picking a receiver. The receiver should provide enough power for clear sound.
Too little power can cause weak sound. Too much power can damage your speakers. Find a balance for the best performance.
- Look for receiver wattage per channel
- Match wattage to speaker power handling
- Consider speaker impedance (ohms)
Checking Compatible Inputs And Outputs
Make sure your receiver has the right inputs for your devices. You need inputs for TV, Blu-ray player, and gaming console.
Check outputs for speakers and subwoofers. Also, see if you need outputs for headphones or extra zones.
- HDMI inputs for video devices
- Optical or coaxial digital audio inputs
- Speaker terminals that fit your cables
- Subwoofer pre-out for bass
- Additional outputs for multiple rooms
Considering Wireless And Streaming Features
Many receivers have wireless options. They let you connect to Wi-Fi or Bluetooth without cables.
Streaming features let you play music from apps or your phone. Choose a receiver with the features you use.
- Bluetooth for wireless audio from phones
- Wi-Fi for internet music services
- Support for streaming apps like Spotify or Pandora
- Multi-room audio capability
- Smart home integration options
Preparing Your Home Theater Components
Setting up a home theater system starts with preparing your equipment. Proper preparation makes connecting easier and improves sound quality.
Focus on gathering cables, placing speakers, and organizing devices before you connect everything to the receiver.
Gathering Necessary Cables And Accessories
Get all cables before starting the setup. Different cables connect your devices to the receiver and speakers.
Check if you have the right types and lengths of cables to avoid interruptions later.
- HDMI cables for video and audio
- Speaker wires for each speaker
- Optical or coaxial audio cables
- Power cords and extension cables
- Remote control and batteries
Positioning Speakers For Optimal Sound
Place your speakers carefully to get the best sound. Position them around the room where you will sit.
Make sure speakers face the listening area and are not blocked by furniture or walls.
- Front left and right speakers at ear level
- Center speaker above or below the TV
- Surround speakers to the sides or behind the seating
- Subwoofer near a corner for better bass
Organizing Devices For Easy Access
Keep your devices close to the receiver for quick connections. This helps avoid tangled cables and confusion.
Arrange devices on shelves or stands where you can reach buttons and ports easily.
- Place Blu-ray players, game consoles, and streaming boxes near the receiver
- Use cable ties or clips to keep wires neat
- Label cables for quick identification
- Leave space for ventilation around devices
Connecting Speakers To Receiver
Connecting your home theater speakers to the receiver is key for great sound. You need to know how to handle the wires and terminals safely.
This guide shows you how to identify terminals, prepare wires, and secure connections to avoid signal loss.
Identifying Speaker Terminals
Receivers have different terminals for speakers. They usually look like red and black posts or spring clips. Red is positive (+), and black is negative (−).
- Check the receiver’s back panel for terminals.
- Match each speaker with the correct terminal label.
- Use the same color code for all connections.
Stripping And Connecting Speaker Wires
Strip the speaker wire ends to expose the metal. About half an inch of bare wire is enough. Avoid cutting too much wire to prevent shorts.
| Wire Type | Strip Length | Tip |
| Standard Copper Wire | 0.5 inch (12 mm) | Twist strands to avoid fraying |
| Speaker Wire with Connectors | Follow connector instructions | Ensure firm fit |
Insert the stripped wire into the terminal and tighten it firmly. Make sure no bare wire touches other terminals.
Securing Connections To Avoid Signal Loss
Loose connections cause poor sound or signal loss. Secure the wires well to keep a strong signal.
- Tighten all terminal screws or clips firmly.
- Use cable ties to keep wires neat and prevent pulling.
- Check for corrosion or damage on wire ends.
- Keep wires away from power cables to avoid interference.

Credit: www.reddit.com
Hooking Up Audio And Video Sources
Connecting your home theater system to a receiver lets you enjoy better sound and video. You need to link audio and video sources properly for the best experience.
This guide shows how to connect different devices to your receiver. It covers HDMI, analog, and digital audio inputs and how to set up external devices.
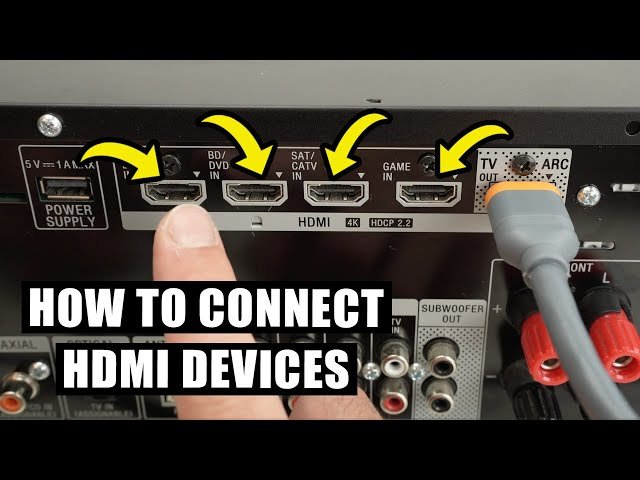
Using Hdmi For High-quality Connections
HDMI cables carry both audio and video signals in one wire. This makes connection simple and keeps the quality high. Most modern devices support HDMI.
Connect the HDMI cable from your device's HDMI Out port to the receiver's HDMI In port. Then connect the receiver's HDMI Out to your TV. This setup passes sound and picture through the receiver.
- Use high-speed HDMI cables for 4K or HDR content.
- Check that all devices support the same HDMI version for best results.
- Use HDMI ARC or eARC ports if your TV and receiver support them.
Connecting Analog And Digital Audio Inputs
Not all devices use HDMI. Some older devices send audio through analog or digital cables. Your receiver has ports for both types.
Analog audio uses red and white RCA cables. Digital audio uses optical or coaxial cables. Connect these from your device’s output to the matching input on the receiver.
- Use RCA cables for analog stereo sound.
- Use optical cables for digital audio without interference.
- Use coaxial cables for digital audio with good quality.
- Match cable colors and ports carefully to avoid mistakes.
Setting Up External Devices Like Blu-ray And Gaming Consoles
Blu-ray players and gaming consoles connect to your receiver to play sound and video through your home theater. Most use HDMI for easy setup.
Plug the device’s HDMI Out into a free HDMI In on your receiver. Turn on the receiver and select the input source for the device. Adjust settings on the device and receiver for best sound and picture.
- Check device manuals for special audio settings.
- Use receiver’s remote to switch inputs quickly.
- Update firmware on devices for compatibility.
- Test sound and video after connecting each device.
Configuring Receiver Settings
After connecting your home theater system to the receiver, you need to set up the receiver correctly. Good settings help you get clear sound and the best experience.
This guide explains how to select input sources, adjust speaker levels and distances, and enable surround sound modes on your receiver.
Selecting Input Sources
Choose the correct input source on your receiver to hear sound from your device. Each source matches a connected device like a DVD player or game console.
Use the receiver’s remote or front panel to change the input source. Look for labels like HDMI 1, AUX, or Bluetooth to find your device.
- Turn on your connected device first
- Press the input or source button on the receiver
- Scroll through the options until you find your device
- Select it to start playing audio
Adjusting Speaker Levels And Distances
Set speaker levels to balance the sound from each speaker. This ensures clear and even audio in the room.
Measure the distance from your main seating area to each speaker. Enter these distances in the receiver’s settings to improve sound timing.
- Use a tape measure to find distances in feet or meters
- Access the speaker setup menu on the receiver
- Adjust volume levels so all speakers sound equal
- Input the distance for each speaker for better sound delay
Enabling Surround Sound Modes
Surround sound modes create a richer audio experience by using all speakers. You can choose modes like Dolby Digital or DTS.
Pick the mode that matches your content. Some receivers have auto mode to detect the best option for you.
- Find the surround sound settings in the receiver menu
- Select the desired mode like Stereo, Dolby Digital, or DTS
- Use auto mode if you want the receiver to choose
- Test different modes to see which sounds best

Credit: soundcertified.com
Testing And Troubleshooting
Connecting your home theater system to a receiver can be tricky. Proper testing ensures everything works smoothly. Troubleshooting helps fix any issues that arise.
Follow these steps to make sure your home theater setup is perfect. This will enhance your viewing and listening experience.
Verifying Sound Output From All Speakers
Check if each speaker is working correctly. Play a test sound or a movie scene with distinct audio cues. Listen to the sound from each speaker to ensure proper audio output.
Make sure the balance and volume levels are set correctly. Adjust settings on the receiver for optimal sound distribution.
Resolving Common Connection Issues
Loose cables often cause problems. Check all connections between the receiver and speakers. Ensure cables are securely plugged in.
Incorrect input selection can also be an issue. Verify that the input source on the receiver matches the connected device.
- Check for any damaged cables
- Ensure proper input selection on the receiver
- Verify speaker wiring is correct
Updating Firmware For Best Performance
Firmware updates improve system performance. Check the manufacturer’s website for updates for your receiver model.
Follow instructions to update the firmware. This can fix bugs and enhance connectivity.
| Step | Action |
| 1 | Visit manufacturer’s website |
| 2 | Download the latest firmware |
| 3 | Follow update instructions |
Frequently Asked Questions
How Do I Connect My Home Theater To The Receiver?
To connect, use HDMI or optical cables from your home theater to the receiver. Match input ports correctly. Power on devices and select the receiver input source.
What Cables Are Best For Home Theater And Receiver Connection?
HDMI cables are best for audio and video quality. Optical cables work well for audio-only setups. Choose high-speed HDMI for 4K content compatibility.
Can I Connect Multiple Devices To One Receiver?
Yes, most receivers have multiple input ports. Connect each device to a separate port. Switch inputs on the receiver to use different devices.
How Do I Set Up Speakers With The Receiver?
Connect speaker wires to matching terminals on the receiver and speakers. Ensure polarity is correct (positive to positive). Use the receiver’s setup menu to calibrate sound.
Conclusion
Connecting your home theater system to the receiver is simpler than it seems. Start by matching the cables and ports carefully. Double-check each connection to avoid sound or picture issues. Power on your devices and adjust settings for the best experience.
Test the sound and video to ensure everything works well. Enjoy clear audio and vivid visuals in your living room. With these steps, your setup will bring movies and music to life. Take your time, and soon your home theater will feel complete.