Have you ever wanted to create beautiful clay crafts but don’t have an oven at home? You’re not alone.
Many people think baking clay requires special equipment, but that’s not true. You can easily bake clay right at home without an oven, using simple tools you probably already have. Imagine turning your ideas into lasting art without any hassle or extra costs.
Keep reading, and you’ll discover easy, effective ways to bake your clay creations perfectly every time. Your next masterpiece is just a few steps away!
Choosing The Right Clay
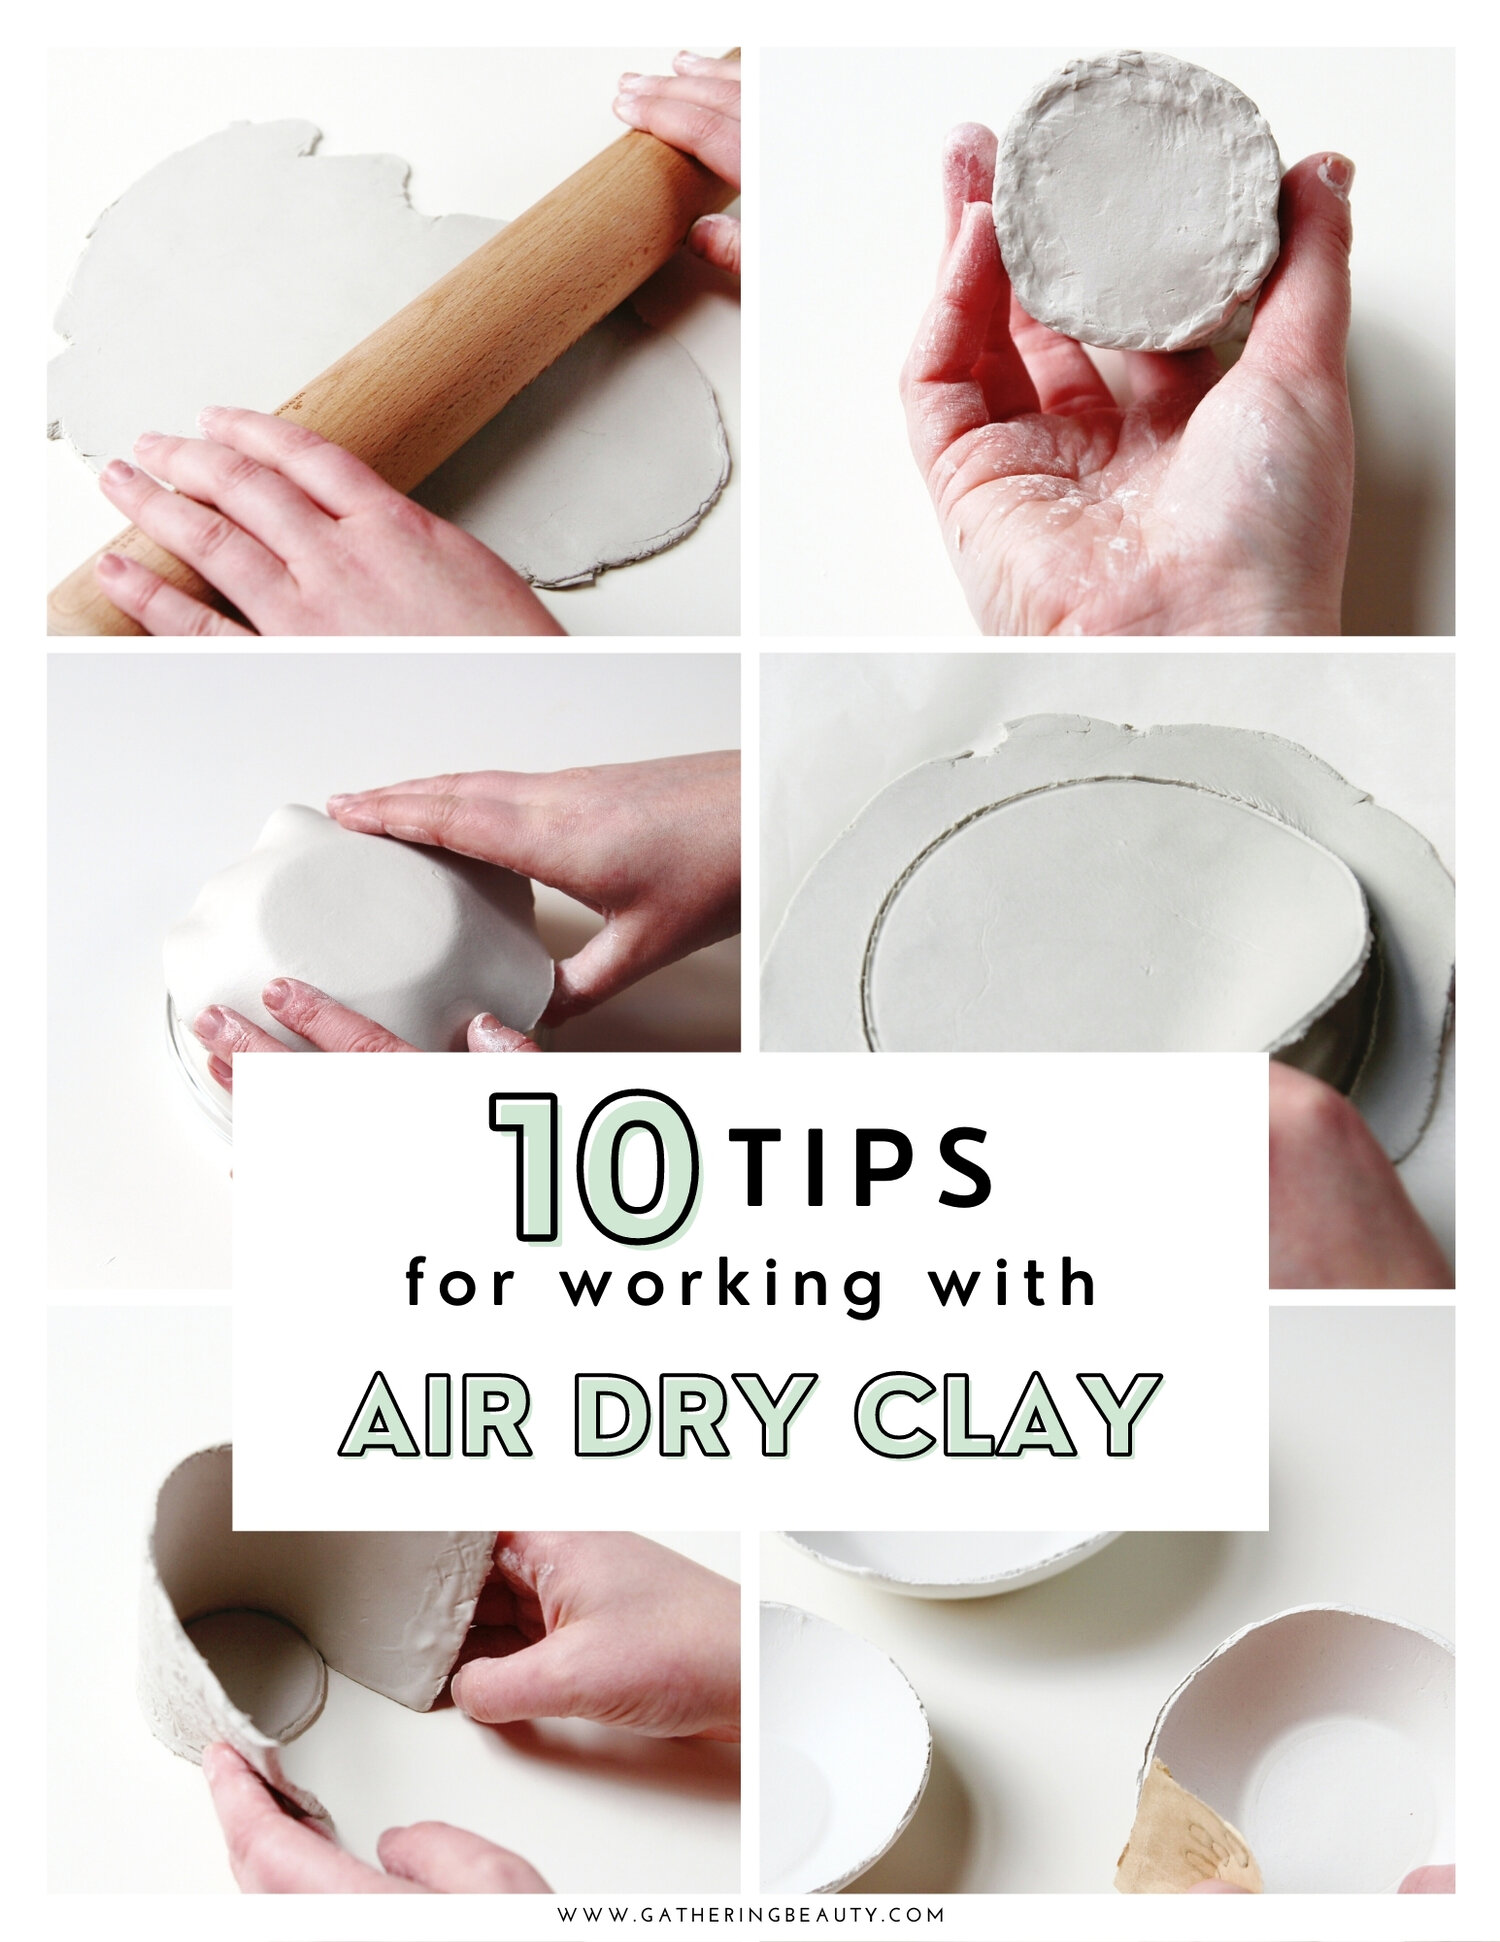
Baking clay at home without an oven is possible with the right type of clay. Not all clay works well without high heat. Choosing clay that suits low-temperature baking helps you get good results.
This guide explains which clays work best for home baking and which ones to avoid. Knowing this will save you time and effort.
Types Suitable For Home Baking
Air-dry clay is a popular choice for baking without an oven. It hardens naturally when left in the open air. This clay does not need heat, so it is safe and easy to use at home.
Another option is polymer clay. It usually needs an oven, but some brands can cure at lower temperatures or with heat sources like a heat gun. Always check the packaging for baking instructions.
- Air-dry clay: dries without heat in 24-72 hours
- Low-temperature polymer clay: cures at lower heat or with heat guns
- Natural clay: can be air-dried but may crack without firing
Avoiding Oven-only Clays
Some clays require high heat to harden and cannot be baked at home without an oven. These clays will stay soft or crumbly if not baked properly.
Porcelain and stoneware clays are examples that need kiln firing. They are not suitable for home baking without special equipment. Avoid these clays if you lack an oven or kiln.
- Porcelain clay: requires kiln firing above 1200°C
- Stoneware clay: needs high heat to harden
- Earthenware clay: must be fired in a kiln
Preparing Your Workspace
Baking clay at home without an oven needs a clean and organized workspace. This helps you work safely and easily.
Set up a place with good light and enough room for your tools and clay pieces.
Essential Tools And Materials
To bake clay without an oven, gather the right tools and materials first. This makes the process smooth and safe.
- Heat source like a stove or hot plate
- Metal or heat-safe container for baking
- Aluminum foil to wrap the clay
- Clay that can harden with heat
- Protective gloves to handle hot items
- Thermometer to check temperature
- Work surface cover like silicone mat
Safety Precautions
Safety is important when baking clay without an oven. Follow these rules to avoid accidents and burns.
- Keep children and pets away from heat sources
- Use gloves when handling hot containers
- Work in a well-ventilated area to avoid fumes
- Do not leave heat sources unattended
- Check the clay’s instructions for safe baking temperatures
- Have a fire extinguisher nearby just in case
Air Drying Method
Air drying clay is a simple way to harden your craft without an oven. This method works well for many types of clay.
It takes longer than baking, but it is safe and easy to do at home.
Step-by-step Process
Follow these steps to dry your clay pieces properly using air drying.
- Shape your clay into the desired form.
- Place the clay on a clean, flat surface.
- Keep the clay in a dry, warm place away from direct sunlight.
- Turn the clay piece every few hours to dry evenly.
- Wait 24 to 72 hours depending on the size and thickness.
- Check if the clay feels hard and dry to the touch.
Tips For Even Drying
Use these tips to avoid cracks and get smooth, dry clay pieces.
- Cover the clay loosely with a breathable cloth to prevent dust.
- Dry thin pieces faster than thick ones by separating them.
- Place your drying clay on a mesh or rack for air circulation.
- Keep humidity low in the room where clay dries.
- Avoid stacking clay pieces to prevent uneven drying.
| Tip | Reason |
| Turn clay often | Prevents moisture buildup on one side |
| Use mesh rack | Allows air to flow under the piece |
| Keep humidity low | Speeds up drying and reduces cracks |
| Separate thick parts | Ensures all areas dry evenly |
Using A Stovetop
Baking clay usually needs an oven, but you can bake it on a stovetop. This method works well for small clay projects.
Using a stovetop is safe if you control the heat and use the right tools. Let's see how to do it.
Setting Up A Double Boiler
A double boiler uses steam to heat the clay gently. It helps avoid burning or cracking your clay.
Place water in a pot and bring it to a low boil. Put a smaller pot or heat-safe bowl on top without touching the water.
- Fill the bottom pot with about 2 inches of water.
- Keep the water simmering, not boiling hard.
- Put your clay inside the smaller pot or bowl.
- Cover the clay with a lid or foil to keep heat even.
Controlling Temperature
Keeping the right temperature is key. Too much heat can burn clay, too little won't bake it properly.
Use a low to medium heat setting on your stovetop. Check water often and add more if it evaporates.
- Keep water simmering around 180-200°F (82-93°C).
- Use a thermometer if possible to watch the heat.
- Do not let water boil hard or the clay may crack.
- Bake clay slowly for 30-60 minutes depending on size.
Microwave Baking Technique
Baking clay at home without an oven is easy with a microwave. This method heats clay quickly and safely.
The microwave baking technique works well for small clay projects. It saves time and uses common kitchen tools.
Suitable Clay Types
Not all clays bake well in a microwave. Choose clays designed for low heat and fast curing.
Microwave baking suits air-dry and polymer clays made for quick hardening.
- Polymer clay (like Sculpey or Fimo)
- Microwave-safe air-dry clay
- Low-temperature oven clay
Timing And Power Settings
Set the microwave on medium power to avoid burning or cracking the clay. Short bursts work best.
Start with low time and check often. Adjust time based on clay thickness and size.
| Clay Thickness | Power Level | Time |
|---|---|---|
| Up to 1/4 inch (6 mm) | 50% (medium) | 30 seconds |
| 1/4 to 1/2 inch (6-12 mm) | 50% (medium) | 1 minute |
| Over 1/2 inch (12 mm) | 30-50% | 1-2 minutes in short bursts |

Credit: www.reddit.com
Sun Drying Approach
Sun drying clay is an easy method to harden your creations. This approach uses natural sunlight to dry and set the clay.
It's a simple process that requires minimal equipment. Let’s explore the best conditions for sun drying and how to protect your clay from the elements.
Best Conditions For Sun Drying
The right conditions are crucial for effective sun drying. Direct sunlight is important for drying clay evenly.
Dry and warm weather is best to speed up the drying process. Avoid humid days as they can slow down drying.
- Choose a sunny spot with good air circulation
- Avoid shaded areas or places with tall trees
- Ideal temperatures range between 70°F and 90°F
Protecting Clay From Elements
Protecting your clay from unexpected weather changes is important. Rain or strong winds can damage your creations.
Covering your clay can help shield it from these elements. Use materials that allow airflow while offering protection.
- Use a clear plastic cover to shield from rain
- Secure the cover with weights to prevent it from blowing away
- Monitor weather forecasts to avoid surprises
Using A Toaster Oven
Clay baking is a fun activity you can do at home. You don't need a big oven to bake small clay pieces. A toaster oven works perfectly for this task.
Make sure to follow simple steps to get the best results. Let's look at how to bake clay using a toaster oven.
Temperature Settings
Setting the right temperature is important for baking clay. Each type of clay has its own temperature needs.
| Type of Clay | Temperature (°F) |
| Polymer Clay | 275 |
| Air-dry Clay | 170 |
| Modeling Clay | 250 |
Always check the clay package for specific instructions. This prevents burning and ensures proper hardening.
Monitoring The Baking Process
Keep an eye on your clay while it bakes. This helps avoid overcooking or undercooking.
- Preheat the toaster oven to the recommended temperature.
- Place clay pieces on a baking sheet.
- Set a timer based on the clay package guidelines.
- Check the clay halfway through the baking time.
- Let clay cool before handling to prevent cracks.
Credit: www.gatheringbeauty.com
Common Issues And Fixes
Baking clay at home without an oven can cause some problems. Knowing common issues helps you fix them fast.
This guide covers cracking, warping, and uneven hardening. Learn easy tips to improve your clay baking results.
Cracking And Warping
Clay often cracks or warps during baking without an oven. This happens if the clay dries too fast or unevenly.
- Keep the clay moist before baking to avoid cracks.
- Bake the clay slowly at low heat to prevent warping.
- Use a flat, heat-safe surface to keep clay shape stable.
- Let the clay cool down gradually after baking.
Uneven Hardening
Uneven hardening means some clay parts stay soft while others become hard. This happens if heat is not spread well.
| Cause | Fix |
| Heat source too close to one side | Rotate the clay regularly during baking |
| Clay thickness varies | Make clay pieces the same thickness |
| Uneven airflow | Use a fan or open window for air circulation |
| Too high baking temperature | Lower the temperature and bake longer |
Finishing Touches
Baking clay at home without an oven is just the start. Finishing touches make your project look smooth and polished. This stage improves the feel and appearance of your clay piece.
Two key steps help finish your clay: sanding and smoothing, then painting and sealing. Each step adds to the final quality.
Sanding And Smoothing
After baking, your clay may have rough edges or bumps. Sanding helps remove these flaws. Use fine sandpaper for best results.
- Start with medium grit sandpaper (around 150 grit)
- Gently rub the surface to smooth out bumps
- Switch to fine grit sandpaper (around 220 grit) for a smooth finish
- Wipe off dust with a damp cloth before painting
Painting And Sealing
Painting adds color to your clay piece. Choose acrylic paint for good coverage and fast drying. After painting, seal your work to protect it.
| Type | Purpose | Tips |
| Acrylic Paint | Adds color | Use thin layers, let dry between coats |
| Clear Sealer | Protects paint and clay | Use spray or brush-on sealer, apply evenly |
| Matte or Gloss Finish | Changes final look | Choose based on your desired shine |

Credit: www.youtube.com
Frequently Asked Questions
How Can I Bake Clay Without Using An Oven?
You can bake clay using alternatives like a stovetop, microwave, or air drying. Each method requires careful temperature control to avoid burning or cracking. Choose the method based on your clay type and workspace availability for best results.
What Is The Best Temperature To Bake Clay At Home?
Baking temperature depends on the clay brand but usually ranges between 230°F to 275°F (110°C to 135°C). Avoid exceeding recommended temperatures to prevent burning. Always refer to your clay’s instructions for precise baking temperatures.
Can I Use A Microwave To Bake Clay Safely?
Yes, some polymer clays can be microwaved at low power for short intervals. However, overheating can cause damage or release fumes. Use a microwave-safe container and monitor closely to ensure even baking without burning.
How Long Should I Bake Clay Without An Oven?
Baking time varies by clay thickness and method but generally takes 15 to 30 minutes. Thicker pieces may require longer baking or multiple sessions. Always follow clay instructions and test with small pieces first.
Conclusion
Baking clay at home without an oven is easy and fun. You can use simple tools like a stove or microwave. These methods save money and space. Just follow the steps carefully to get good results. Dry your clay slowly to avoid cracks.
Patience helps your clay harden well. Try different ways to see what works best for you. Enjoy creating your own clay art anytime, anywhere. Keep practicing, and your skills will improve quickly. Simple tools, little effort, great results.