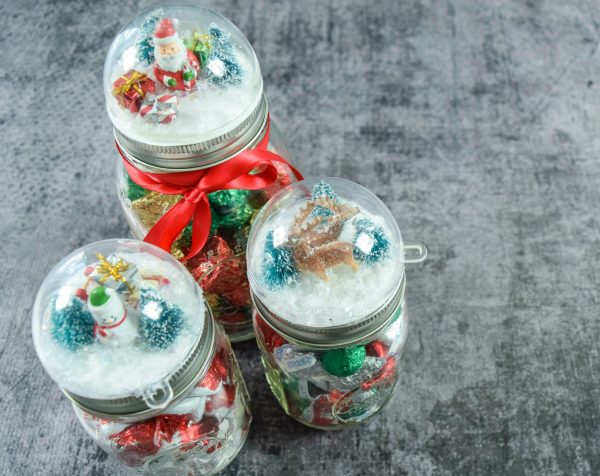
Are you looking for a fun and creative way to add a personal touch to your holiday decorations? A DIY holiday mason jar snow globe is the perfect project for you.
It’s simple, affordable, and lets you create a magical winter scene right at home. Imagine holding your own sparkling snow globe that you made yourself—how special would that feel? Keep reading, and you’ll discover easy steps to bring this charming holiday craft to life.
Your festive spirit will thank you!

Credit: www.youtube.com
Materials Needed
Making a DIY holiday mason jar snow globe is simple and fun. You only need a few basic materials to create a beautiful decoration.
Gathering the right supplies will help your snow globe last longer and look great on display.
Choosing The Right Jar
Select a jar that is clear and has a tight lid. Mason jars work best because they seal well and look classic.
Pick a size that fits the decorations you want to use. Small jars are cute, but bigger jars hold more details.
- Clear glass jar with wide mouth
- Tight-sealing lid to prevent leaks
- Size depends on your decoration ideas
Selecting Decorative Elements
Choose small, waterproof decorations for inside the globe. Tiny figurines, fake snow, and glitter work well.
Use decorations that match the holiday theme. Avoid items that can fade or dissolve in water.
- Mini holiday figurines or toys
- Artificial snow or glitter
- Small waterproof decorations
- Optional: small pine cones or beads
Glue And Sealants
Use strong waterproof glue to attach decorations to the jar lid. This keeps them in place when the jar is shaken.
Seal the jar with waterproof sealant around the lid. This prevents water from leaking out and keeps your snow globe safe.
- Waterproof craft glue or epoxy
- Clear silicone sealant for lids
- Protective gloves for safe handling
Credit: www.abbikirstencollections.com
Step-by-step Assembly
Creating a DIY holiday mason jar snow globe is fun and easy. Follow these clear steps to build your own festive decoration.
This guide will walk you through preparing the jar lid, arranging the scene inside, filling with water and glitter, and sealing the globe.
Preparing The Jar Lid
Start by cleaning the jar lid thoroughly. Remove any labels or glue to ensure a smooth surface for your scene.
Next, choose small decorations that will fit inside the jar. Use waterproof glue to attach them firmly to the underside of the lid.
Arranging The Scene Inside
Plan the layout of your mini scene before gluing. Place items like tiny trees, figurines, or fake snow to create a festive look.
- Use waterproof glue for all decorations
- Keep the scene small to fit inside the jar
- Allow glue to dry completely before next steps
Filling With Water And Glitter
Fill the jar almost to the top with distilled water. Add a few drops of glycerin to slow down the falling glitter.
| Ingredient | Amount |
|---|---|
| Distilled Water | Almost full jar |
| Glycerin | 5-10 drops |
| Glitter | 1 teaspoon |
Sprinkle the glitter inside the jar. Use fine glitter for the best snow effect.
Sealing The Globe
Carefully screw the lid with the glued scene onto the jar. Make sure it is tight and secure to prevent leaks.
For extra sealing, apply waterproof glue or silicone around the lid’s edge. Let it dry fully before shaking your snow globe.
Creative Design Tips
Making a holiday mason jar snow globe is a fun way to decorate. You can use many items to make it look special and bright.
Here are some design tips to help you create a unique snow globe with simple materials.
Using Miniature Figures
Choose small figures that match your holiday theme. Tiny trees, animals, or people add charm. Place them carefully to create a small scene inside your jar.
- Pick figures made of plastic or resin for durability
- Use glue to fix the figures on the jar lid
- Arrange figures with space so the scene looks clear
- Avoid very tall figures that won't fit the jar
Adding Natural Elements
Natural items add a fresh, cozy feel. Think about pinecones, small twigs, or dried berries. These pieces bring texture and color to your snow globe.
| Natural Element | Effect |
|---|---|
| Pinecones | Add rustic charm and texture |
| Twigs | Create a woodland look |
| Dried Berries | Bring bright color and contrast |
| Artificial Snow | Mimics real snow for a winter feel |
Incorporating Led Lights
LED lights make your snow globe shine at night. Use small battery-powered lights to keep the jar safe and easy to use.
Try these LED light tips:
- Use fairy string lights for soft glow
- Hide the battery pack behind the lid
- Choose warm white or colored lights
- Turn lights on for a magical effect

Credit: www.1905farmhouse.com
Safety And Maintenance
Building a DIY holiday mason jar snow globe is fun and creative. Keeping it safe and clean helps it last longer. Proper care prevents damage and keeps the globe looking clear.
Follow simple safety and maintenance tips to enjoy your snow globe every holiday season. This guide covers sealing, cleaning, and storing your creation.
Ensuring A Tight Seal
Sealing your mason jar snow globe tightly stops water from leaking. It also keeps dirt and dust out. Use waterproof glue or silicone around the lid for a strong seal.
- Clean the jar rim before sealing.
- Apply glue evenly on the lid’s edge.
- Press the lid firmly onto the jar.
- Let it dry for 24 hours before use.
Avoiding Mold And Cloudiness
Mold and cloudy water spoil your snow globe. Use distilled water and add a small amount of antifreeze like glycerin. This keeps the water clear and clean.
| Cause | How to Prevent |
| Mold Growth | Use distilled water and antifreeze |
| Cloudy Water | Seal jar tightly, avoid air leaks |
| Dirt Inside | Clean jar before filling |
Storage Suggestions
Store your snow globe in a cool, dry place. Avoid direct sunlight and heat to stop water from evaporating. Handle gently to prevent cracks or breaks.
- Place in a padded box or cloth bag.
- Keep away from windows or heaters.
- Check the seal before storing for long periods.
- Refill water if it appears low.
Gift And Decoration Ideas
DIY holiday mason jar snow globes make great gifts and decorations. They add a cozy, personal touch to any space. You can customize them to match the style of your home or the taste of your friends and family.
These snow globes are simple to make and fun to display. They bring charm to holiday tables, shelves, or mantelpieces. You can also use them as thoughtful presents for loved ones.
Personalizing For Loved Ones
Adding personal touches makes each snow globe unique. Choose small figurines or items that reflect the receiver’s hobbies or interests. You can also write a short message or their name on the jar lid or label.
- Use miniatures like animals, trees, or holiday characters
- Add glitter or fake snow in their favorite colors
- Include a small photo inside the globe for a personal memory
- Decorate the jar lid with ribbons, stickers, or paint
Display Options
You can show your mason jar snow globes in many ways. Group several together for a festive centerpiece. Place them on shelves or windowsills to catch light. You can also hang them using decorated wire or ribbons.
| Display Spot | Effect |
| Dining Table Centerpiece | Creates a warm, inviting look |
| Window Sill | Lets sunlight sparkle on the snow |
| Fireplace Mantel | Adds cozy holiday charm |
| Hanging from Hooks | Offers a unique decoration style |
Combining With Other Crafts
Mix your mason jar snow globe with other craft projects for more fun. Pair with handmade ornaments or wreaths. You can also create matching gift tags or cards for a full holiday set.
Ideas for combining crafts:
- Make a wreath using pine cones and tie small snow globes to it
- Create matching gift tags with the same glitter or paint colors
- Use painted wooden blocks to create a display stand
- Craft handmade ornaments to hang alongside your snow globes
Frequently Asked Questions
What Materials Are Needed For A Diy Holiday Mason Jar Snow Globe?
You need a mason jar, distilled water, glycerin, glitter, waterproof figurines, and a strong adhesive. These materials ensure a clear, long-lasting snow globe with festive charm.
How Do You Seal The Mason Jar To Prevent Leaks?
Use a waterproof adhesive to securely glue the jar lid and base together. This prevents water leakage and keeps the glitter floating inside.
Can I Customize My Snow Globe With Different Decorations?
Yes, you can use various figurines, glitter colors, and even add fake snow. Customizing makes your snow globe unique and perfect for holiday decor.
How Long Does A Diy Mason Jar Snow Globe Last?
If sealed properly, it can last for years without water evaporation or mold growth. Proper sealing is key to durability.
Conclusion
Creating a holiday mason jar snow globe brings joy and fun to your home. It uses simple materials anyone can find. You can personalize it with your favorite small decorations. This project suits all ages and skill levels. It makes a perfect gift or festive decoration.
Try making one and enjoy the holiday spirit. Crafting this snow globe can brighten your season. Give it a try and create lasting memories.