Setting up your home theater system can transform your living room into a true entertainment hub. But wiring it to your TV might seem confusing or even overwhelming.
Don’t worry—you’re about to learn simple, step-by-step tips that make the process clear and stress-free. Imagine sinking into your couch, surrounded by rich sound and crystal-clear picture, all thanks to your perfectly connected system. Keep reading, and you’ll discover exactly how to wire your home theater to your TV like a pro—no tech skills needed.
Choosing The Right Equipment
Wiring a home theater system to your TV starts with picking the right equipment. Good choices make setup easier and improve sound quality.
Focus on a receiver, speakers, and the cables you need. Each part plays a key role in your home theater experience.
Selecting A Compatible Receiver
Choose a receiver that matches your TV and speaker setup. Check for enough inputs and outputs for all devices.
Look for receivers that support HDMI connections and the latest sound formats. Make sure it fits your room size and power needs.
Picking Speakers For Your Space
Speakers should fit your room size and seating layout. Larger rooms need bigger or more speakers for good sound.
- Front left and right speakers deliver most sound.
- A center speaker handles dialogue clearly.
- Surround speakers add immersive effects.
- Subwoofers provide deep bass sounds.
- Consider wall-mounted or floor-standing options.
Necessary Cables And Connectors
You need the right cables to connect everything. Use quality cables for better signal and less interference.
| Type | Purpose | Tip |
| HDMI | Connects receiver to TV and devices | Use high-speed HDMI cables |
| Speaker Wire | Connects receiver to speakers | Choose wire thickness based on length |
| Optical Cable | Digital audio connection | Good for TVs without HDMI ARC |
| RCA Cable | Analog audio or subwoofer | Use for older devices |

Credit: columbiaisa.50webs.com
Preparing Your Setup Area
Setting up your home theater system starts with a clean and organized space. This makes wiring easier and keeps everything neat.
Take time to plan where each speaker and cable will go before you begin. This helps avoid confusion later.
Optimal Speaker Placement
Place speakers where sound can fill the room evenly. Avoid placing them too close to walls or corners.
Front speakers should be at ear level when you sit. Surround speakers should be slightly behind or to the side.
- Center speaker goes above or below the TV
- Front left and right speakers should be at equal distance from the TV
- Surround speakers placed slightly above ear level
Organizing Cable Management
Keep cables tidy to prevent tangles and damage. Use cable ties or clips to group wires neatly.
Label cables to know which one connects to each device. This saves time when troubleshooting or adjusting connections.
- Group cables by type or device
- Use cable sleeves or covers for protection
- Keep power and audio cables separate to reduce interference
Ensuring Power Accessibility
Make sure power outlets are near your devices. Avoid overloading a single outlet with many plugs.
Use power strips with surge protection to keep your equipment safe. Check that cords reach without stretching.
- Place power strips where they are easy to reach
- Check cable lengths before setup
- Avoid placing power cords under rugs or heavy furniture
Connecting The Receiver To The Tv
Wiring your home theater receiver to your TV is important for good sound and video. The connection affects the quality of your movie and music experience.
There are several ways to connect the receiver to the TV. Each method works best with different equipment and needs.
Using Hdmi Arc Or Earc Ports
HDMI ARC (Audio Return Channel) and eARC allow audio to travel both ways between your TV and receiver. This means you use one HDMI cable for sound and video.
To use this, connect an HDMI cable to the HDMI ARC or eARC port on your TV. Plug the other end into the receiver’s matching HDMI ARC or eARC port.
- Check that both TV and receiver support ARC or eARC
- Use a high-speed HDMI cable for eARC
- Enable HDMI-CEC settings for better control
Alternative Optical And Rca Connections
If your TV or receiver does not support HDMI ARC, use optical or RCA cables instead. Optical cables carry digital audio signals.
RCA cables carry analog signals with separate red and white plugs. These cables do not carry video.
- Connect the optical cable from TV’s optical out to receiver’s optical in
- Use RCA cables for older devices without digital audio ports
- Ensure cables are firmly connected to avoid sound issues
Configuring Receiver Settings
After connecting cables, adjust your receiver settings. This ensures the best sound output and proper device control.
Set the input source on the receiver to match the connection type. Turn on HDMI-CEC or ARC features if available.
- Select HDMI ARC or Optical as the audio source
- Enable surround sound modes if your system supports them
- Adjust speaker levels and distances for balanced sound
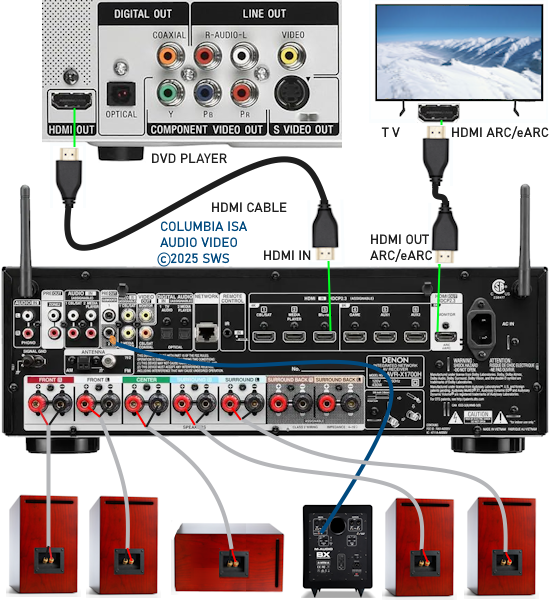
Credit: columbiaisa.50webs.com
Wiring The Speakers To The Receiver
Connecting your speakers to the receiver is important for good sound quality. This guide helps you wire the speakers correctly.
Follow easy steps to make sure each speaker works well with your home theater system.
Identifying Speaker Terminals
Look at the back of the receiver to find speaker terminals. Each speaker has a matching terminal on the receiver.
Terminals are usually red and black. Red is positive (+) and black is negative (–). Match these when wiring.
- Red terminal: positive (+)
- Black terminal: negative (–)
- Different speakers have labeled terminals like Front Left, Center, Surround
Stripping And Connecting Speaker Wires
Use wire strippers to remove about half an inch of insulation from each wire end. This exposes the copper wire inside.
Insert the exposed wire into the correct terminal. Tighten the terminal so the wire stays firmly in place.
- Strip 0.5 inch of insulation from wire ends
- Twist wire strands to keep them together
- Insert wire into matching terminal (red to red, black to black)
- Tighten the terminal securely
Balancing Speaker Levels
After wiring, adjust each speaker’s volume level on the receiver. This balances the sound across the room.
Use the receiver’s test tone or calibration feature. Move around the room to hear if all speakers sound equal.
- Play test tone from the receiver
- Listen to each speaker at your seating area
- Adjust volume levels for each speaker on the receiver
- Ensure sound is even and clear from all speakers
Testing And Calibrating Sound
Testing and calibrating your home theater sound is important for clear audio. It helps you hear every detail from movies and music.
Proper sound setup improves your experience and makes your system work its best.
Running Sound Tests
Start by playing test tones to check each speaker. This lets you hear if all speakers work well.
Use built-in test sounds or audio files with tones at different frequencies.
- Play sound through each speaker one at a time
- Listen for clear, even volume and no distortion
- Check that surround and subwoofer speakers activate properly
Adjusting Bass And Treble
Bass and treble control the low and high sounds in your system. Adjust them to suit your room and preferences.
Too much bass can make sound muddy. Too much treble can cause harshness.
- Start with bass and treble set to neutral or zero
- Increase bass slowly until it feels full but clear
- Raise treble for crispness without sharpness
- Make small changes and listen carefully
Using Room Calibration Tools
Room calibration tools help adjust sound based on your room's size and shape. They improve sound balance and clarity.
Many home theater receivers have built-in calibration microphones and software.
- Place the calibration microphone at your main listening spot
- Run the automatic calibration process on your receiver
- Let the system adjust speaker levels and delays
- Review and fine-tune settings if needed
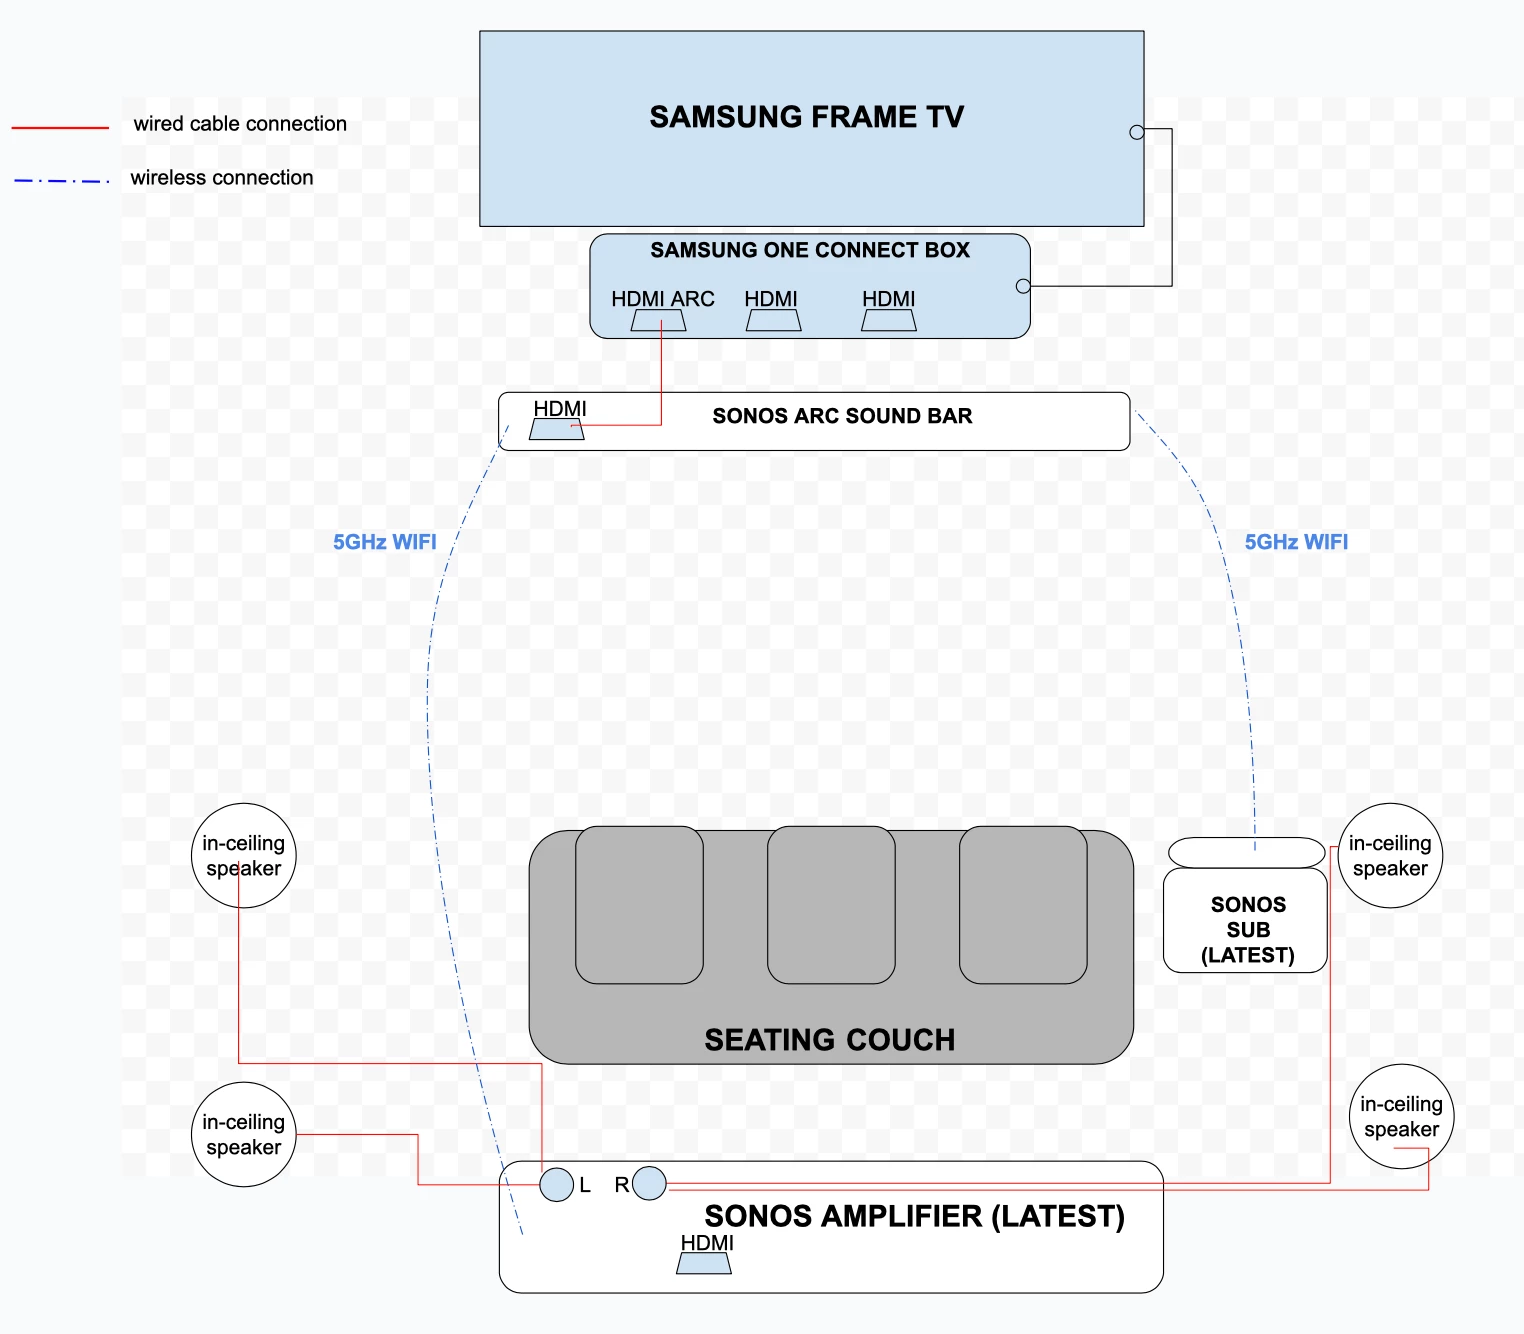
Credit: en.community.sonos.com
Troubleshooting Common Issues
Wiring a home theater system to your TV can sometimes lead to problems. This guide will help you troubleshoot common issues you might face.
Let’s explore some typical problems and their solutions to ensure your home theater system works perfectly with your TV.
No Sound Or Distorted Audio
If you're not hearing sound, or if the audio is distorted, there might be a few reasons. Check the following to resolve the issue:
- Ensure all cables are connected properly.
- Check the volume levels on both your TV and receiver.
- Make sure the correct audio input is selected.
- Inspect the speakers for any visible damage.
- Test with a different audio source to rule out media issues.
Sync Problems Between Tv And Receiver
Sometimes, audio and video might not sync properly. This could be due to settings or connection issues.
Try adjusting the audio delay settings on your receiver or TV. Check your device manuals for specific instructions.
Fixing Connection Errors
Connection errors can prevent your home theater from functioning correctly. Here's a table to help troubleshoot common connection issues:
| Issue | Solution |
| Loose Cable | Secure all connections firmly. |
| Wrong Input | Select the correct input source on the TV. |
| Damaged Cable | Replace with a new cable. |
Frequently Asked Questions
How Do I Connect My Home Theater System To A Tv?
Use HDMI ARC or optical cables to connect your home theater to the TV. Ensure both devices support the chosen connection for best audio quality.
What Type Of Cables Are Best For Home Theater Wiring?
HDMI cables are ideal for transmitting both audio and video signals. Optical cables are a good alternative for audio-only connections.
Can I Wire My Home Theater System Wirelessly To My Tv?
Yes, many modern home theater systems support Bluetooth or Wi-Fi connections. This allows wireless audio streaming without cable clutter.
How Do I Set Up Audio Settings After Wiring?
Access your TV’s audio settings and select the external speaker or home theater option. Adjust volume and sound modes for optimal experience.
Conclusion
Wiring your home theater system to the TV can be simple. Follow the steps carefully and check each connection. Use the right cables and ports for best sound and picture. Take time to organize wires neatly. Test the system before final setup.
Enjoy clear audio and sharp visuals in your room. This small effort brings big entertainment benefits. Your movie nights will feel more exciting and real. Keep this guide handy for quick reference anytime.