Have you ever wondered how steel is made? Imagine turning raw materials into strong, shiny steel right in your own backyard.
Smelting steel at home might sound complicated, but with the right steps, you can do it yourself. This guide will show you exactly how to make steel safely and effectively. By the end, you’ll have the skills to create your own steel and impress everyone with your craftsmanship.
Ready to unlock the secrets of steel smelting? Let’s get started!
Materials And Tools Needed
Smelting steel at home requires careful preparation and the right materials. You need raw materials, equipment, and safety gear.
This guide covers what you need to get started safely and effectively.
Essential Raw Materials
The main raw materials for smelting steel are iron ore and carbon. Iron ore is the base metal, and carbon helps turn it into steel.
You can also add flux to remove impurities during smelting.
- Iron ore (hematite or magnetite)
- Carbon source (charcoal or coke)
- Flux (limestone or silica)
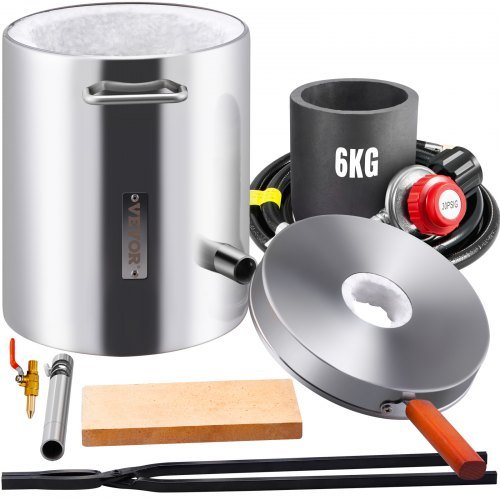
Required Equipment
You need tools that can handle very high temperatures. A furnace or forge is essential to melt the metals.
Other tools help shape and handle the molten steel safely.
- Metal furnace or forge
- Crucible to hold molten metal
- Tongs to handle hot materials
- Anvil and hammer for shaping
- Blower or bellows for airflow
Safety Gear
Smelting steel is dangerous without safety gear. Protect your skin, eyes, and lungs from heat and fumes.
Always wear proper equipment before starting your work.
- Heat-resistant gloves
- Protective goggles or face shield
- Fireproof apron or clothing
- Respirator mask for fumes
- Closed-toe, sturdy boots
Preparing The Workspace
Smelting steel at home requires a safe and organized workspace. Preparing the area helps prevent accidents and improves efficiency.
This guide covers how to pick the best spot, set up good airflow, and arrange your tools and materials.
Choosing A Suitable Location
Pick a place outside or in a well-ventilated garage. Avoid areas near flammable items. The ground should be flat and stable to hold equipment safely.
Setting Up Ventilation
Good ventilation removes smoke and fumes. Open windows and doors to create airflow. Use fans to push air outside.
- Keep an exhaust fan near the smelting area
- Use a chimney or vent hood if possible
- Wear a mask to protect from dust and fumes
- Avoid working in enclosed spaces without airflow
Organizing Tools And Materials
Arrange all tools and materials within reach. This saves time and keeps the workspace tidy. Separate tools by type for easy access.
| Tool/Material | Purpose | Storage Tip |
| Crucible | Hold molten steel | Place on heat-resistant surface |
| Tongs | Handle hot materials | Hang on a hook nearby |
| Protective gloves | Safety for hands | Keep near workspace entrance |
| Flux | Clean steel | Store in sealed container |
Creating The Furnace
Making a furnace is the first step to smelt steel at home. The furnace heats the metal to high temperatures needed for smelting.
This guide covers furnace types, building a simple furnace, and fuel setup. Each part is important to get good results.
Selecting Furnace Types
You can choose from several furnace types for home steel smelting. Each type has pros and cons based on cost, heat, and materials.
- Clay furnace: Easy to make but less durable and lower heat.
- Brick furnace: More durable and holds heat better than clay.
- Metal furnace: Can reach high heat quickly but needs good insulation.
- Electric furnace: Clean and precise but expensive and needs power source.
Building A Simple Furnace
A simple furnace can be built with bricks or clay and a metal container. It should hold heat and allow airflow for burning fuel.
Basic furnace parts include:
- Outer shell made of fire bricks or clay
- A metal container or drum inside to hold the steel
- Air vents or holes to provide oxygen for combustion
- A top opening for adding metal and fuel
Fuel Options And Setup
Choosing the right fuel is key to reaching the temperature needed to smelt steel. Common fuels include charcoal, coal, and propane.
| Fuel Type | Heat Level | Availability | Setup Notes |
| Charcoal | High | Easy | Use with good airflow for best burn |
| Coal | Very High | Moderate | Needs strong air supply; produces more smoke |
| Propane | Very High | Variable | Requires gas burner setup; cleaner burn |

Credit: www.vevor.ca
Smelting Process
Smelting steel at home requires care and attention. The process changes raw materials into molten steel.
Each step in the smelting process is important for good results. You need to control heat, add materials, watch temperature, and extract the steel safely.
Heating The Furnace
Start by heating your furnace to a very high temperature. Use charcoal or propane to reach about 1,600°C (2,912°F). The furnace must be hot enough to melt the steel.
Adding Raw Materials
Add iron ore, scrap steel, and a carbon source like charcoal to the furnace. These raw materials will combine to form molten steel.
- Iron ore provides the iron content
- Scrap steel adds extra metal
- Charcoal acts as a fuel and carbon source
- Mix materials evenly to ensure good melting
Monitoring Temperature
Keep track of the furnace temperature with a thermometer or pyrometer. The ideal range is 1,400°C to 1,600°C.
| Temperature (°C) | Effect |
| Below 1,400 | Steel will not melt properly |
| 1,400 - 1,600 | Optimal melting range |
| Above 1,600 | Risk of damage to furnace and material loss |
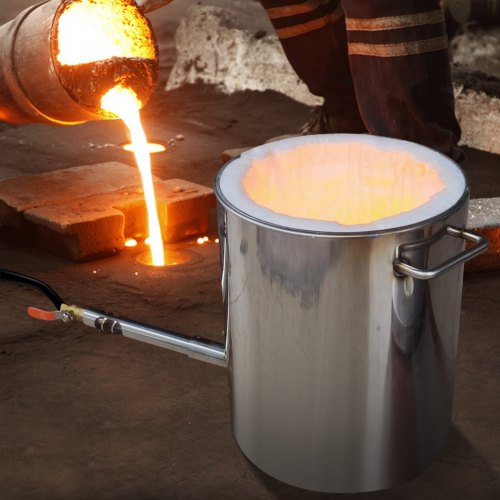
Extracting Molten Steel
Once the steel is molten, carefully pour it into a mold. Use heat-resistant gloves and tools to avoid burns.
Safety Tips for Extraction:
- Wear protective gear like gloves and goggles
- Use tongs and ladles made for high heat
- Work in a well-ventilated area
- Keep a fire extinguisher nearby
Cooling And Shaping Steel
Smelting steel at home can be exciting. Cooling and shaping steel are key steps in this process. These steps affect the final quality of your product.
Learning safe cooling techniques and basic forging methods is important. Let's explore how to cool and shape steel safely and effectively.
Safe Cooling Techniques
Cooling steel safely prevents accidents and improves the steel's quality. Different methods can affect the steel's strength and durability.
- Use water to cool steel quickly
- Air cooling is slower but safer
- Oil cooling adds surface hardness
Basic Forging Methods
Forging gives steel its shape. Basic forging involves heating, hammering, and cooling. Beginners should practice these methods carefully.
- Heat steel until red-hot
- Hammer steel on an anvil
- Reheat as needed to maintain workability
Shaping Tips For Beginners
Shaping steel requires patience and practice. Beginners should start with simple shapes to gain experience and confidence.
Use tools like hammers and anvils. Wear safety gear to protect from heat and sparks.
- Plan your shape before you start
- Use consistent hammer strikes
- Take breaks to avoid fatigue
Credit: www.vevor.ca
Troubleshooting Common Issues
Smelting steel at home can be tricky. Many problems can occur during the process.
Knowing how to fix common issues helps you get better results. This guide covers key problems and solutions.
Temperature Problems
Steel needs a very high temperature to melt properly. Too low heat will not melt the metal.
Too high heat can cause damage or burn the materials. Keep your furnace temperature steady.
- Use a reliable thermometer to check the heat
- Adjust fuel supply to control temperature
- Allow time for the furnace to reach the right heat
- Keep airflow consistent for proper burning
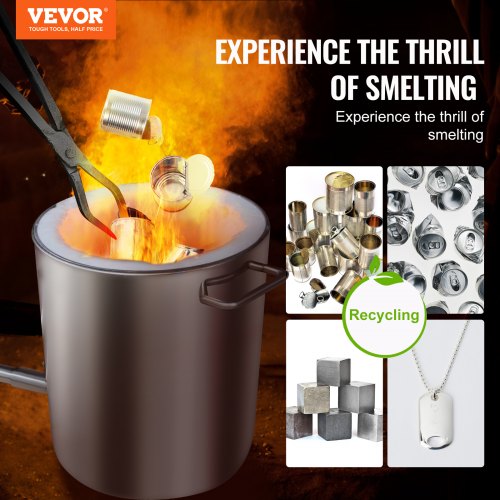
Material Impurities
Impurities in your metal can weaken the steel. Dirt, rust, and other materials cause problems.
Clean your raw materials before smelting. Remove any unwanted parts to get purer steel.
- Sort metals to separate clean steel from scrap
- Wash and dry metals before use
- Avoid mixing different metals that may react badly
- Use flux to help remove impurities during melting
Furnace Malfunctions
Furnace problems stop the smelting process. These include poor airflow or broken parts.
Check your furnace regularly to keep it working well. Fix any leaks or blockages fast.
- Inspect the furnace for cracks or holes
- Clean out ash and debris after each use
- Make sure the blower or fan runs smoothly
- Replace worn or damaged parts as needed
Maintenance And Cleanup
Keeping your steel smelting setup clean is important. It ensures safety and efficiency.
Regular maintenance extends the life of your tools and equipment. Follow these tips for best results.
Furnace Care Tips
Your furnace needs regular attention to work well. Clean it after each use.
- Remove ash and debris from the furnace.
- Check for cracks or damage in the lining.
- Ensure the air vents are clear and unobstructed.
Disposing Of Waste Safely
Proper disposal of waste is crucial. It prevents hazards and keeps the environment safe.
Use designated containers for metal scraps and hazardous waste.
Contact local waste management for disposal guidelines.
Tool Maintenance
Tools need care to function properly. Inspect them regularly for wear and tear.
| Tool | Maintenance Task |
| Hammer | Check handle for splits |
| Tongs | Ensure grip is firm |
| Protective Gear | Inspect for tears or holes |
Credit: www.vevor.ca
Frequently Asked Questions
What Materials Are Needed To Smelt Steel At Home?
You need iron ore, charcoal or coke, flux (like limestone), a furnace, and crucibles. Safety gear is essential. These materials enable effective smelting and steel production.
How Hot Should The Furnace Be For Smelting Steel?
Maintain furnace temperatures between 2,500°F and 2,800°F (1,370°C to 1,540°C). This heat melts iron ore and removes impurities for quality steel.
Can I Smelt Steel Safely Without Professional Training?
Yes, but only with proper safety equipment, ventilation, and thorough research. Beginners should start small and follow expert guidelines to minimize risks.
How Long Does The Steel Smelting Process Take At Home?
Typically, smelting takes 1 to 3 hours depending on furnace size and materials. Cooling and finishing add more time before steel is usable.
Conclusion
Smelting steel at home takes patience and care. Follow each step closely for good results. Use safe tools and wear protective gear. Practice helps improve your skills over time. Enjoy the process of creating steel yourself. Keep learning and stay curious about metalwork.
Your efforts will lead to better steel each time. Simple tools and effort make home smelting possible. Try it, and see what you can create!