Are you looking to give your living room chair a fresh, stylish look without spending a fortune? Reupholstering your chair with piping can add a professional, polished touch that makes your furniture stand out.
It might sound tricky, but with the right steps, you can transform your chair yourself—and feel proud of the result. In this guide, you’ll discover how to bring new life to your chair using piping, making your space look elegant and unique.
Keep reading, and you’ll learn the simple secrets to master this rewarding DIY project.
Materials And Tools Needed
Reupholstering a living room chair with piping gives it a fresh look. You need the right materials and tools for a smooth process.
This guide helps you pick the fabric, piping, and tools needed to start your project.
Choosing The Right Fabric
Pick fabric that feels good and lasts long. It should match your room’s style and be easy to clean.
Look for fabrics made for furniture. They handle wear and tear well.
- Cotton blends are soft and durable
- Leather is strong and easy to clean
- Microfiber resists stains and fading
- Linen has a natural look but wrinkles easily
Selecting Piping Material
Piping adds a neat border to your chair. Choose piping that matches or contrasts with the fabric.
Use durable materials for piping so it keeps shape and stays attached.
- Fabric-covered piping blends with upholstery
- Vinyl piping is easy to clean and strong
- Corded piping offers a firm edge
- Choose piping color carefully for style
Essential Tools For Reupholstery
Having the right tools makes reupholstering easier and faster. Prepare all tools before you start.
- Staple gun with staples for securing fabric
- Scissors for cutting fabric and piping
- Measuring tape to get accurate dimensions
- Flathead screwdriver or pliers to remove old staples
- Needle and strong thread for sewing piping
- Chalk or fabric marker for marking cuts
- Hammer to help with tacking and staples

Credit: linwoodfabric.com
Preparing The Chair
Before adding new fabric and piping, you must prepare the chair well. This step helps the new upholstery fit perfectly.
Cleaning and fixing the chair frame ensures your work lasts a long time and looks good.
Removing Old Fabric And Padding
Start by taking off the old fabric carefully. Use a staple remover or pliers to pull out staples and tacks.
Remove all old padding next. Check if the padding is still soft and clean. Throw away worn-out padding.
- Use gloves to protect your hands
- Keep the old fabric pieces for pattern reference
- Work slowly to avoid damaging the frame
Inspecting And Repairing The Frame
Look over the chair frame for cracks or loose joints. Check the legs and arms for stability.
Fix any damage by tightening screws or gluing loose parts. Sand rough spots to make the surface smooth.
- Use wood glue for small cracks
- Replace missing screws or nails
- Test the frame by pressing on different areas
Cutting Fabric And Piping
Reupholstering a living room chair needs careful fabric and piping cutting. This ensures a neat fit and a professional look.
Focus on accurate measuring and precise cutting to avoid wasting material or making errors that affect the chair’s appearance.
Measuring The Chair Accurately
Start by measuring all parts of the chair you want to cover. Include the seat, back, arms, and sides if needed.
- Use a tape measure and write down each dimension.
- Measure height, width, and depth of each section.
- Add extra inches for seams and tucking.
- Double-check measurements before cutting fabric.
Cutting Fabric Pieces
Cut fabric pieces based on the measurements taken. Use sharp scissors or a rotary cutter for clean edges.
| Chair Part | Measured Size (inches) | Fabric Cut Size (inches) |
| Seat | 20 x 18 | 22 x 20 |
| Back | 22 x 24 | 24 x 26 |
| Armrest | 8 x 14 | 10 x 16 |
Label each fabric piece to avoid confusion when sewing. Keep fabric grain in mind for a smooth finish.
Creating And Preparing Piping
Piping adds a polished edge to your chair’s upholstery. Make the piping using fabric strips and cording.
- Cut fabric strips about 2 inches wide and long enough to wrap around the cording.
- Fold the strip in half lengthwise, wrong sides together.
- Place the cording inside the fold and sew close to the edge.
- Trim seam allowances and press piping flat.
- Prepare enough piping to outline all chair edges.
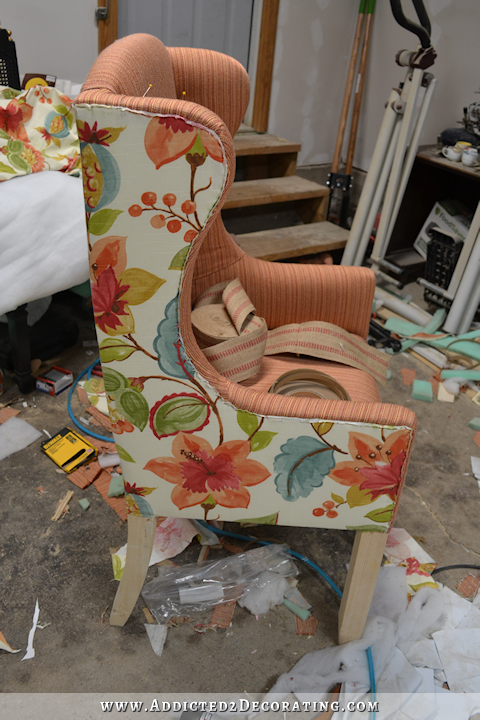
Attaching Piping To Fabric
Reupholstering a chair with piping gives it a neat finish. It adds a professional touch to the edges.
Attaching piping involves sewing it along the edges of the fabric. You need patience and precision for this task.
Sewing Piping Along Fabric Edges
Place the piping between two layers of fabric. Ensure the raw edges of the piping and fabric align.
Use a zipper foot to sew close to the piping cord. This ensures the piping stays in place and looks smooth.
- Pin the piping carefully to avoid movement
- Check the tension of your sewing machine
- Slow and steady sewing prevents mistakes
Tips For Smooth Piping Application
Cut the piping at a 45-degree angle for corners. This helps it bend smoothly around edges without bunching.
Iron the fabric before attaching the piping. Smooth fabric ensures the piping looks even and professional.
- Test on scrap fabric first
- Choose piping that matches or complements your fabric
- Use sharp scissors for clean cuts
Reupholstering The Chair
Reupholstering a chair can give it new life. It's a fun and rewarding project.
Follow these steps to reupholster your living room chair with piping. This guide helps you through the process.
Positioning Fabric With Piping
The first step is to position your fabric on the chair. Make sure the fabric is smooth and even.
- Lay the fabric on a flat surface.
- Place the piping along the edges.
- Ensure the fabric pattern is straight.
- Pin the fabric in place before moving to the chair.
Stapling And Securing Fabric
Now, secure the fabric to the chair using a staple gun. This step keeps the fabric tight and neat.
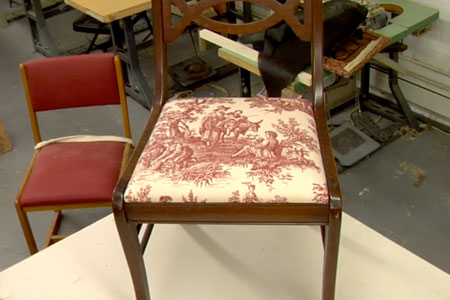
Adding Cushion And Padding
Adding cushion and padding makes the chair more comfortable. It also gives the chair a fuller look.
| Material | Purpose |
| Foam | Provides support |
| Batting | Softens edges |
| Fabric | Final cover |
Once these steps are done, your chair will look refreshed and new. Enjoy your reupholstered chair!
Credit: www.thisoldhouse.com
Finishing Touches
Finishing your living room chair reupholstery with piping adds a neat, polished look. It also helps secure fabric edges firmly in place.
In this section, you will learn how to trim excess fabric and perform a final inspection to ensure your chair looks perfect.
Trimming Excess Fabric
After attaching the fabric and piping, remove any extra material to prevent bulkiness. Use sharp scissors to cut close to the seams but avoid cutting the stitches.
- Check all edges for loose fabric folds.
- Trim fabric about ¼ inch from the seam line.
- Be careful near corners and curves to keep smooth shapes.
- Use pinking shears if possible to reduce fraying.
- Remove any stray threads to keep a clean finish.
Final Inspection And Adjustments
Look over the chair carefully to spot any imperfections or loose spots. Small adjustments can improve both appearance and durability.
| Inspection Point | What to Check | Action if Needed |
|---|---|---|
| Seams | Ensure all seams are tight and even. | Re-stitch any loose or uneven areas. |
| Piping | Piping should follow edges smoothly without gaps. | Adjust and re-staple if piping lifts. |
| Fabric Tension | Fabric must be smooth and wrinkle-free. | Pull fabric tighter and re-attach staples. |
| Staples | Staples should be hidden and secure. | Remove visible staples and replace them properly. |
| Overall Look | Check for symmetry and neatness on all sides. | Make small corrections for balance and appearance. |
Maintenance Tips
Keeping your reupholstered living room chair clean helps it last longer. Proper care protects the fabric and piping from damage.
Simple maintenance steps keep your chair looking fresh and neat every day.
Cleaning Upholstered Chairs
Dust and dirt can harm your chair’s fabric over time. Use a soft brush or vacuum to remove loose dirt gently.
Spot clean spills quickly with a damp cloth and mild soap. Avoid soaking the fabric to prevent damage.
- Vacuum weekly with a brush attachment
- Blot spills immediately, do not rub
- Use mild soap and water for stains
- Test cleaning products on a small area first
Protecting Piping And Fabric
Piping adds style but needs care to stay tight and clean. Avoid pulling or snagging the piping during cleaning.
Keep the chair out of direct sunlight to stop fabric and piping colors from fading. Rotate the chair if possible to spread out sun exposure.
- Handle piping gently when cleaning
- Keep chair away from direct sunlight
- Use fabric protectors suitable for upholstery
- Check piping edges regularly for loose threads

Credit: hymnsandhome.com
Frequently Asked Questions
What Materials Are Needed To Reupholster A Chair With Piping?
You need fabric, piping cord, upholstery foam, staple gun, scissors, and a sewing machine. These materials ensure a professional and durable finish.
How Do You Attach Piping To Chair Upholstery?
Sew the piping along fabric edges before stapling it to the chair frame. This creates a clean, tailored look and secures the piping firmly.
Can Beginners Reupholster A Living Room Chair With Piping?
Yes, beginners can reupholster with basic sewing and stapling skills. Following step-by-step instructions ensures good results even with minimal experience.
How Long Does Reupholstering A Chair With Piping Take?
Reupholstering typically takes 4 to 8 hours depending on chair complexity and skill level. Allow extra time for precise sewing and fitting.
Conclusion
Reupholstering a living room chair with piping adds style and durability. It takes patience but feels rewarding. Small steps bring big changes to your furniture. Choose fabric and piping that match your room well. Keep tools handy and work carefully for best results.
This project lets you refresh old chairs easily. Enjoy the new look and comfort you create yourself. Try it and see how your chair transforms. A little effort makes a big difference.