Want to transform your plain walls into a stunning stone masterpiece without the heavy cost or hassle of real stone? You’re in the right place.
Painting a stone wall effect is easier than you think, and with the right steps, your space can have that natural, textured look you’ve always wanted. Imagine the warm, rustic charm of stone bringing new life to your room—sounds amazing, right?
Keep reading, and you’ll discover simple tips and tricks to create this eye-catching effect yourself. By the end, you’ll be ready to impress everyone with your new, stylish walls. Let’s dive in!
Materials Needed
Painting a stone wall effect needs some special materials. These help create a textured and natural look.
Gathering the right supplies makes the painting process easier and the results better.
Choosing The Right Paint
Pick paint that works well on walls and gives a stone-like finish. Matte or eggshell paints are best.
Use colors in shades of gray, beige, or brown to look like real stone.
- Matte or eggshell finish paints
- Colors: gray, beige, brown, or mixed tones
- Water-based acrylic paint for easy cleanup
Tools And Supplies
You need specific tools to create the stone texture and paint details. These help add depth.
Basic tools include brushes, sponges, and rollers for different effects.
- Various paintbrush sizes (small and medium)
- Sea sponge or natural sponge for texture
- Paint roller with a smooth cover
- Palette or tray for mixing paint
- Painter’s tape to protect edges
Surface Preparation Items
Preparing the wall surface helps paint stick better and last longer. Clean and smooth the wall first.
Use these items to fix cracks and protect areas you do not want painted.
- Sandpaper or sanding block for smoothing
- Spackle or filler for cracks and holes
- Putty knife to apply filler
- Cleaner or detergent to wash the wall
- Drop cloth or plastic sheet to cover floors
Preparing The Wall
Painting a stone wall effect starts with good preparation. A clean and smooth wall helps paint stick better.
Take time to prepare the wall well. This makes your stone effect look real and last longer.
Cleaning The Surface
Remove dirt, dust, and grease from the wall. A clean surface helps the paint stick evenly.
Use soap and water or a mild cleaner. Rinse well and let the wall dry completely before painting.
- Use a scrub brush for tough dirt
- Rinse thoroughly with clean water
- Wait for the wall to dry fully
Repairing Imperfections
Check the wall for cracks, holes, or loose paint. Fix these problems before painting.
Fill cracks and holes with wall filler or spackle. Sand the surface smooth when dry to avoid bumps.
- Scrape off loose or flaking paint
- Apply filler to holes and cracks
- Sand the repaired areas smooth
Priming The Wall
Apply a primer to the wall before painting. Primer helps paint stick and shows the true color.
Choose a primer suitable for your wall type. Use a brush or roller to cover the whole surface evenly.
- Use masonry primer for brick or concrete walls
- Apply one even coat of primer
- Let the primer dry completely before painting
Base Coat Application
Painting a stone wall effect starts with applying a good base coat. This coat sets the foundation for the texture and colors you want to create.
Choosing the right colors and applying the paint evenly helps the final look appear natural and beautiful.
Selecting Base Colors
Select colors that match the type of stone you want to mimic. Earth tones like gray, beige, and brown work well for most stone effects.
- Use a medium shade as your main base color
- Choose lighter and darker shades for highlights and shadows
- Test colors on a small wall area before painting fully
Techniques For Even Coverage
Apply the base coat evenly to avoid streaks or blotches. Use the right tools and methods for smooth coverage.
- Use a roller for large flat areas
- Brush edges and corners carefully
- Apply thin layers to prevent drips
- Work in sections to keep a wet edge
- Check for missed spots and touch up
Drying Times
Allow the base coat to dry fully before adding texture or details. Drying times vary by paint type and temperature.
| Paint Type | Average Drying Time | Notes |
|---|---|---|
| Latex | 1-2 hours | Touch dry quickly, fully dry in 24 hours |
| Oil-based | 6-8 hours | Longer to dry, smooth finish |
| Acrylic | 30 minutes - 1 hour | Fast drying, water-resistant |

Credit: m.youtube.com
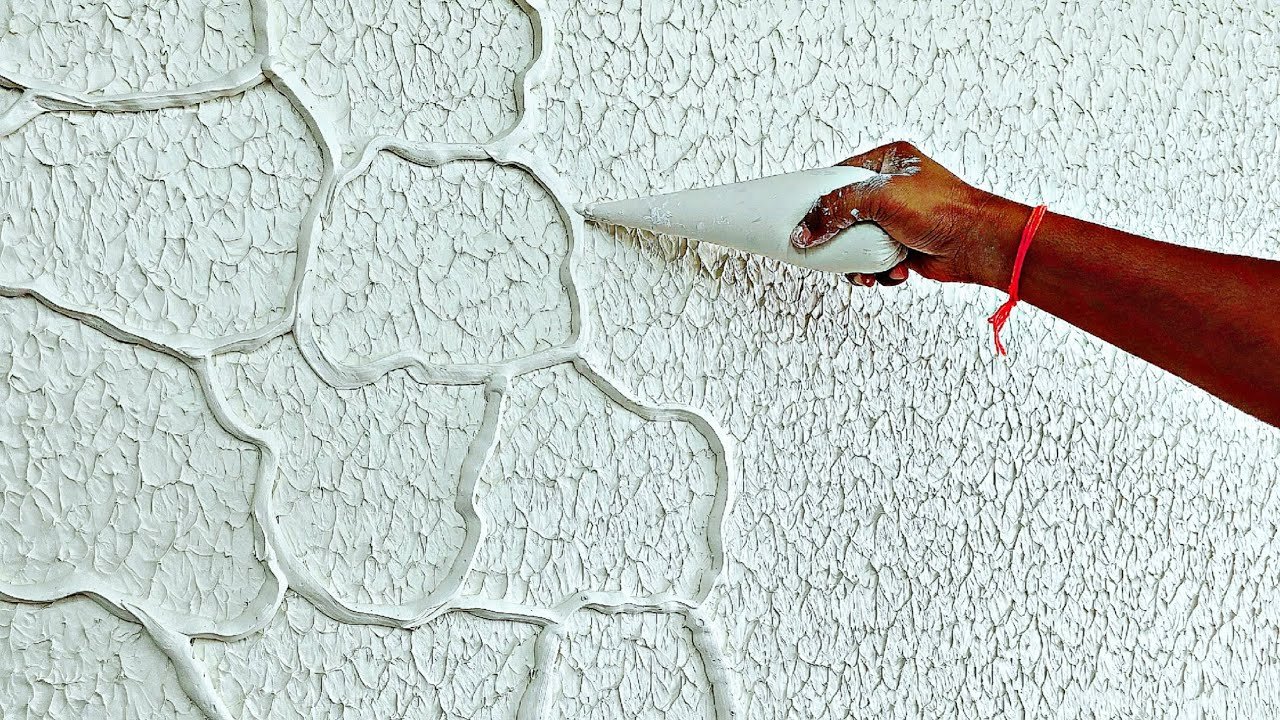
Creating Stone Texture
Painting a stone wall effect adds charm to any room. The key is to create a texture that looks real.
Use simple tools and techniques to mimic the look of stone surfaces. Texture is the main focus.
Using Sponges And Brushes
Sponges and brushes help create the uneven surface of stone. Dab paint with a sponge for a rough look.
Use a stiff brush to add small scratches and spots. This adds to the natural feel of stone.
- Dab paint with a sea sponge for irregular shapes
- Use a dry brush to add texture lines
- Mix both tools for varied stone effects
Layering Colors
Apply several paint layers to build the stone’s color depth. Start with a light base coat.
Add darker and lighter shades on top. Blend edges softly to avoid harsh lines.
- Base coat in a light gray or beige
- Mid-layer with darker gray or brown
- Highlight edges with a light color
Adding Depth And Dimension
Use shadows and highlights to give stones a 3D effect. Paint shadows under stones to lift them.
Highlight stone edges with a lighter color. This makes the texture look more real.
- Shade crevices with dark paint
- Highlight raised areas lightly
- Use a soft brush for smooth blending
Detailing And Highlights
Painting a stone wall effect needs careful detailing. Highlights make the stones look real and lively.
Small touches bring out the texture and depth in your painted stones.
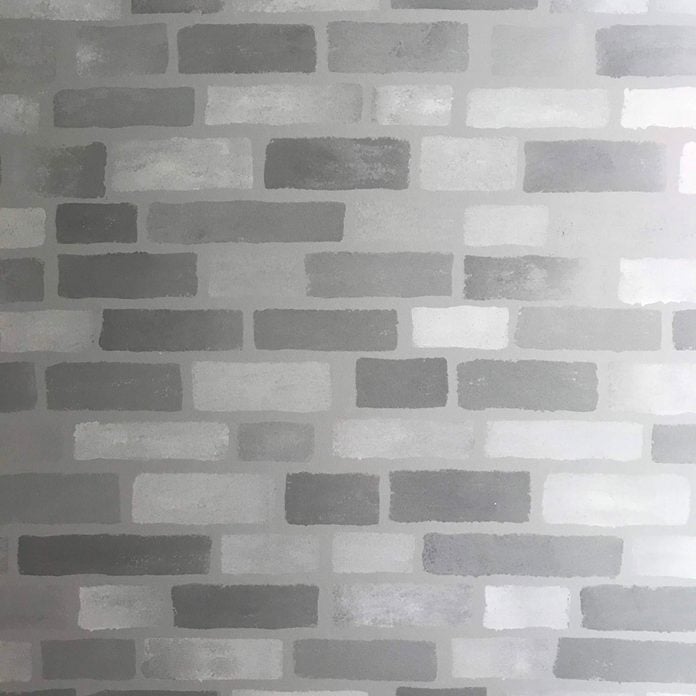
Painting Grout Lines
Grout lines separate the stones and give structure. Paint them with a darker shade to create depth.
Use a thin brush to keep the lines neat and clean. This makes the stone shapes clear.
- Choose a dark gray or brown color for grout lines.
- Paint carefully between each stone shape.
- Keep lines thin for a realistic look.
Enhancing Shadows
Shadows add three-dimensional effect to stones. Paint shadows on one side of each stone.
Use a mix of dark colors like deep gray or blue to make soft shadows.
- Focus on edges and corners of stones.
- Blend shadows gently into the stone color.
- Keep shadows consistent with a light source direction.
Adding Natural Stone Variations
Real stones have color changes and small marks. Add spots and streaks to copy this look.
Use lighter and darker shades of your base color for these variations.
- Apply small dots of different colors with a sponge or brush.
- Create thin streaks to show natural stone veins.
- Mix colors softly to avoid harsh lines.
Sealing And Finishing
Sealing a painted stone wall effect is crucial for durability. It protects the surface from damage and enhances its look.
Finishing touches ensure the wall remains vibrant and well-protected over time.
Choosing Sealants
Selecting the right sealant is key to a long-lasting finish. Different types of sealants offer various levels of protection.
- Water-based sealants are eco-friendly and easy to use.
- Solvent-based sealants provide a tougher finish but emit more fumes.
- Acrylic sealants give a glossy look to the wall.
Applying Protective Coats
After sealing, apply protective coats to ensure the wall's longevity. Protective coats shield against moisture and wear.
Ensure even coverage by using a brush or roller. Allow each coat to dry before applying the next.
For best results, apply two to three coats of protection.
Maintenance Tips
Regular maintenance keeps your stone wall effect looking fresh. Follow these simple tips to prolong its life.
| Task | Frequency |
| Dust the surface | Weekly |
| Reapply sealant | Every 2 years |
| Inspect for cracks | Monthly |
Common Mistakes To Avoid
Painting a stone wall effect can be fun, but mistakes can happen. Knowing what to avoid helps in achieving a great finish.
Let's explore the common pitfalls and how to steer clear of them.
Overworking The Paint
Many people keep brushing the paint too much. This can lead to an uneven look.
- Allow each layer to dry before adding more.
- Use steady, light strokes to blend colors.
- Avoid layering too thickly in one go.
Ignoring Surface Prep
Ignoring surface preparation is a common error. A well-prepared wall takes paint better.
Using Inappropriate Tools
The tools you choose matter. Wrong tools make the job harder and affect the result.
| Tool | Best Use |
| Roller | Large areas |
| Brush | Details and edges |
| Sponges | Texture creation |
Credit: www.familyhandyman.com
Credit: www.youtube.com
Frequently Asked Questions
What Materials Do I Need To Paint A Stone Wall Effect?
You need textured paint, base coat, sponge or brush, painter’s tape, and sealant. These create a realistic stone texture easily. Preparing the wall surface is essential for better paint adhesion and durability.
How Long Does It Take To Paint A Stone Wall Effect?
It usually takes 2 to 4 hours depending on wall size and drying time. Multiple layers and detailing extend the process. Proper drying between coats ensures a long-lasting stone effect finish.
Can Beginners Paint A Stone Wall Effect Successfully?
Yes, beginners can achieve good results with patience and practice. Following step-by-step tutorials and using the right tools simplify the process. Start with small sections to build confidence before tackling larger walls.
Is Painting A Stone Wall Effect Cost-effective?
Yes, it’s an affordable way to mimic expensive natural stone walls. It saves money on materials and installation compared to real stone. Plus, it adds aesthetic value to your space without major renovations.
Conclusion
Painting a stone wall effect adds charm to any space. It takes patience and simple steps to achieve a natural look. Use the right tools and colors for best results. Practice on a small area before starting the whole wall.
Enjoy the process and watch your wall transform. This technique brings texture and style without heavy costs. Try it yourself and see the difference it makes. A fresh, new wall can brighten your home instantly.