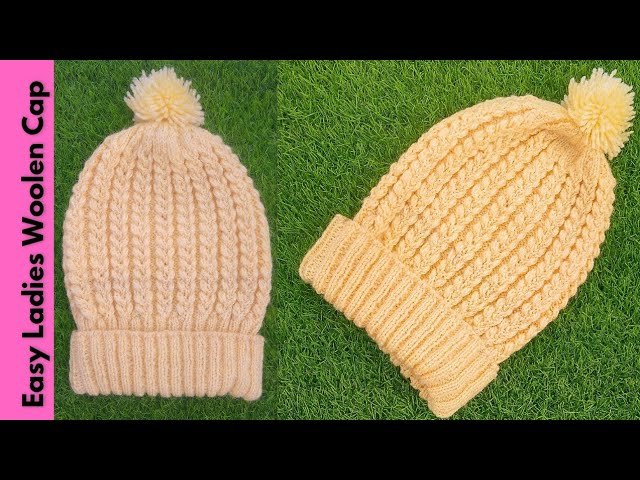
Are you looking for a simple way to create a warm, stylish woolen cap right at home? Imagine wearing a cozy cap that you made yourself, perfectly fitting your style and size.
Making a woolen cap at home is easier than you think, and you don’t need to be an expert. You will discover step-by-step instructions in Hindi that guide you through the entire process. By the end, you’ll have a unique cap that keeps you warm and stands out.
Ready to start? Let’s dive in and make your own woolen cap today!
Materials Needed
Making a woolen cap at home is easy and fun. You need some basic materials to start your project.
Here are the important things you will need before making your woolen cap.
Types Of Wool Yarn
Different types of wool yarn give different looks and feels to your cap. Choose the best yarn for warmth and comfort.
- Merino Wool: Soft and warm, good for sensitive skin
- Acrylic Wool: Affordable and easy to care for
- Alpaca Wool: Very warm and lightweight
- Cashmere Wool: Very soft, but expensive
- Blended Wool: Mix of wool and synthetic fibers for durability
Essential Tools
You need a few tools to make your woolen cap smoothly. These tools help you knit or crochet easily.
- Knitting Needles or Crochet Hook: Choose size based on yarn thickness
- Scissors: For cutting yarn
- Measuring Tape: To measure the size of the cap
- Yarn Needle: For sewing ends and finishing
- Stitch Markers: To keep track of your stitches
Choosing The Right Pattern
Making a woolen cap at home is fun and creative. The pattern you select affects the cap’s look and fit.
Choosing the right pattern helps you make a cap that is easy to knit and looks good. Start with simple patterns if you are new.
Simple Patterns For Beginners
Beginners should pick patterns with easy stitches and few steps. Simple patterns use basic knit and purl stitches.
These patterns help you practice without feeling confused. You can finish your first woolen cap quickly and proudly.
- Rib stitch pattern gives a stretchy and neat look
- Garter stitch uses only knit stitches for a soft texture
- Stockinette stitch has a smooth front and bumpy back
- Simple beanie shape fits most heads comfortably
Customizing Your Design
After choosing a basic pattern, add your personal touch. Customization makes your woolen cap unique and special.
You can change colors, add stripes, or use different yarn textures. Small changes can make a big difference in style.
- Use two or more colors to create stripes or blocks
- Add a small pom-pom on top for fun
- Try different yarn thickness for warmth or lightness
- Decorate with simple knit shapes like stars or hearts
Measuring Head Size
Creating a woolen cap requires knowing the right head size. This ensures a comfortable fit.
Measuring the head correctly is the first step in this creative process. Let's explore how to do it.
Using A Tape Measure
A tape measure is essential to get an accurate head size. Wrap it around the head just above the ears.
- Place the tape measure above the eyebrows
- Ensure it wraps around the widest part of the head
- Keep the tape snug but not too tight
Adjusting For Stretch
Wool stretches, so adjustments are necessary. This ensures the cap fits well over time.
| Head Size (cm) | Adjustment (cm) |
| 50-55 | +1 |
| 56-60 | +1.5 |
| 61-65 | +2 |
Consider the adjustment to maintain comfort and fit. This way, your woolen cap will be both stylish and functional.
Starting The Cap
Making a woolen cap at home is fun and easy. The first part is starting the cap correctly.
We begin by casting on stitches and then making the ribbing. These steps set the base for your cap.
Casting On Stitches
Casting on means putting the first loops of yarn on the needle. This forms the base row of your work.
Use a long tail cast on for a neat edge and good stretch. Count the stitches to fit your head size.
- Make a slip knot and place it on the needle.
- Hold yarn tail and yarn from the ball.
- Wrap yarn around fingers to form loops.
- Pull loops through to cast stitches on needle.
- Repeat until you have the needed number of stitches.
Creating The Ribbing
Ribbing adds stretch and a good fit to the cap’s edge. It looks like small vertical lines.
Use knit and purl stitches alternately to create the ribbing pattern.
- Knit one stitch, then purl one stitch.
- Repeat this pattern across the row.
- Turn your work and do the same for next rows.
- Continue ribbing for 2 to 3 inches.
- This helps the cap fit snugly on the head.
Knitting The Body
Knitting the body of a woolen cap is an important step. This part shapes the main section of the cap. Understanding basic stitches and tension helps create a smooth fabric.
We will look at two key points: basic knit and purl stitches, and how to keep even tension while knitting.
Basic Knit And Purl Stitches
Knit and purl stitches are the foundation of most knitting projects. The knit stitch creates a smooth “V” shape on the fabric’s front. The purl stitch forms a bump, making the back side textured.
- Knit Stitch:Insert the needle from front to back, wrap the yarn, and pull through.
- Purl Stitch:Insert the needle from back to front, wrap the yarn, and pull through.
- Alternate these stitches to create patterns or textures.
Maintaining Even Tension
Even tension keeps the woolen cap’s fabric consistent in size and shape. Tight stitches make the fabric stiff. Loose stitches cause holes and uneven shape.
| Tip | Description |
| Hold Yarn Comfortably | Keep yarn in one hand with relaxed fingers. |
| Check Needle Size | Use needles matching the wool’s thickness. |
| Practice Regularly | Consistent practice helps control tension better. |
| Adjust Grip | Loosen or tighten your hold if stitches vary. |

Credit: www.youtube.com
Shaping The Crown
Creating a woolen cap at home involves shaping the crown. This is an important part of the process. The crown gives the cap its form and fit.
As you shape the crown, you will gradually decrease stitches. This technique helps the cap to taper smoothly at the top.
Decreasing Stitches
Decreasing stitches is crucial for shaping the crown. It ensures a snug fit and smooth finish.
- Count your stitches to ensure accuracy.
- Knit two stitches together at regular intervals.
- Continue this pattern until you reach the desired number.
Finishing The Top
After decreasing stitches, finish the top of the cap. This step completes the crown shaping.
Once the top is secure, weave in any remaining yarn ends. This helps to keep the cap neat and tidy.
Adding Finishing Touches
After knitting your woolen cap, finishing touches make it look neat and complete. These steps help secure your work and add a personal style.
Focus on hiding loose yarn ends and adding small decorations. These details improve the cap’s strength and appearance.
Weaving In Ends
Weaving in ends means hiding loose yarn tails inside the cap. It stops the yarn from coming undone and makes the cap look tidy.
Use a yarn needle to thread the loose ends back through the stitches. Make sure you go in different directions for a strong hold.
- Thread the loose end into a yarn needle.
- Pass the needle through nearby stitches inside the cap.
- Weave the yarn back and forth two or three times.
- Cut off any extra yarn close to the fabric.
Adding Decorative Elements
You can add decorations to make your woolen cap unique. Small additions give a personal touch and style.
Try sewing on buttons, beads, or small patches. You can also add a pom-pom on top for a classic look.
- Sew buttons or beads near the edge or side.
- Attach fabric patches with simple stitches.
- Make a pom-pom using leftover yarn and attach it on top.
- Use embroidery thread for small stitched designs.

Credit: www.youtube.com
Care Tips For Woolen Caps
Woolen caps keep your head warm in cold weather. Taking good care of them makes them last longer.
Follow simple steps to wash and store your woolen caps properly. This helps keep their shape and softness.
Washing Instructions
Wash woolen caps gently to avoid damage. Use cold water and mild detergent for the best results.
- Fill a basin with cold water and add mild wool detergent.
- Soak the cap for 5 to 10 minutes without rubbing.
- Gently press out water without wringing the cap.
- Rinse with cold water until no soap remains.
- Lay the cap flat on a towel to dry in shade.
Storage Suggestions
Proper storage keeps woolen caps clean and free from moth damage. Avoid folding caps to keep their shape.
| Storage Tip | Description |
| Use Breathable Bags | Store caps in cotton or linen bags to avoid moisture. |
| Keep in Dry Place | Store caps in a dry area away from direct sunlight. |
| Use Cedar Blocks | Place cedar blocks nearby to prevent moths. |
| Do Not Hang | Hanging can stretch the cap and ruin its shape. |

Credit: www.youtube.com
Frequently Asked Questions
How Do I Start Making A Woolen Cap At Home?
Begin by selecting soft wool yarn and appropriate knitting needles. Follow basic knitting patterns step-by-step for beginners. Measure your head for size accuracy. Practice simple stitches like knit and purl before starting the cap. Consistency and patience are key to success.
What Materials Are Needed For A Homemade Woolen Cap?
You need wool yarn, knitting needles, scissors, and a measuring tape. Choose wool suitable for warmth and comfort. Optionally, use a yarn needle for sewing parts together. Having a simple knitting pattern or tutorial will guide you through the process effectively.
Can Beginners Easily Make Woolen Caps At Home?
Yes, beginners can make woolen caps with simple patterns. Start with basic knitting techniques and easy designs. Use video tutorials or step-by-step guides in Hindi for better understanding. Practice small projects to build confidence. Patience and practice improve results quickly.
How Long Does It Take To Make A Woolen Cap?
Making a woolen cap usually takes 4 to 6 hours. Time depends on your knitting speed and pattern complexity. Beginners may take longer, but experience reduces time significantly. Taking breaks helps maintain focus and avoid mistakes during knitting.
Conclusion
Making a woolen cap at home is simple and fun. You need just a few materials and some patience. Following easy steps helps you create a warm, cozy cap. It saves money and lets you choose your style. Handmade caps bring pride and joy.
Try this project and enjoy the warm winter days. Keep practicing to improve your skills. A homemade woolen cap is perfect for cold weather. Give it a try today!