Have you ever wanted to create a soft, cuddly teddy bear all by yourself? Making a teddy bear at home with cotton is easier than you might think, and it’s a fun way to add a personal touch to your gift or decor.
Imagine holding a bear that you made with your own hands—soft, comforting, and full of love. In this guide, you’ll discover simple steps and tips to bring your very own teddy bear to life, even if you’ve never tried sewing before.
Ready to start crafting something special? Let’s dive in!

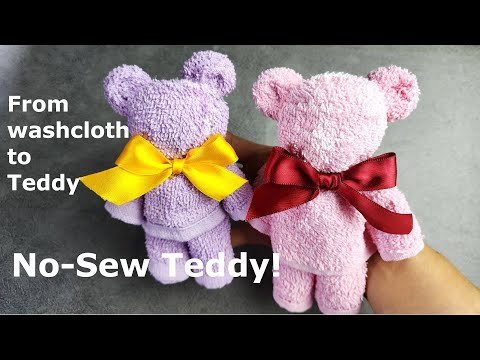
Credit: mindymakes.com
Materials Needed
Making a teddy bear at home with cotton is a fun and creative activity. To start, you need the right materials. These materials help you create a soft and cuddly toy.
Below are the essential materials divided into types of cotton and other supplies. Knowing these will prepare you for making your teddy bear.
Types Of Cotton
Cotton is the main filling for your teddy bear. It gives the bear a soft and fluffy feel. There are different types of cotton to choose from based on texture and quality.
- Polyester Cotton:A synthetic cotton that is soft and easy to shape. It holds its form well.
- Natural Cotton:Made from cotton plants, this is soft but may compress over time.
- Cotton Balls:Small balls of cotton often used as stuffing for toys and crafts.
- Cotton Batting:Sheets of cotton that can be torn into smaller pieces for filling.
Additional Supplies
Besides cotton, you need a few other items to make your teddy bear look nice and hold together. These supplies help with sewing, shaping, and decorating the bear.
| Supply | Purpose |
| Fabric (felt or cotton) | Used to make the outer body of the teddy bear |
| Needle and Thread | For sewing the fabric pieces together |
| Scissors | To cut fabric and thread |
| Buttons or Safety Eyes | To create eyes for the teddy bear |
| Fabric Glue | Helps to attach small parts if sewing is difficult |
| Marker or Pencil | To draw patterns on fabric before cutting |
Preparing The Cotton
Making a teddy bear at home starts with preparing the cotton. Clean and soft cotton helps create a fluffy and cuddly toy.
Careful preparation of cotton makes shaping the teddy bear easier and more precise. Let's see how to clean, soften, and shape the cotton.
Cleaning And Softening
Before using cotton, remove any dirt or dust. Clean cotton gives a fresh look and feels nice to touch.
- Wash the cotton gently in warm water with mild soap.
- Rinse thoroughly to remove all soap residues.
- Squeeze out excess water without twisting the cotton.
- Let the cotton dry completely in a clean, airy place.
- Once dry, pull and fluff the cotton to soften it.
Shaping Techniques
Shaping cotton correctly helps form the teddy bear’s body parts. Use your hands to mold the cotton as you fill the fabric.
| Technique | Description | Tip |
| Rolling | Roll cotton into tight cylinders for arms and legs. | Keep pressure even. |
| Pinching | Pinch small amounts to form ears and nose. | Use small, quick pinches. |
| Fluffing | Fluff cotton to fill large body sections. | Spread cotton evenly. |
| Layering | Add cotton in layers for shape depth. | Work slowly for better shape. |
Creating The Bear’s Body
Making a teddy bear at home is a fun and creative project. The first big step is to create the bear’s body parts. You will shape the head, torso, and limbs using cotton and fabric.
Each part needs care to look soft and cuddly. Take your time to form each piece well. This guide explains how to make the bear’s body step by step.
Forming The Head
Start by cutting a circle from your fabric for the head. Sew the edges together, leaving a small opening. Stuff the head with cotton tightly but keep it soft.
Close the opening by sewing it shut. Shape the head by adjusting the cotton inside. You can add small details like ears by sewing small fabric pieces on the sides.
Making The Torso
Cut two oval shapes for the torso from fabric. Sew them together, leaving a space to fill with cotton. Stuff the torso firmly to give the bear a good body shape.
After stuffing, sew the opening closed. Make sure the torso is round but not too hard. It should feel soft when you press it gently.
Crafting The Limbs
Cut four long oval pieces for the arms and legs. Sew each pair together, leaving openings to fill cotton inside. Stuff the limbs to make them soft but firm.
Sew the openings closed after stuffing. Make sure the limbs are shaped well to attach easily to the torso later. You can bend the limbs slightly for a natural look.
Assembling The Parts
After preparing all the pieces of your teddy bear, it is time to join them. Assembling the parts carefully makes your teddy look neat and sturdy.
Use simple stitches and soft cotton to connect the parts. Take your time to make each joint strong and even.
Attaching Head And Body
Start by placing the head on top of the body. Make sure the edges line up well before sewing.
Sew the head to the body using small, tight stitches. Use cotton stuffing to keep the shape full and soft.
- Align the neck opening of the head and body
- Use needle and thread to sew around the edges
- Stuff cotton gently to keep the shape firm
- Secure the thread with a knot to finish
Securing Arms And Legs
Attach the arms and legs to the sides and bottom of the body. Make sure they are evenly placed on both sides.
Sew each limb securely with small stitches. Add cotton stuffing inside the limbs before closing the seams.
- Position arms on the upper sides of the body
- Place legs at the lower sides of the body
- Sew limbs with strong, close stitches
- Stuff cotton inside limbs before final sewing
- Tie off thread to keep limbs firmly attached
Adding Facial Features
Giving your teddy bear a friendly face makes it special. The eyes, nose, and mouth bring the bear to life.
You can choose simple ways to add these features using cotton and thread at home.
Eyes And Nose Options
You can create eyes and nose using buttons, felt, or embroidered stitches. Each method changes the look and feel of your teddy bear.
- Buttons:Sew small black buttons for shiny eyes and a nose. Make sure they are firmly attached for safety.
- Felt Pieces:Cut small shapes from black or brown felt. Glue or sew them onto the bear’s face.
- Embroidery:Use black thread to stitch simple round eyes and a small triangle for the nose. This method is soft and safe for children.
Embroidering The Mouth
Adding a mouth with embroidery makes your teddy bear look friendly. You only need a needle, thread, and some patience.
| Step | Instructions |
| 1 | Thread a needle with red or brown embroidery floss. |
| 2 | Start stitching a small horizontal line below the nose. |
| 3 | Add two short vertical stitches at the ends to form a smile shape. |
| 4 | Tie off the thread securely on the inside of the bear’s head. |

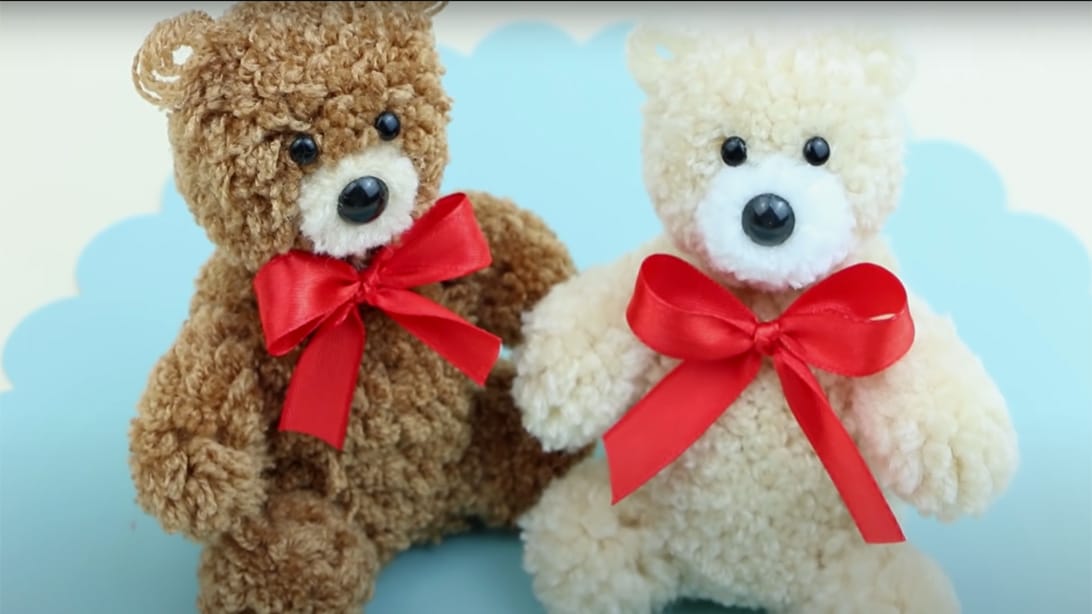
Credit: m.youtube.com
Final Touches
Adding final touches to your homemade teddy bear brings it to life. This step is fun and lets you personalize your creation.
In this guide, we will focus on adding accessories and tips for durability to ensure your teddy bear lasts long.
Adding Accessories
Accessories make your teddy bear unique and special. You can add ribbons, buttons, or tiny hats to give it personality.
- Add a colorful ribbon around the neck.
- Sew small buttons for eyes.
- Use fabric scraps to make a cute hat.
- Attach a little scarf for a cozy look.
Tips For Durability
To keep your teddy bear durable, choose strong materials and secure stitching. This will help it withstand lots of hugs and playtime.
Consider these tips for a long-lasting teddy bear:
| Tip | Details |
| Use strong thread | Prevents seams from breaking |
| Double stitch seams | Extra durability for stress points |
| Washable fabric | Easy to clean and maintain |
Care And Maintenance
Keeping your homemade teddy bear clean and safe helps it last longer. Proper care makes sure your bear stays soft and cuddly.
Follow simple steps to keep your teddy bear in top shape. Learn how to clean and store it properly.
Cleaning Your Teddy Bear
Your teddy bear can get dirty from playtime or dust. Cleaning it gently is important.
- Use a soft brush to remove dust.
- Spot clean with mild soap and water.
- Let it air dry completely.
Storage Suggestions
Storing your teddy bear properly keeps it safe when not in use. Follow these tips for the best results.
| Storage Tip | Reason |
| Keep in a cool, dry place | Prevents mold and mildew |
| Avoid direct sunlight | Prevents color fading |
| Use a breathable bag | Protects from dust while allowing air flow |
Credit: diyjoy.com
Frequently Asked Questions
How Do I Start Making A Cotton Teddy Bear At Home?
Begin by gathering soft cotton, fabric, needles, and thread. Cut the fabric into teddy bear shapes. Sew the edges carefully and stuff with cotton to form the bear.
What Materials Are Needed For A Homemade Cotton Teddy Bear?
You need soft cotton, fabric (like felt or fleece), sewing needles, thread, scissors, and optional buttons for eyes. These basic materials help create a soft and cuddly teddy bear.
How Long Does It Take To Make A Cotton Teddy Bear?
Making a cotton teddy bear typically takes 2 to 4 hours. The time depends on sewing skill and the bear’s size and details.
Can Beginners Easily Make A Teddy Bear With Cotton?
Yes, beginners can make a cotton teddy bear. Start with simple patterns and basic sewing techniques to ensure success.
Conclusion
Making a teddy bear at home with cotton is fun and simple. It lets you create a soft, cuddly toy by yourself. You only need a few materials and some patience. This project helps you enjoy crafting and feel proud of your work.
Try different colors and shapes to make it unique. Share your teddy with friends or family to spread happiness. Keep practicing, and you will get better each time. Handmade toys hold special value and memories. Start today and enjoy the joy of making your own teddy bear.