Have you ever wanted to create something unique with your own hands? Making clay things at home is easier than you think, and it’s a fun way to bring your ideas to life.
Whether you want to craft decorations, gifts, or simple keepsakes, this guide will show you step-by-step how to get started. You don’t need fancy tools or experience—just a little time and creativity. Keep reading, and you’ll discover how satisfying it is to turn ordinary clay into something truly special.

Credit: www.youtube.com
Choosing The Right Clay
Making clay items at home is a fun and creative hobby. Picking the right clay is important for your project’s success.
Different clays have unique properties. Knowing these will help you choose what suits your needs best.
Types Of Clay For Home Crafts
There are many types of clay for home use. Each type works well for certain crafts.
- Air-dry clay: dries without baking, easy for kids and beginners.
- Polymer clay: needs baking, stays flexible and hardens well.
- Modeling clay: stays soft and reusable, good for practice.
- Natural clay: requires firing in a kiln, best for pottery.
Where To Buy Clay Supplies
You can buy clay at many places. Look for stores that sell art or craft materials.
| Store Type | What You Get | Notes |
| Craft stores | Wide clay types and tools | Good for beginners |
| Online shops | Specialty clays and brands | Check reviews before buying |
| Art supply stores | Professional-grade clay | Best for advanced projects |
| Local markets | Natural clay | May need cleaning and preparation |
Tools You’ll Need
Having the right tools makes working with clay easier and more fun. Some tools help shape and smooth your clay.
- Rolling pin: to flatten clay evenly
- Clay cutters: to cut shapes
- Sculpting tools: for details and texture
- Sanding paper: to smooth dry clay
- Water spray bottle: keeps clay moist
Preparing Your Workspace
Making clay things at home is fun and relaxing. A good workspace helps you create better and stay organized.
Before you start, prepare your area carefully. This makes your work easier and keeps your home clean.
Setting Up A Craft Area
Choose a quiet spot with enough light. A table near a window works well. Make sure the space is comfortable and has a chair at the right height.
Keep your craft area dedicated to your clay projects. This stops distractions and keeps your tools ready.
Protecting Surfaces
Clay can stain or damage furniture. Protect your surfaces with easy-to-clean materials.
- Use a plastic tablecloth or a silicone mat on your workspace.
- Cover floors with old newspapers or a drop cloth.
- Keep wet wipes or paper towels nearby for quick cleanups.
- Use containers to hold water and avoid spills.
Organizing Materials
Organize your clay, tools, and accessories to save time and reduce mess. Group similar items together.
| Material | Storage Idea |
| Clay blocks | Seal in plastic bags or airtight containers |
| Tools | Use a small toolbox or jar |
| Paints and brushes | Keep in a cup or small box |
| Finished pieces | Place on a shelf or tray to dry |
Basic Clay Techniques
Making clay things at home is fun and creative. You can use simple tools and your hands to shape clay into many forms.
This guide covers basic techniques to help you start your clay projects easily. Learn how to shape, smooth, and join clay pieces.
Shaping And Molding
Shaping clay is the first step in making any object. You can use your fingers or tools to mold the clay into the shape you want.
- Roll clay into balls or coils
- Press clay flat with your palm or a rolling pin
- Use cookie cutters or molds for specific shapes
- Pinch clay to form small details
- Sculpt clay with wooden or plastic tools
Smoothing And Texturing
Smoothing makes clay surfaces even and clean. Texturing adds patterns or designs to your work. Both improve the look of your clay item.
| Technique | Tool | Purpose |
|---|---|---|
| Smoothing | Wet sponge or finger | Remove bumps and cracks |
| Texturing | Toothpick, comb, or fabric | Create patterns or rough surfaces |
| Burnishing | Smooth stone or spoon | Polish surface for shine |
Joining Pieces Together
Joining clay pieces makes larger or complex shapes. Use slip and scoring to attach parts firmly.
- Score the surfaces by scratching them
- Apply slip (wet clay mixture) on scored areas
- Press pieces together gently but firmly
- Blend edges with fingers or tools to hide seams
- Let the joined piece dry slowly to avoid cracks

Credit: www.youtube.com
Simple Diy Clay Projects
Making things with clay at home is fun and easy. You only need basic tools and some clay.
Try simple projects to create beautiful and useful items. Clay lets you express your creativity.
Making Clay Jewelry
Clay jewelry is light and colorful. You can make earrings, pendants, or rings with simple shapes.
Use tools like toothpicks or small cutters to shape the clay. Bake or air dry your pieces to harden them.
- Roll clay into thin sheets
- Cut out shapes like hearts or stars
- Make holes for stringing
- Decorate with paint or glaze
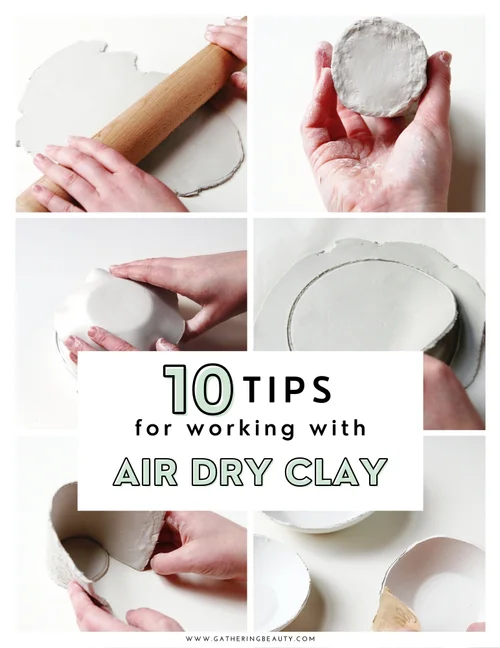
Creating Decorative Bowls
Decorative bowls add charm to any room. They are easy to make with simple clay techniques.
Shape the clay by pressing it into a bowl or mold. Smooth edges with your fingers or a tool before drying.
- Flatten clay into a circle
- Press clay into a small bowl
- Smooth the rim and surface
- Let the clay dry fully
- Paint or varnish for shine
Crafting Miniature Figurines
Miniature figurines are small clay models of animals or people. They are fun to make and decorate.
Start with simple shapes like balls and cylinders. Attach parts carefully and add details with tools.
- Make basic shapes for body parts
- Join parts by pressing gently
- Add eyes, nose, or clothes details
- Dry or bake the figurine
- Paint after drying for color
Drying And Baking Clay
Making clay items at home is fun and creative. Drying and baking clay are key to finishing your projects well.
Different clay types need different drying or baking methods. Learn how to dry air-dry clay and bake oven-hardening clay safely.
Air-dry Clay Tips
Air-dry clay hardens without heat. It dries by losing moisture to the air. This process can take from hours to days.
Keep your clay project in a dry, well-ventilated place. Avoid direct sunlight to stop cracking or warping.
- Dry flat pieces on a smooth surface
- Turn thicker pieces to dry evenly
- Use a light sealant after drying to protect your item
- Wait at least 24 hours before handling small projects
Using An Oven For Hardening
Oven-bake clay needs heat to harden. Follow the clay package instructions for temperature and time. Usually, it bakes at low temperatures.
Place your clay item on a baking sheet lined with parchment paper. Bake in the middle of the oven for even heat.
- Preheat the oven before baking
- Do not bake too long to avoid burning
- Cool the clay slowly after baking
- Use a kitchen thermometer to check oven temperature
Avoiding Common Mistakes
Many beginners make simple mistakes that ruin their clay projects. Avoid these to get the best results.
- Do not bake air-dry clay in the oven
- Do not rush drying air-dry clay by heating it
- Do not use high oven temperatures for baking clay
- Do not handle clay while it is still soft or warm
- Do not forget to check for cracks before baking or drying
Painting And Finishing Touches
After shaping your clay, painting adds life to your creations. Finishing touches make them last longer and look professional.
Learn how to choose paints, seal your crafts, and add decorative details for the best results.
Choosing The Right Paint
Selecting the right paint ensures vibrant colors and a smooth finish. Consider the type of clay and desired effect.
- Acrylic paints are versatile and come in many colors.
- Watercolor paints offer soft, delicate effects.
- Oil-based paints add a rich, glossy finish.
Sealing And Protecting Your Crafts
Sealing your clay items protects them from damage. Use a sealer suitable for your paint type.
A good sealant prevents moisture and dust from ruining your work. It also enhances the color.
- Clear acrylic spray works well for most projects.
- Mod Podge provides a glossy or matte finish.
- Polyurethane varnish offers strong protection.
Adding Decorative Details
Decorative details give personality to your clay crafts. Use simple tools or household items to create textures and patterns.
Experiment with different techniques to add unique features to each piece.
- Use a toothpick to etch designs before baking.
- Apply glitter for a sparkling effect.
- Attach small beads or charms for extra flair.
Troubleshooting Common Problems
Making clay things at home is fun and creative. Sometimes, problems can happen. This guide helps you fix them easily.
Learn how to solve common issues when working with clay. From cracks to sticky textures, find solutions here.
Fixing Cracks And Breaks
Cracks can appear while your clay dries. This can be frustrating, but you can fix it.
- Mix a small amount of clay with water to form a slip.
- Apply the slip to the cracked area.
- Gently smooth the surface with your finger or a tool.
- Let it dry slowly to prevent more cracks.
Preventing Warping
Warping happens when clay dries unevenly. Follow these tips to keep your creations straight and true.
| Tip | Action |
| Even Thickness | Roll clay to same thickness everywhere |
| Slow Drying | Cover clay with plastic to dry slowly |
| Rotate | Turn pieces often during drying |
Dealing With Sticky Clay
Clay sticking to your hands or tools can be tricky. Here are some easy ways to handle sticky clay.
- Dust your hands with cornstarch to reduce stickiness.
- Use a non-stick mat or surface when rolling clay.
- Keep tools clean and dry for better handling.

Credit: www.youtube.com
Inspiring Ideas To Try Next
Making clay things at home is fun and creative. You can make many items with simple tools and clay.
This guide offers ideas to inspire your next clay project. Try seasonal decorations, gifts, or useful items.
Seasonal Decorations
Create clay decorations for holidays and seasons. These add a personal touch to your home or gifts.
- Spring flower pots with bright colors
- Summer seashell ornaments
- Autumn leaf-shaped coasters
- Winter snowflake charms and tree decorations
Personalized Gifts
Clay gifts show you care. Add names, dates, or special shapes to make them unique.
| Gift Type | Customization Idea | Occasion |
| Name Tags | Engrave names | Weddings, birthdays |
| Photo Frames | Add decorative patterns | Anniversaries |
| Keychains | Shape initials or symbols | Friendship gifts |
| Jewelry | Include birthstones or initials | Holidays |
Functional Clay Items
Clay can be used to make useful items for daily life. These projects are simple and practical.
Try these ideas at home:
- Small bowls for snacks or jewelry
- Pen holders for your desk
- Plant pots with drainage holes
- Soap dishes with textured bottoms
Frequently Asked Questions
What Basic Materials Do I Need To Make Clay Things At Home?
You need clay, water, sculpting tools, a flat surface, and an oven or air-dry space. These basics help you shape and harden your creations easily.
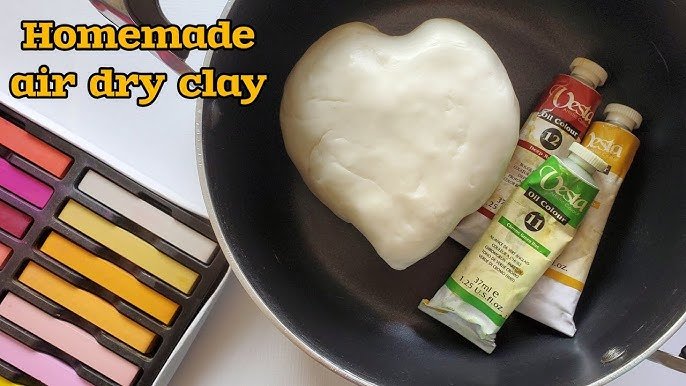
How Can I Make Homemade Clay For Crafting?
Mix 1 cup flour, 1/2 cup salt, and 1/2 cup water. Knead until smooth. This simple dough works well for crafting at home.
What Are Some Easy Clay Projects For Beginners?
Start with simple items like beads, small bowls, or figurines. These projects build skills and confidence in handling clay.
How Do I Dry And Harden Clay Items Safely?
Air-dry clay needs 24-48 hours to harden. Oven-bake clay requires specific temperatures, usually 250°F for 15-30 minutes. Follow instructions carefully.
Conclusion
Making clay things at home is fun and simple. You only need a few tools and some patience. Try different shapes and colors to see what you like. Each piece you create shows your own style. Keep practicing, and your skills will grow.
Clay art can relax your mind and make you happy. Start today, and enjoy the process of crafting with clay. Little steps lead to great results. Just have fun and be creative!