Are you looking for a simple way to save money and cook more efficiently? Making a clay stove at home is easier than you think, and it can change how you prepare your meals every day.
Imagine having a stove that uses less fuel, keeps your kitchen smoke-free, and is made from materials you already have. In this guide, you’ll discover step-by-step how to build your own clay stove quickly and safely. Keep reading, and you’ll learn a skill that not only benefits your cooking but also helps the environment and your wallet.
Ready to start? Let’s dive in!
Benefits Of Clay Stoves
Clay stoves are simple to make at home and offer many advantages. They use natural materials and help reduce pollution.
Understanding the benefits helps you see why clay stoves are a good choice for cooking.
Eco-friendly Cooking Advantages
Clay stoves use less wood or charcoal, which means fewer trees are cut down. They burn fuel more cleanly and produce less smoke.
- Reduces air pollution in homes and outdoors
- Uses natural and biodegradable materials
- Supports sustainable cooking practices
Cost Savings And Efficiency
Clay stoves need less fuel to cook food. This saves money over time and makes cooking faster.
| Fuel Type | Fuel Used (kg) | Cooking Time (minutes) |
| Clay Stove | 1.5 | 30 |
| Traditional Stove | 3.0 | 45 |
Health And Safety Benefits
Clay stoves produce less smoke. This lowers the risk of breathing problems and eye irritation.
- Cleaner indoor air
- Less risk of burns due to controlled flames
- Reduced chance of respiratory diseases

Credit: www.youtube.com
Materials Needed
Making a clay stove at home needs some basic materials. These materials help you build a strong and safe stove.
Gathering the right materials makes the process easier and the stove more effective.
Types Of Clay Suitable For Stove Making
Clay is the main material for making a clay stove. It must be strong and heat-resistant. Not all clay types work well.
Here are some common clay types you can use for your stove:
- Fire clay: This clay can handle high heat without cracking.
- Ball clay: It is smooth and easy to shape, good for detailed work.
- Earthen clay: Found in nature, it is easy to find and use.
- Kaolin clay: This clay is pure and strong but harder to shape.
Additional Tools And Supplies
Besides clay, you need some tools to shape and build your stove. These tools help make the process smooth.
- Water: To mix with clay and make it soft.
- Mixing container: To mix clay and water well.
- Trowel or spatula: To shape and smooth the clay.
- Knife or cutting tool: To cut clay parts.
- Wire mesh: To give extra strength to the stove.
- Sandpaper: To smooth rough edges after drying.
- Bucket or mold: To hold the clay in shape while drying.
Preparing The Clay
Preparing the clay is the first step to make a clay stove at home. Good clay makes your stove strong and long-lasting.
You need to mix and knead the clay well. Removing air bubbles is important to avoid cracks during drying.
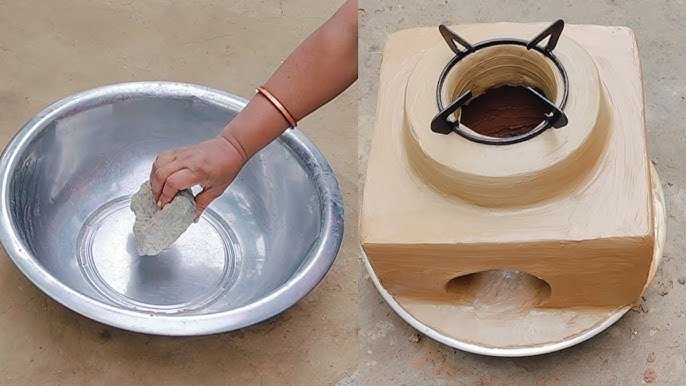
Mixing And Kneading Techniques
Start by adding water slowly to dry clay powder. Mix the clay until it feels soft and smooth.
Knead the clay with your hands for about 10 to 15 minutes. This helps to make the clay even and easy to shape.
- Add small amounts of water to avoid making clay too wet.
- Press and fold the clay repeatedly to mix it well.
- If the clay is sticky, add a little dry clay powder.
Removing Air Bubbles
Air bubbles in the clay can cause cracks when the stove dries. Remove them by punching and kneading the clay.
Use a rolling pin or your hands to press the clay flat. Fold it and press again to push air out.
- Cut the clay into smaller pieces to check for bubbles.
- Use firm pressure while kneading to remove trapped air.
- Repeat the process until the clay feels dense and smooth.

Credit: www.youtube.com
Building The Stove Base
Creating a strong base is key to making a clay stove at home. The base supports the entire stove and keeps it safe to use.
This guide covers how to shape the foundation and make sure it stays stable and durable.
Shaping The Foundation
Start by clearing the area where you want to build the stove. The ground must be flat and free of debris. Use clay mixed with sand to form the base. This mix holds well and resists cracking.
- Flatten the soil and remove stones.
- Mix clay and sand in a 3:1 ratio.
- Shape the base into a square or circle, about 30 cm high.
- Press the mixture firmly to avoid air gaps.
- Let it dry in the sun for two days.
Ensuring Stability And Durability
Stability comes from a solid and even base. Adding reinforcing materials helps the stove last longer. Use natural fibers like straw or dried grass inside the clay mix. These fibers help hold the clay together and stop cracks.
| Material | Purpose | Amount |
|---|---|---|
| Clay | Main building material | 70% |
| Sand | Improves strength and drying | 25% |
| Straw or dried grass | Prevents cracks and adds durability | 5% |
Constructing The Stove Body
Making a clay stove at home starts with building a strong body. The stove body holds the fire and supports cooking pots. Careful construction ensures good heat and durability.
This guide covers forming the fire chamber and creating air vents. These parts help your stove burn fuel efficiently and safely.
Forming The Fire Chamber
The fire chamber is where the fuel burns. It needs to be shaped correctly to hold the fire and allow air to flow.
- Choose a size that fits your cooking pots.
- Use damp clay mixed with straw for strength.
- Shape the chamber with your hands or a mold.
- Make the walls thick enough to hold heat but not too thick.
- Leave an opening at the top for placing pots and adding fuel.
- Let the chamber dry slowly to avoid cracks.
Creating Air Vents For Ventilation
Air vents supply oxygen to the fire, helping it burn hotter and cleaner. Proper placement and size of vents improve stove efficiency.
| Vent Location | Purpose | Recommended Size |
| Front Lower Side | Primary air intake | 3-5 cm wide |
| Back Lower Side | Extra airflow | 2-4 cm wide |
| Top Opening | Smoke exit and pot placement | Depends on pot size |

Credit: www.youtube.com
Drying And Firing Process
Making a clay stove at home involves careful drying and firing. These steps ensure the stove is strong and durable.
Proper drying and firing of the clay stove will help it withstand high temperatures when used for cooking.
Proper Drying Methods
To dry the clay stove properly, choose a spot with good airflow. This prevents cracks and ensures even drying.
- Place the stove in a shaded area to avoid direct sunlight.
- Ensure the stove is elevated to allow air circulation beneath it.
- Turn the stove occasionally to promote even drying on all sides.
Firing The Stove For Strength
Firing the stove makes it strong and heat-resistant. This step is crucial for the stove's longevity.
Use a kiln or open fire pit for firing. Maintain a consistent temperature throughout the process.
| Firing Method | Temperature Range |
| Open Fire Pit | 600-800°C |
| Electric Kiln | 900-1000°C |
Using And Maintaining The Clay Stove
Clay stoves are great for cooking meals at home. They are eco-friendly and cost-effective.
To make the best use of your clay stove, follow simple tips and care steps. This will ensure it lasts longer and functions well.
Tips For Efficient Cooking
Cooking on a clay stove can be easy with the right techniques. You can save time and fuel with these tips.
- Use dry wood for a steady flame
- Preheat the stove before cooking
- Cover pots to keep heat inside
- Keep the stove's air vents open
- Adjust the wood placement for even cooking
Cleaning And Repairing The Stove
Regular cleaning keeps your clay stove efficient. It also helps in spotting any needed repairs early.
Clean the stove after each use. Remove ash and soot with a brush. If you find cracks, fix them with clay and water.
- Brush off ash after every cooking session
- Check for cracks monthly
- Repair small cracks with wet clay
- Let repairs dry completely before using
Frequently Asked Questions
What Materials Are Needed To Make A Clay Stove At Home?
You need clay soil, sand, water, straw, and a metal pot or drum. These materials help create a durable and heat-resistant stove.
How Long Does It Take To Build A Clay Stove?
Building a clay stove typically takes 2 to 3 days. This includes molding, drying, and setting time for the clay structure.
Can A Homemade Clay Stove Be Used For Cooking?
Yes, a homemade clay stove efficiently cooks food using wood or charcoal. It retains heat well and is eco-friendly.
How Do I Maintain My Clay Stove For Durability?
Keep your clay stove dry and clean. Avoid exposure to heavy rain and repair cracks promptly to extend its life.
Conclusion
Making a clay stove at home is simple and cost-effective. You need basic materials like clay, sand, and water. Follow the steps carefully, and take your time shaping the stove. This stove can help save fuel and reduce smoke. It works well for cooking meals outdoors or during power cuts.
Try making one yourself to enjoy its benefits. Small efforts can bring big changes in daily cooking. Keep practicing, and you will improve your skills. A homemade clay stove can be a useful addition to your home.