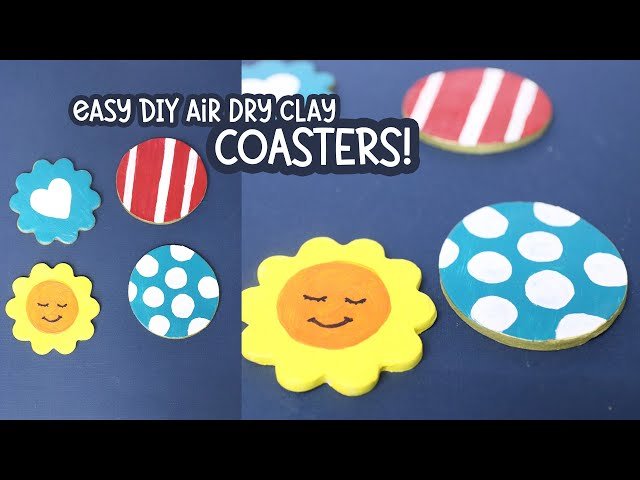
Are you looking for a fun and creative way to add a personal touch to your home? Making clay coasters at home is easier than you think.
Not only will you get unique, stylish coasters, but you’ll also enjoy the satisfying feeling of crafting something with your own hands. Imagine having coasters that match your style perfectly or make great gifts for friends and family. In this guide, you’ll discover simple steps to create beautiful clay coasters that stand out.
Ready to turn ordinary clay into something amazing? Let’s get started!

Credit: www.youtube.com
Materials Needed
Making clay coasters at home is a fun and simple craft. You only need a few basic materials to get started.
This guide will help you gather the right clay, tools, and decorative items for your project.
Types Of Clay
Choosing the right clay is important for durability and look. There are several types you can use for coasters.
- Air-dry clay: Easy to use and does not need baking.
- Polymer clay: Requires baking but is very strong.
- Natural clay: Needs to be fired in a kiln for best results.
Tools And Accessories
You will need some basic tools to shape and finish your coasters. These make the process easier and cleaner.
| Tool | Purpose |
| Rolling pin | Flattens the clay evenly |
| Clay cutter or knife | Shapes and trims edges |
| Sanding paper | Smooths rough edges after drying |
| Sealant | Protects the finished coaster |
Optional Decorative Items
You can add fun designs and textures to your coasters with some decorative items. These add a personal touch.
- Acrylic paints for color
- Stamps for patterns
- Glitter for sparkle
- Varnish to give a shine
Preparing The Clay
Making clay coasters at home is a fun and creative activity. The first step is preparing your clay properly.
Proper preparation ensures your coasters are smooth and durable. It also helps in achieving a beautiful finish.
Conditioning The Clay
Conditioning clay is important for making it soft and workable. You need to knead the clay until it's smooth.
Use your hands to warm the clay. This makes it easier to shape and mold into coasters.
- Start by rolling the clay into a ball.
- Flatten and fold it several times.
- Continue until the clay feels pliable and smooth.
Choosing The Right Thickness
The thickness of the clay affects the coaster's strength. It is important to choose the right thickness.
A good thickness for coasters is about 1/4 inch. This ensures they are not too fragile or too bulky.
| Thin Coasters | Less than 1/4 inch | May break easily |
| Ideal Coasters | 1/4 inch | Strong and durable |
| Thick Coasters | More than 1/4 inch | Too bulky |
Shaping The Coasters
Creating clay coasters at home is fun and easy. Learn how to shape them perfectly.
With a few tools and some patience, you can make unique coasters. Let's explore the steps for shaping them.
Cutting Shapes
Start by rolling out your clay evenly. Use a rolling pin for best results.
Next, choose a shape for your coaster. Circles, squares, and hexagons work well.
- Use cookie cutters for consistent shapes
- A knife can help with custom shapes
- Ensure each piece is the same thickness
Smoothing Edges
Smooth edges make your coasters look polished. Use your fingers or a damp sponge.
Gently rub the edges until they are even. This prevents chipping later.
- Inspect each edge carefully
- Keep a small bowl of water nearby
- Patience is key for smooth results
Adding Texture And Designs
Textures and designs give coasters character. Use everyday items to create patterns.
Press leaves, lace, or stamps into the clay. Try different tools for unique effects.
- Experiment with various objects
- Press gently to avoid deep marks
- Combine textures for a creative look

Credit: www.hobbycraft.co.uk
Drying And Baking
Drying and baking are important steps to finish your clay coasters. They help the clay harden and last longer. You can choose air-drying or oven-baking depending on the clay type.
Follow these tips to dry or bake your coasters safely and get the best results.
Air-drying Tips
Air-drying is easy and does not require special tools. It takes longer but keeps the clay strong.
- Place coasters on a flat, clean surface
- Keep them in a dry, well-ventilated area
- Turn coasters over after 24 hours to dry both sides
- Avoid direct sunlight to prevent cracking
- Let them dry for 2 to 3 days until fully hard
Oven-baking Instructions
Baking in the oven speeds up the drying process. Follow the clay package for exact temperature and time.
| Clay Type | Temperature | Time |
| Polymer Clay | 265°F (130°C) | 15-30 minutes |
| Air-Dry Clay (oven-safe) | 200°F (93°C) | 30-60 minutes |
Preheat your oven and place coasters on a baking sheet. Use parchment paper to avoid sticking. Let coasters cool before handling.
Painting And Sealing
Painting and sealing clay coasters make them look great and last longer. This guide covers how to pick paints and sealants for your project.
Proper painting and sealing protect your coasters from water and wear. Follow the tips below to finish your clay coasters well.
Selecting Paints
Choose paints that stick well to clay and resist water. Acrylic paints are a good choice because they dry fast and hold color.
- Use acrylic paints for bright, lasting colors
- Avoid oil-based paints; they take longer to dry
- Test paint on a small clay piece before full use
- Thin the paint with water for smooth layers
- Apply several thin coats instead of one thick coat
Applying Sealants
Sealants protect your painted coasters from water rings and scratches. Choose a sealant that is clear and waterproof.
| Sealant Type | Features | Application Tips |
| Matte Acrylic Spray | Dries clear, no shine | Spray in thin layers, allow dry time |
| Glossy Polyurethane | Shiny finish, strong protection | Use brush, apply 2-3 coats |
| Mod Podge Waterbase | Easy to use, dries clear | Brush on, avoid thick layers |
Maintenance And Care
Clay coasters add a personal touch to your home. Taking care of them helps keep their look and strength. Simple steps can make your coasters last longer.
Proper maintenance prevents damage and keeps your coasters clean. Follow easy tips to enjoy your handmade clay coasters every day.
Cleaning Tips
Clean clay coasters gently to avoid scratches. Use mild soap and warm water for best results. Avoid soaking them for a long time to protect the clay.
- Use a soft cloth or sponge
- Wipe off spills quickly
- Dry coasters completely before use
- Do not use harsh chemicals or abrasive cleaners
Avoiding Damage
Clay coasters can crack or chip if handled roughly. Handle them with care and store them properly to avoid damage. Keep them away from high heat and heavy objects.
- Do not drop or bang coasters
- Store coasters flat in a safe place
- Avoid placing hot pots or pans directly on coasters
- Keep coasters away from extreme temperatures
Creative Variations
Making clay coasters at home is fun and allows you to add your style. You can try different creative ideas to make each coaster unique.
These variations help you customize coasters with colors, objects, and patterns. They make your coasters stand out and match your home decor.
Mixing Colors
Mixing colors in clay lets you create beautiful patterns. You can blend two or more colors to make swirls or marbled effects.
Try kneading small pieces of colored clay together but do not mix fully. This keeps the colors separate but connected.
- Use primary colors to make new shades
- Mix gently for a soft marble look
- Create stripes by layering different colors
- Combine light and dark tones for contrast
Embedding Objects
Embedding small objects inside the clay adds texture and interest. Use items like dried flowers, beads, or tiny shells.
Press objects gently into the clay surface before it dries. Make sure they stay flat and secure for a smooth coaster.
- Dried flowers add natural beauty
- Small beads create a colorful look
- Leaves make pretty nature designs
- Shells give a beachy feel
Using Stencils
Stencils help you add clear patterns to your clay coasters. You can use paper or plastic stencils with shapes or letters.
Place the stencil on clay and press or carve around it. This leaves a neat design on your coaster surface.
- Use geometric shapes for modern style
- Try floral patterns for a soft look
- Stencil letters for personalized coasters
- Mix stencil designs with colors for variety

Credit: www.hobbycraft.co.uk
Frequently Asked Questions
What Materials Are Needed To Make Clay Coasters At Home?
You need air-dry clay, a rolling pin, coaster molds or cutters, sandpaper, and acrylic paint for decoration. These basic materials are easy to find and ideal for beginners.
How Long Does It Take For Clay Coasters To Dry?
Air-dry clay coasters usually take 24 to 48 hours to dry completely. Drying time depends on thickness and room humidity.
Can I Customize Clay Coasters With Paint Or Designs?
Yes, you can paint and decorate clay coasters after they dry. Use acrylic paints and seal with a clear varnish for durability.
Are Homemade Clay Coasters Water-resistant?
Air-dry clay coasters are not fully water-resistant. Applying a waterproof sealant protects them from moisture and extends their lifespan.
Conclusion
Making clay coasters at home is fun and simple. You only need a few materials and some patience. Each coaster shows your personal style and creativity. These coasters protect your table and add charm to any room. Try different shapes and colors to make them unique.
Enjoy crafting and sharing your handmade coasters with friends. This small project brings big joy and satisfaction. Start today and see how rewarding crafting can be!