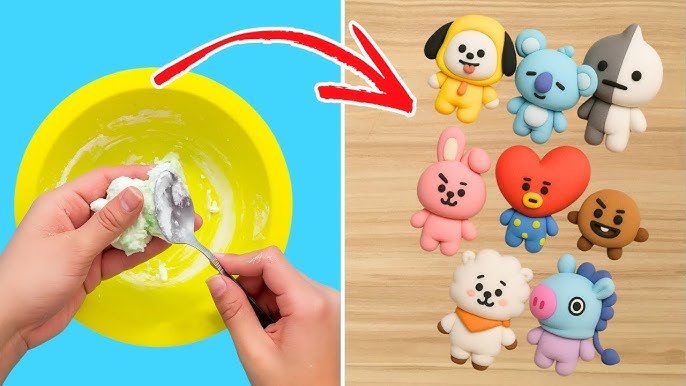
Have you ever wanted to create your own air drying clay at home but didn’t know where to start? Making clay yourself is easier than you think, and it gives you full control over the materials you use.
Imagine crafting beautiful, personalized art pieces or fun decorations without needing to buy expensive supplies. In this guide, you’ll discover simple steps to make your own air drying clay using ingredients you probably already have. Ready to unlock your creativity and save money?
Keep reading, and you’ll be molding your own clay in no time!

Credit: www.youtube.com
Materials Needed
Making air drying clay at home is easy and fun. You only need a few simple materials. These materials are usually found in most kitchens.
Knowing what to use helps you create the best clay for your projects. Let’s look at the basic ingredients and some optional additives.
Basic Ingredients
Basic ingredients form the main part of your air drying clay. They help the clay hold together and dry well. You can mix these easily at home.
- 1 cup of baking soda
- 1/2 cup of cornstarch
- 3/4 cup of water
- 1 tablespoon of white glue (optional for strength)
These ingredients mix into a smooth dough. Baking soda and cornstarch give the clay a soft texture. Water helps to bind the mix.
Optional Additives
Optional additives can improve your clay. They add color, scent, or make the clay last longer. You can try these based on your needs.
- Food coloring for different colors
- Essential oils for a nice smell
- Baby oil for extra smoothness
- White glue for stronger clay
Use small amounts of additives to keep the clay soft. Add colors slowly until you get the shade you want.

Credit: www.youtube.com
Step-by-step Recipe
Making air drying clay at home is easy and fun. You only need a few simple ingredients.
This recipe will guide you through mixing, adjusting, and kneading the clay. Let’s get started.
Mixing Ingredients
Gather the ingredients first. You will need white glue, baking soda, and water. Mix them in a bowl.
- 1 cup white glue
- 1 cup baking soda
- 1/2 cup water
Stir the glue and baking soda well before adding water. Mix slowly to avoid lumps.
Adjusting Texture
Check the mixture’s texture. It should feel like soft dough but not sticky. Add more baking soda if sticky.
- Add 1 tablespoon baking soda to make it firmer.
- Add a few drops of water if it feels dry.
- Mix well after each addition.
Keep adjusting until you get a smooth, easy-to-shape clay. It should not stick to your hands.
Kneading The Clay
Take the dough out of the bowl. Knead it on a clean surface with your hands.
- Push and fold the dough repeatedly.
- Knead for about 5 minutes.
- Stop when the dough is soft and smooth.
Proper kneading helps the clay hold its shape better when drying.
Tips For Best Results
Making air drying clay at home is easy and fun. To get the best results, you need to follow some simple tips. These tips help your clay stay smooth and last longer.
Keep your clay safe from cracks and store it properly. This guide will help you avoid common problems.
Preventing Cracks
Cracks can ruin your clay projects. To stop cracks, keep the clay moist while working. Cover unused clay with a damp cloth. Dry your finished items slowly in a cool, dry place.
- Work on small pieces at a time to keep clay moist
- Use water sparingly to smooth edges
- Cover projects with plastic wrap while drying
- Avoid direct sunlight or heat sources during drying
- Allow clay to dry completely before painting or sealing
Storage Suggestions
Proper storage keeps your air drying clay soft and ready to use. Store clay in airtight containers or sealed plastic bags. Keep it in a cool, dry spot. Avoid freezing or heating the clay.
| Storage Method | Tip |
| Plastic Wrap | Wrap tightly around clay to keep moisture in |
| Airtight Container | Use containers with tight lids to prevent drying |
| Plastic Bag | Seal clay in a zip-lock bag with a damp paper towel |
| Cool Dry Place | Store clay away from heat and sunlight |
Creative Uses
Air drying clay is easy to make and fun to use. It lets you create many unique crafts at home.
You can shape it into decorations, toys, and gifts. This clay dries without baking.
Craft Ideas
Use air drying clay to make jewelry like beads, pendants, or charms. You can also craft small figurines.
Try making fridge magnets, keychains, or decorative bowls. The clay is soft and easy to mold.
- Make simple ornaments for holidays or parties
- Create personalized name tags or labels
- Build miniature plants or animals
- Design custom buttons for clothes or bags
Painting And Finishing
Once dry, air drying clay can be painted with acrylic or tempera paints. Use thin layers for best results.
Seal your creations with a clear varnish to protect the paint. This also gives a nice shine and makes items last longer.
- Lightly sand rough edges before painting
- Use fine brushes for details
- Apply a primer for brighter colors
- Let each paint layer dry before adding another
- Use water-based varnish for safety and easy cleanup
Troubleshooting Common Issues
Making air drying clay at home is fun, but sometimes problems happen.
This guide helps you fix common issues like dryness and stickiness.
Fixing Dryness
Dry clay cracks and is hard to shape. It often means the clay is too dry.
- Add a few drops of water and knead the clay well.
- Cover the clay with a damp cloth to keep moisture.
- Store unused clay in an airtight container.
- If very dry, mix in a bit of white glue for softness.
Dealing With Stickiness
Sticky clay can be hard to work with and leaves residue on hands.
| Cause | How to Fix |
| Too much water | Add small amounts of flour and knead well |
| Warm room temperature | Cool the clay in a refrigerator for 10 minutes |
| Not enough flour | Slowly add flour until clay feels less sticky |
| Sticky hands | Dust hands with flour before handling clay |

Credit: www.youtube.com
Frequently Asked Questions
What Ingredients Are Needed For Homemade Air Drying Clay?
You need basic ingredients like baking soda, cornstarch, and water. These are easy to find and safe for crafting. Mixing them creates a smooth, pliable clay perfect for air drying projects.
How Long Does Homemade Air Drying Clay Take To Dry?
Air drying clay typically takes 24 to 48 hours to dry fully. Drying time depends on the thickness and humidity. Thinner pieces dry faster, while thicker ones may need more time.
Can I Paint Air Drying Clay After It Dries?
Yes, you can paint air drying clay once it is completely dry. Use acrylic or water-based paints for best results. Painting adds color and enhances your craft’s appearance.
Is Homemade Air Drying Clay Safe For Kids?
Homemade air drying clay is generally safe for kids with adult supervision. It uses non-toxic, natural ingredients. However, avoid ingestion and keep the workspace clean to ensure safety.
Conclusion
Making air drying clay at home saves money and is fun. You can use simple ingredients found in your kitchen. This clay is great for crafts and gifts. It dries hard without needing an oven. Try different shapes and colors to get creative.
Keep your clay in an airtight container to stay fresh. Enjoy making art with your homemade clay anytime you want. Give it a try and see how easy it is!