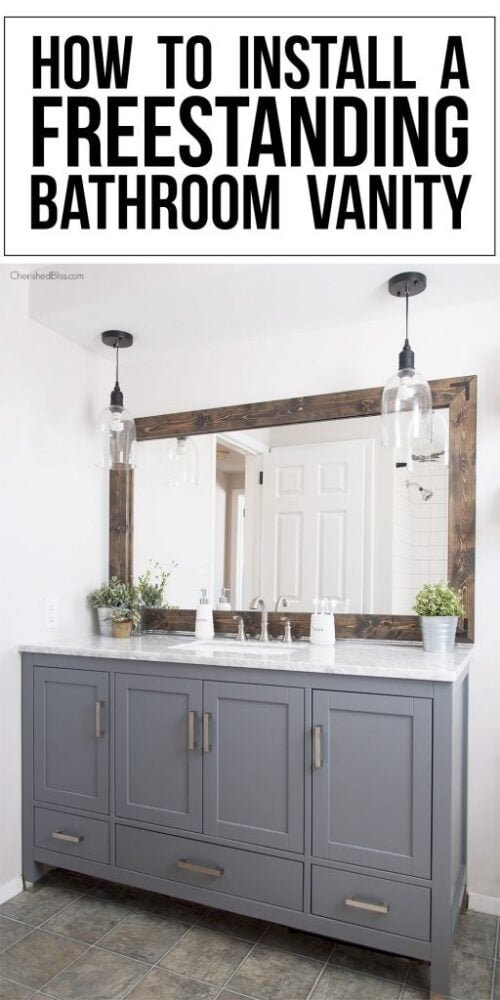
Are you ready to transform your bathroom with a stylish freestanding vanity? Installing one might seem tricky, but with the right steps, you can do it yourself and save money.
Imagine having a beautiful, functional centerpiece that fits perfectly in your space—without calling a pro. In this guide, you’ll find simple, clear instructions to help you install your freestanding bathroom vanity quickly and confidently. Keep reading, and by the end, you’ll know exactly what to do to achieve that fresh, upgraded look you want.

Credit: acedecorbath.com
Choosing The Right Vanity
Selecting the perfect freestanding bathroom vanity is key to creating a functional and stylish space. The right vanity fits well, matches your style, and meets your storage needs.
Understanding your space and preferences helps you choose a vanity that suits your bathroom perfectly.
Measuring Your Space
Accurate measurements avoid buying a vanity that is too big or too small. Measure the width, depth, and height of your available space. Also, consider doorways and clearances for comfort.
- Measure the wall space where the vanity will go
- Check the distance from the floor to the plumbing
- Ensure enough space for bathroom traffic
- Note the location of electrical outlets and switches
Selecting Materials And Styles
Vanities come in many materials like wood, metal, and laminate. Each has pros and cons for durability and look. Choose a style that matches your bathroom décor.
| Material | Benefits | Considerations |
| Solid Wood | Durable, classic look | Needs protection from moisture |
| Metal | Modern, sturdy | Can feel cold or industrial |
| Laminate | Affordable, easy to clean | Less durable than wood |
Considering Storage Needs
Think about what you store in your bathroom. Vanities offer drawers, cabinets, or open shelves. Pick a design that fits your items and keeps clutter away.
- Drawers for small items like toiletries
- Cabinets for larger items like towels
- Open shelves for easy access and display
- Built-in organizers for better space use

Credit: www.eclifeusa.com
Gathering Tools And Materials
Installing a freestanding bathroom vanity needs proper tools and supplies. Getting these ready makes the process easier and safer.
This guide lists the essential tools and plumbing supplies you need before starting the installation.
Essential Tools List
Having the right tools helps you install the vanity quickly and correctly. These tools are common for many home projects.
- Measuring tape to check dimensions
- Level to ensure the vanity is straight
- Adjustable wrench for plumbing fittings
- Power drill with screwdriver bits
- Pipe wrench for tightening pipes
- Stud finder to locate wall supports
- Safety gloves and goggles for protection
- Silicone caulk and caulk gun for sealing
Vanity And Plumbing Supplies
Besides tools, you will need specific supplies related to the vanity and plumbing. These parts help connect the vanity to your bathroom water system.
| Item | Description | Purpose |
|---|---|---|
| Freestanding vanity | Cabinet with sink and countertop | Main fixture for storage and washing |
| Faucet | Water tap installed on the vanity | Controls water flow |
| P-trap | Curved pipe under the sink | Prevents sewer gas from entering room |
| Supply lines | Flexible hoses connecting water | Deliver hot and cold water |
| Drain assembly | Sink drain parts including stopper | Allows water to flow out |
| Thread seal tape | White tape for pipe threads | Prevents leaks at connections |
Preparing The Bathroom
Installing a freestanding bathroom vanity requires some preparation. You need a clean and safe workspace.
Preparing the bathroom well makes the installation easier and faster. It also protects your fixtures.
Clearing The Area
Start by removing items around the old vanity. This gives you space to work and prevents damage.
Clear the floor and countertop of toiletries, rugs, and other objects. Move furniture if needed.
- Take out rugs and mats
- Remove toiletries and decorations
- Clear any nearby furniture
- Protect the floor with a cloth or cardboard
Turning Off Water Supply
Turn off the water supply to avoid leaks when removing the old vanity. This stops water flow to the sink.
Locate the shut-off valves under the sink or near the main water line. Turn them clockwise to close.
- Find hot and cold water valves
- Turn valves clockwise until tight
- Open the faucet to drain remaining water
- Check for leaks before continuing
Removing Old Vanity
Remove the old vanity carefully to avoid damage. Disconnect water lines and electrical wires first.
Unscrew the vanity from the wall. Pull it away gently and clear any debris left behind.
- Turn off water supply and drain pipes
- Disconnect water lines with a wrench
- Unplug any electrical connections
- Remove screws or nails attaching vanity to wall
- Lift vanity out and set aside
- Clean the area for the new installation
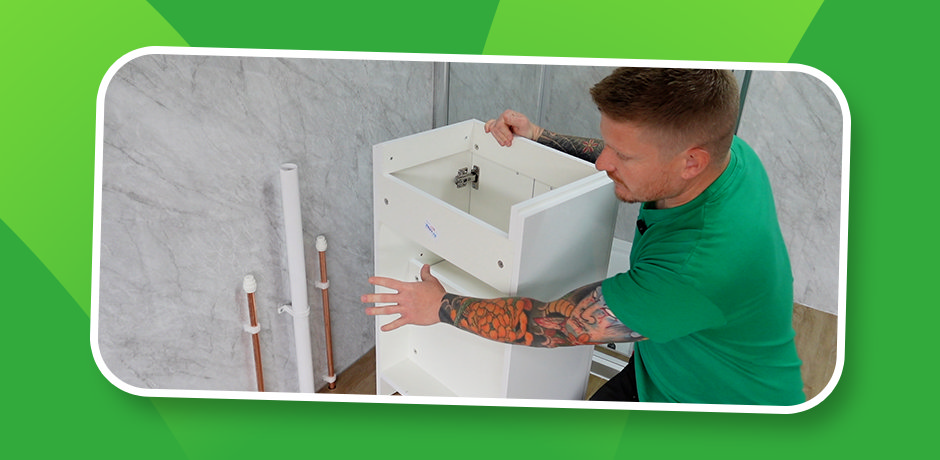
Installing The Vanity
Installing a freestanding bathroom vanity is a simple task with the right tools. This guide explains how to position, level, and secure your vanity. You will also learn how to attach the sink properly.
Follow each step carefully to ensure your vanity looks great and stays stable for years. Let’s start with placing the vanity in the right spot.
Positioning The Vanity
Place the vanity near the plumbing connections. Make sure there is enough space for the doors or drawers to open fully. Check that the vanity does not block any vents or electrical outlets.
Measure the distance from the wall to the front edge of the vanity. This helps you keep it aligned with other bathroom fixtures. Keep the vanity centered under the sink faucet.
Leveling And Securing
Use a spirit level to check if the vanity sits flat on the floor. Adjust the feet or add shims under the base to fix any unevenness. A level vanity prevents water from pooling and doors from swinging open.
- Place the level on top of the vanity.
- Check front-to-back and side-to-side balance.
- Insert shims under low points until level.
- Tighten adjustable feet if available.
- Secure the vanity to the wall using screws and anchors.
Attaching The Sink
Most freestanding vanities come with a sink that fits on top. Use a bead of silicone caulk around the sink edge to seal it. Press the sink firmly onto the vanity surface to hold it in place.
| Tool | Purpose |
|---|---|
| Silicone caulk | Seals sink to vanity |
| Caulk gun | Applies caulk evenly |
| Cleaning cloth | Wipes excess caulk |
| Screwdriver | Attaches sink clips if provided |
Connecting Plumbing
Installing a freestanding bathroom vanity involves connecting plumbing. This ensures water flows correctly and drains properly.
Follow these steps to install faucets, connect water lines, and seal drain pipes.
Installing Faucets
Faucets need to be installed before connecting water lines. Ensure they fit snugly in the vanity holes.
Use a wrench to tighten the nuts underneath. Make sure not to overtighten.
- Place the faucet through the hole
- Tighten nuts beneath the counter
- Check alignment of the faucet
Connecting Water Lines
Water lines supply water to your faucets. Connect them securely to avoid leaks.
Use flexible hoses for an easier fit. Attach hoses to both the faucet and the wall pipe.
- Attach one end to the faucet
- Connect the other end to the wall pipe
- Turn on the water to check for leaks
Sealing Drain Pipes
Drain pipes remove wastewater from the sink. Proper sealing prevents leaks and water damage.
Use plumber's putty around the drain hole. Tighten the drain assembly under the sink.
- Apply plumber's putty to the drain hole
- Insert the drain pipe through the hole
- Tighten the assembly to secure
- Check for leaks by running water
Finishing Touches
After installing your freestanding bathroom vanity, the finishing touches make it look complete. These details help protect the vanity and improve its appearance.
Pay close attention to sealing edges, adding hardware, and cleaning up. These steps ensure your vanity looks great and lasts longer.
Sealing Edges
Sealing the edges stops water from damaging your vanity. Use a waterproof sealant around the edges where the vanity meets the wall or floor.
Apply a smooth bead of sealant and wipe off any extra with a damp cloth. Let it dry fully before using the vanity.
- Choose a mold-resistant sealant for bathrooms
- Seal gaps between vanity and wall or floor
- Check for any cracks or holes to fill
- Allow sealant to dry completely
Installing Hardware
Next, attach the hardware such as handles, knobs, or drawer pulls. These parts make your vanity easy to use and add style.
Follow the hardware instructions and use the right tools. Tighten screws without overdoing it to avoid damage.
- Align hardware holes before screwing in
- Use a screwdriver or drill with care
- Tighten screws firmly but not too tight
- Test hardware to ensure it moves smoothly
Cleaning Up
Clean the vanity and the surrounding area after installation. Remove dust, dirt, and any leftover materials for a fresh look.
Use a soft cloth and mild cleaner safe for your vanity’s finish. Avoid harsh chemicals that can damage surfaces.
- Wipe down all surfaces gently
- Clean up debris from drilling or sealing
- Check for any spots missed during installation
- Dispose of trash and packaging properly
Troubleshooting Common Issues
Installing a freestanding bathroom vanity can sometimes come with challenges. Here are common problems and solutions to ensure a smooth installation.
Address these issues to keep your bathroom vanity in top shape and functioning well.
Fixing Leaks
Leaks can occur if connections are not tight. Ensure all pipes and fixtures are secured properly.
- Check all joints for water droplets.
- Tighten loose connections with a wrench.
- Replace old or worn-out washers.
Adjusting Leveling
An uneven vanity can cause issues with water flow and storage. Use a level tool to check the surface.
If needed, adjust the feet of the vanity or place shims under the legs to achieve a balanced setup.
Addressing Drain Problems
Slow drainage can be frustrating. It's often due to blockages or misaligned pipes.
| Problem | Solution |
| Clogged Drain | Use a plunger or drain snake. |
| Misaligned Pipe | Reposition and secure the pipe properly. |
Credit: www.victorianplumbing.co.uk
Frequently Asked Questions
How Do I Prepare The Bathroom For Vanity Installation?
Start by turning off the water supply. Remove the old vanity and clean the area. Check wall studs for mounting support. Measure space to ensure the new vanity fits perfectly. Gather all necessary tools and materials before you begin.
What Tools Are Needed To Install A Freestanding Vanity?
You will need a drill, screwdriver, level, tape measure, adjustable wrench, and silicone caulk. A stud finder and pencil help with precise mounting. Having these tools ready ensures a smooth and efficient installation process.
How Do I Secure The Vanity To The Wall Safely?
Locate wall studs and mark their positions. Use screws to anchor the vanity’s mounting brackets into the studs. This prevents movement and ensures stability. Avoid mounting only on drywall, as it won’t support the weight.
Can I Install Plumbing Myself With The Vanity?
Basic plumbing like connecting water lines and drain pipes can be DIY if you have experience. Otherwise, hiring a licensed plumber is safer. Proper sealing and leak checks are essential to avoid water damage.
Conclusion
Installing a freestanding bathroom vanity is simple with clear steps. Measure your space carefully before buying your vanity. Gather all tools and materials to avoid delays. Follow the instructions closely to ensure a good fit. Check plumbing connections for leaks after installation.
Take your time and work safely throughout the process. Enjoy your new bathroom look with added style and storage. This project boosts both function and appearance easily. You can do it yourself with patience and care.