Are you looking to transform your empty wall into a stunning display of memories and art? Hanging a wall collage is a simple way to add personality and style to any room.
But where do you start? How do you arrange everything so it looks balanced and eye-catching? In this guide, you’ll discover easy steps to create a wall collage that reflects your unique taste. By the time you finish reading, you’ll have the confidence to turn your blank wall into a beautiful centerpiece that grabs attention and feels just right.
Let’s dive in and make your walls come alive!
Choose A Theme
Creating a wall collage starts with choosing a clear theme. A theme helps your artwork and photos look connected.
It guides your choices and makes the collage feel balanced and interesting.
Select Artwork And Photos
Pick artwork and photos that fit the theme you want. Use images that tell a story or share a feeling.
Try to mix different sizes and shapes to keep the collage lively and fun to look at.
- Use personal photos for a family theme
- Add prints or posters for a travel theme
- Include drawings or paintings for art themes
Pick A Color Palette
Choose a set of colors that work well together. The colors should match your theme and style.
Use colors to make your collage feel warm, cool, bright, or calm.
- Pick 2 to 4 main colors
- Use shades and tints of those colors
- Make sure colors repeat in different pieces
Decide On A Style
Choose a style that fits your space and personality. Styles can be modern, vintage, or eclectic.
Keep the style consistent to make your collage look neat and planned.
- Modern: clean lines and simple frames
- Vintage: old photos and classic frames
- Eclectic: mix of different shapes and frames
Plan Your Layout
Planning your wall collage layout helps you create a balanced and attractive design. It saves time and avoids mistakes when hanging your pieces.
Think about the shapes and sizes of your frames. Decide how you want them to look together before putting nails in the wall.
Arrange On The Floor
Place your frames on the floor to try different layouts. This lets you see how each piece fits with the others.
Move frames closer or farther apart. Change their order to find the best grouping for your wall space.
- Start with the largest pieces in the center
- Fill gaps with smaller frames
- Keep consistent spacing between items
- Try both symmetrical and asymmetrical designs
Use Paper Templates
Cut paper shapes to match your frames. Tape them on the wall to test your layout without making holes.
This helps you visualize the collage at eye level. You can easily adjust spacing and alignment before hanging anything.
- Trace each frame on paper
- Cut out the shapes carefully
- Use painter’s tape to attach templates
- Step back often to check the look
Consider Wall Space
Measure the wall area where you want the collage. Make sure your layout fits well and does not crowd the space.
Think about furniture and light switches nearby. Leave enough room so the collage looks balanced and neat.
- Keep at least 6-12 inches from ceiling and furniture
- Avoid blocking outlets and switches
- Choose a wall with good lighting
- Match the collage size to the wall’s width
Gather Materials
Before hanging a wall collage, you need to collect all the needed materials. This helps keep the process smooth and organized.
Having the right tools and supplies makes it easier to create a beautiful and balanced display.
Frames And Mounts
Choose frames that match your photos or art style. Mounts help protect your pictures and add a clean look.
You can use different frame sizes and shapes to make the collage interesting. Mounts usually come in white or cream colors.
- Wooden or metal frames
- Mat mounts for extra border
- Shadow box frames for 3D items
- Simple clip frames for easy changes
Hanging Tools
Use strong hanging tools that fit the frame weight. This keeps your collage safe on the wall.
Nails, hooks, or adhesive strips are common options. Pick what suits your wall type and frame size.
- Picture hanging nails or hooks
- Adhesive strips for light frames
- Wall anchors for heavy frames
- Hammer or screwdriver
Measuring Supplies
Good measuring tools help you space your frames evenly. This keeps the collage looking neat and balanced.
Use a level to make sure frames hang straight. Mark spots on the wall before hanging.
- Tape measure for distances
- Level to check straight lines
- Pencil for marking spots
- Painter’s tape to plan layout

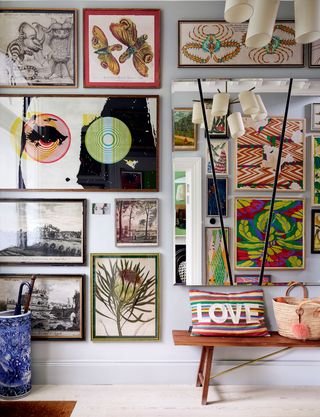
Credit: jasperandjute.co.za
Prepare The Wall
Before hanging a wall collage, it's important to prepare the wall properly. This ensures your artwork or photos hang securely and look great.
Follow these simple steps to get your wall ready for a stunning collage display.
Clean The Surface
Dirt and dust can prevent adhesives from sticking well. A clean surface is essential for a secure hold.
Use a damp cloth to wipe the wall. Allow it to dry completely before proceeding.
Mark Placement
Decide where each piece of your collage will go. Mark these spots lightly with a pencil.
This helps in visualizing the final look and ensures even spacing between items.
- Start with the largest piece in the center
- Work outward with smaller pieces
- Keep consistent gaps between frames
Check For Studs
Studs provide a sturdy support for heavier items. Use a stud finder to locate them on your wall.
Mark the stud positions if you plan to hang large or heavy frames. This ensures they stay securely on the wall.
Hang The Pieces
Hanging a wall collage needs care and planning. Place each piece carefully to create a balanced look. This guide helps you hang your collage with ease and style.
Use the right tools and follow simple tips. This makes sure your collage looks great and stays secure on the wall.
Use Level For Alignment
Use a level tool to keep frames straight. Align the top edges or centers of your pictures. This gives a neat and orderly appearance to your collage.
- Place the level on top of the frame before hanging.
- Mark the wall where the nails should go.
- Check alignment after hanging each piece.
- Adjust if any frame tilts or shifts.
Secure Frames Properly
Use proper hooks and nails to hold each frame. Different frames may need different hardware. Secure hanging prevents frames from falling or tilting.
| Frame Type | Recommended Hardware |
| Lightweight frames | Small nails or adhesive hooks |
| Medium-weight frames | Picture hooks with nails |
| Heavy frames | Wall anchors or screws |
Adjust Spacing As Needed
Check the gaps between frames once they are hung. Equal spacing looks tidy and pleasing. Move frames slightly to fix uneven gaps or overlaps.
Tips for spacing adjustment:
- Stand back and view the whole collage.
- Use a tape measure for exact distances.
- Keep consistent spacing for a balanced look.
- Leave small spaces to avoid clutter.
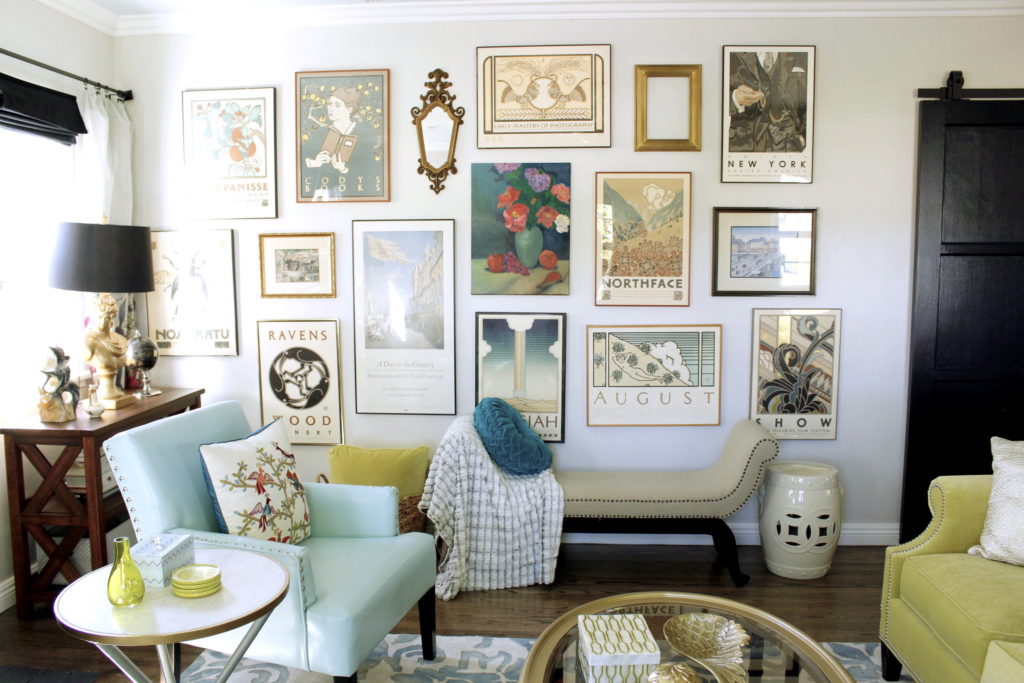
Credit: marilynntaylor.com
Add Finishing Touches
Adding finishing touches to your wall collage makes it look complete. These small details bring your space to life.
Focus on small changes that improve the overall look and feel of your collage.
Incorporate Decorative Items
Decorative items add personality to your wall collage. They create depth and interest around your photos or art.
Try using plants, small shelves, or unique objects to enhance your display.
- Place small plants to add freshness
- Use shelves for small sculptures or books
- Add string lights for soft lighting
- Include clocks or mirrors for variety
Balance The Arrangement
Balance makes your collage pleasing to the eye. Spread items evenly so one side does not feel heavier.
Mix different sizes and shapes carefully to keep the collage interesting and stable.
- Place large frames at center or corners
- Fill gaps with smaller pieces or decorations
- Keep colors and styles consistent
- Step back often to check balance
Maintain The Display
Keep your wall collage looking fresh by cleaning and updating it. Dust frames and items regularly.
Swap photos or decorations now and then to keep the display interesting and personal.
- Use a soft cloth to dust weekly
- Check for loose nails or hooks
- Replace worn or faded pictures
- Change decorations by season or mood

Credit: www.mpix.com
Frequently Asked Questions
How Do I Start Planning A Wall Collage?
Begin by choosing a wall space and selecting a theme or color palette. Arrange frames on the floor to visualize your layout before hanging.
What Tools Do I Need To Hang A Wall Collage?
You’ll need a tape measure, level, hammer, nails or hooks, and painter’s tape to mark positions precisely.
How High Should I Hang A Wall Collage?
Hang your collage at eye level, typically 57-60 inches from the floor to the center of the arrangement.
Can I Mix Different Frame Styles In One Collage?
Yes, mixing frame styles adds visual interest. Keep a consistent color or theme for cohesion.
Conclusion
Hanging a wall collage adds life to any room. Choose your favorite frames and arrange them nicely. Use simple tools and follow easy steps. Take your time to measure and plan carefully. Enjoy seeing your personality shine through your wall art.
This small project brings big joy and style. Try it today and see the difference.