Are you working with clay at home and wondering how to cure it perfectly every time? Whether you’re making pottery, sculptures, or crafts, curing clay properly is key to making your creations strong and long-lasting.
But curing clay can seem tricky if you don’t know the right steps. Don’t worry—you’re about to discover simple, effective methods that you can use right now. By the end of this article, you’ll feel confident curing your clay with ease and getting the best results for all your projects.
Ready to make your clay creations last? Let’s dive in!

Credit: www.youtube.com
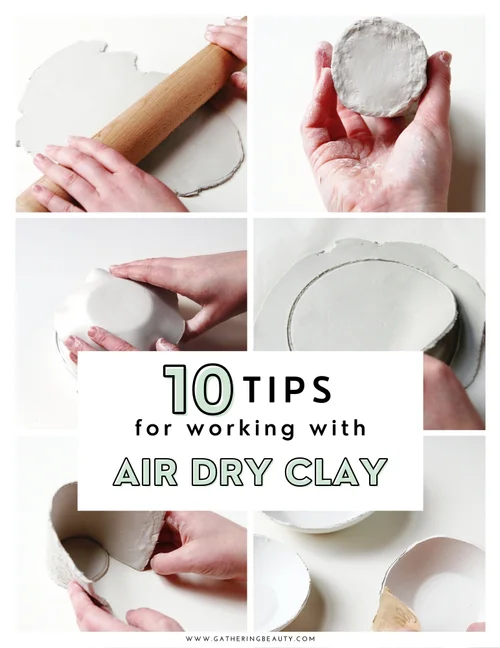
Choosing The Right Clay
Choosing the right clay is important for your home project. The type of clay affects how you work with it and how it cures.
Different clays have different textures, drying times, and finishes. Pick one that fits your project needs.
Types Of Clay For Home Projects
There are several types of clay for home use. Each type has unique features and uses.
- Air-Dry Clay: Dries naturally in air without heat.
- Oven-Bake Clay: Hardens when baked in an oven.
- Polymer Clay: A type of oven-bake clay, flexible and colorful.
- Natural Clay: Needs to be fired in a kiln, less common at home.
Selecting Air-dry Vs. Oven-bake Clay
Air-dry clay cures by drying in the open air. It is easy to use and needs no oven.
Oven-bake clay needs heat to harden. You bake it in a home oven at low temperature.
| Feature | Air-Dry Clay | Oven-Bake Clay |
|---|---|---|
| Drying Time | Several hours to days | Minutes in oven |
| Tools Needed | None | Oven |
| Durability | Moderate | High |
| Finish | Matte or chalky | Glossy or firm |
| Best For | Simple crafts, kids' projects | Detailed art, jewelry |

Credit: www.youtube.com
Preparing Your Workspace
Before you start curing clay at home, set up a good workspace. A clean, organized area helps your clay dry evenly.
A proper workspace keeps your materials safe and your project neat. It also makes the process easier and more fun.
Essential Tools And Materials
Gather all the tools and materials you need before you begin. This saves time and avoids interruptions.
- Clay pieces ready for curing
- Oven or air-drying space
- Baking sheet or tray
- Parchment paper or foil
- Clay tools like rollers or knives
- Protective gloves if needed
- Timer to track curing time
Setting Up A Clean And Safe Area
Choose a flat, stable surface to work on. Clean the area well to avoid dirt or dust on your clay.
Make sure the area is well-ventilated, especially if you use an oven. Keep children and pets away during curing.
- Clear the workspace of clutter
- Cover surfaces with newspaper or plastic
- Use a fan or open a window for airflow
- Keep water and cleaning cloths nearby
- Have a fire extinguisher close if using an oven
Shaping And Sculpting Tips
Working with clay at home can be fun and creative. Shaping and sculpting are key steps to make your clay projects look great.
With the right tips, you can create smooth and detailed pieces that are ready for curing.
Techniques For Smooth Finishing
To get a smooth finish, start by gently shaping your clay with clean hands. Use water or clay slip to soften rough edges.
Tools like rubber shapers and soft brushes help smooth the surface without damaging details.
- Use a damp sponge to gently wipe surfaces
- Apply thin layers of slip to fill small cracks
- Sand lightly with fine-grit sandpaper after curing if needed
Avoiding Common Mistakes
One common mistake is rushing the shaping process. Take your time to avoid cracks and uneven shapes.
Keep your clay moist but not too wet. Too much water makes the clay weak and hard to cure.
- Do not press too hard to avoid dents
- Keep tools and hands clean to prevent dirt in clay
- Check for air bubbles and remove them before curing

Credit: tandoormorni.com
Drying Clay At Room Temperature
Drying air-dry clay at room temperature is a simple way to cure your creations. It does not need an oven or special tools.
Patience is key because the drying process takes time. Proper conditions help the clay dry evenly and strong.
Ideal Conditions For Air-dry Clay
To get the best results, keep your clay in the right environment. This prevents cracks and warping.
- Keep the clay in a warm room, about 65-75°F (18-24°C).
- Place your project on a flat, clean surface.
- Avoid direct sunlight, which can dry clay too fast.
- Maintain low humidity to help the clay dry properly.
- Turn the clay piece occasionally to dry all sides evenly.
How Long To Let Clay Dry
The drying time depends on the thickness and size of your clay piece. Thicker parts take longer to dry.
| Clay Thickness | Approximate Drying Time |
| 1/4 inch (0.6 cm) | 24 hours |
| 1/2 inch (1.3 cm) | 48 hours |
| 1 inch (2.5 cm) | 3-4 days |
| More than 1 inch (2.5 cm) | Up to 1 week |
Make sure the clay feels hard and dry to the touch before finishing or painting.
Baking Clay In The Oven
Baking clay at home is a simple way to harden your projects. Using your oven lets you cure the clay properly.
It is important to know the right oven settings and how to avoid common problems like cracks and bubbles.
Correct Oven Settings
Set your oven temperature exactly as the clay package says. Too hot or too cold can ruin your work.
Use an oven thermometer to check the temperature. This helps keep the heat steady and correct.
- Preheat the oven before putting in the clay
- Do not use a microwave for baking clay
- Bake on a baking sheet or ceramic tile
- Follow the time guide on the clay package carefully
Preventing Cracks And Bubbles
Cracks happen when the clay dries too fast or unevenly. Slow baking helps stop cracks.
Bubbles form if the clay has trapped air or moisture. Press the clay well before baking.
- Roll clay evenly to avoid thick and thin spots
- Use a toothpick to pop air bubbles before baking
- Cover clay with foil to slow down baking
- Cool the clay slowly after baking to prevent cracks
Finishing Touches After Curing
Once your clay project is cured, it's time to add the finishing touches. This step includes sanding, smoothing, painting, and sealing.
These processes enhance the look and durability of your clay creation. Let's explore each step in detail.
Sanding And Smoothing
Sanding and smoothing help remove rough edges and imperfections. This step is crucial for a polished finish.
- Start with coarse sandpaper to remove large bumps.
- Use finer sandpaper for a smoother surface.
- Ensure even sanding across the entire piece.
Painting And Sealing Options
Painting and sealing protect the clay and add color. Choose the right products for your project.
| Paint Type | Best Use |
| Acrylic | Vibrant colors |
| Oil-based | Durable finish |
| Watercolor | Soft effects |
After painting, use a sealant to protect the surface. This step ensures your creation lasts longer.
Troubleshooting Common Issues
Curing clay at home can be tricky. Common problems include cracks and uneven curing. These issues can be frustrating, but they are fixable.
Understanding how to deal with these issues will make your clay projects successful. Let's explore how to fix these problems.
Fixing Cracks And Breaks
Cracks can happen if clay dries too fast. Slow drying helps prevent this. Keep your clay covered while working on it.
If cracks appear, use a wet sponge to smooth them out. Adding a bit of water can help mend small breaks. For larger cracks, mix clay with water to make a slip and fill the gaps.
- Cover clay with plastic to slow drying
- Use a wet sponge for smoothing
- Make slip from clay and water for large cracks
Dealing With Uneven Curing
Uneven curing happens if some parts of the clay are thicker than others. Make sure your clay is of even thickness before curing.
If the clay cures unevenly, sand the thicker areas gently. This helps to even out the surface. Properly rotating your clay piece during curing can also help.
- Ensure even thickness before curing
- Sand thicker areas gently if needed
- Rotate clay piece during curing
Frequently Asked Questions
How Long Does It Take To Cure Clay At Home?
Curing clay at home typically takes 24 to 72 hours. Drying time depends on the clay type and thickness. Thinner pieces dry faster, while thicker ones need more time. Proper air circulation speeds up the process. Avoid direct sunlight to prevent cracking.
Can I Cure Air-dry Clay Without An Oven?
Yes, you can cure air-dry clay without an oven by letting it dry naturally. Place your clay project in a dry, well-ventilated area. Turn the piece occasionally for even drying. This method is safe and preserves the clay’s texture.
What Is The Best Temperature To Cure Clay?
The best temperature to cure polymer clay is between 265°F and 275°F (130°C to 135°C). Follow the manufacturer’s instructions carefully. Avoid higher temperatures to prevent burning or discoloration. Baking at the right temperature ensures durability and a smooth finish.
How Do I Prevent Cracks When Curing Clay?
To prevent cracks, cure clay slowly and evenly. Avoid rapid drying or overheating. Keep the clay thickness uniform to ensure consistent curing. Seal thin areas with extra clay if needed. Proper hydration before curing also reduces cracking risks.
Conclusion
Curing clay at home can be simple and rewarding. Follow the steps carefully to avoid cracks or breaks. Proper drying and baking help your clay last longer. Take your time and work in a clean space. Soon, you’ll create strong and beautiful clay items.
Enjoy the process and keep practicing often. Your handmade creations will improve with each try. Happy crafting!