
Thinking about giving your bathroom a fresh new look? Changing your bathroom vanity is one of the quickest and most effective ways to transform the space.
But where do you start? You might feel overwhelmed by the tools, measurements, and steps involved. Don’t worry—this guide is here to make the process simple and doable. By the time you finish reading, you’ll have the confidence and know-how to replace your vanity like a pro.
Ready to upgrade your bathroom and boost your home’s style? Let’s dive in!

Credit: www.reddit.com
Planning Your Vanity Upgrade
Upgrading your bathroom vanity can improve both style and function. Planning carefully helps you avoid mistakes and extra costs.
Think about your space, style, and budget before you start shopping. This guide covers the key points to consider.
Choosing The Right Vanity Size
Measure your bathroom space to find a vanity that fits well. Too large or small vanities can make the room feel unbalanced.
- Measure the width, depth, and height available
- Leave enough space for doors and drawers to open
- Consider if you want one or two sinks
- Think about storage needs
Selecting Materials And Styles
Pick materials that match your bathroom’s look and can handle moisture. Styles range from modern to classic designs.
| Material | Durability | Style Options | Maintenance |
| Wood | Moderate | Traditional, Rustic | Needs sealing |
| Laminate | High | Modern, Variety of colors | Easy to clean |
| Stone (Granite, Marble) | Very High | Elegant, Luxurious | Requires sealing |
| Metal | High | Industrial, Contemporary | Resists moisture |
Setting A Budget
Decide how much money you want to spend before buying. This helps you pick the best vanity for your price range.
- Set a total budget for the project
- Include costs for plumbing or installation
- Leave some money for unexpected expenses
- Compare prices from different stores or brands
Gathering Tools And Supplies
Changing a bathroom vanity needs the right tools and materials. Collecting these before starting saves time. It also helps avoid interruptions during the work.
Make sure you have everything ready. This guide lists what you need for a smooth project.
Essential Tools For The Job
These tools help you remove the old vanity and install the new one safely and correctly.
- Adjustable wrench for plumbing connections
- Screwdrivers (flathead and Phillips)
- Power drill with drill bits
- Level to ensure the vanity is straight
- Measuring tape for accurate sizing
- Utility knife for trimming caulk and sealants
- Putty knife to remove old adhesive
- Bucket and towels to catch water spills
Materials And Fixtures Needed
Besides tools, you will need materials and fixtures to complete the vanity replacement.
| Material/Fixture | Purpose |
| New bathroom vanity | Main furniture piece for storage and sink |
| Sink and faucet | For washing and water supply |
| Water supply lines | Connect faucet to water source |
| Drain assembly | Allows water to flow out |
| Silicone caulk | Seals edges to prevent leaks |
| Mounting hardware | Secures vanity to the wall |
| Plumber’s tape | Ensures leak-proof plumbing connections |
Preparing The Bathroom Space
Changing a bathroom vanity starts with proper preparation. Getting the space ready helps the process go smoothly.
This guide covers clearing the area, turning off the water supply, and removing the old vanity.
Clearing The Area
Remove all items around the vanity. This includes toiletries, towels, and rugs.
Clear space gives you room to work and protects your belongings from damage.
- Take out any objects on or near the vanity
- Move rugs and mats away from the work area
- Cover the floor with a drop cloth if needed
Turning Off Water Supply
Before removing the vanity, turn off the water supply. This stops leaks and water damage.
Look for shut-off valves under the sink or near the main water line.
- Locate the hot and cold water valves
- Turn each valve clockwise to close
- Open the faucet to drain leftover water
Removing The Old Vanity
Start by disconnecting plumbing and electrical connections. Use tools carefully to avoid damage.
Remove screws or nails holding the vanity to the wall. Then, gently pull the vanity away.
- Disconnect water supply lines with a wrench
- Unscrew mounting brackets or fasteners
- Lift and remove the vanity from the space
- Check for any remaining debris or nails on the floor
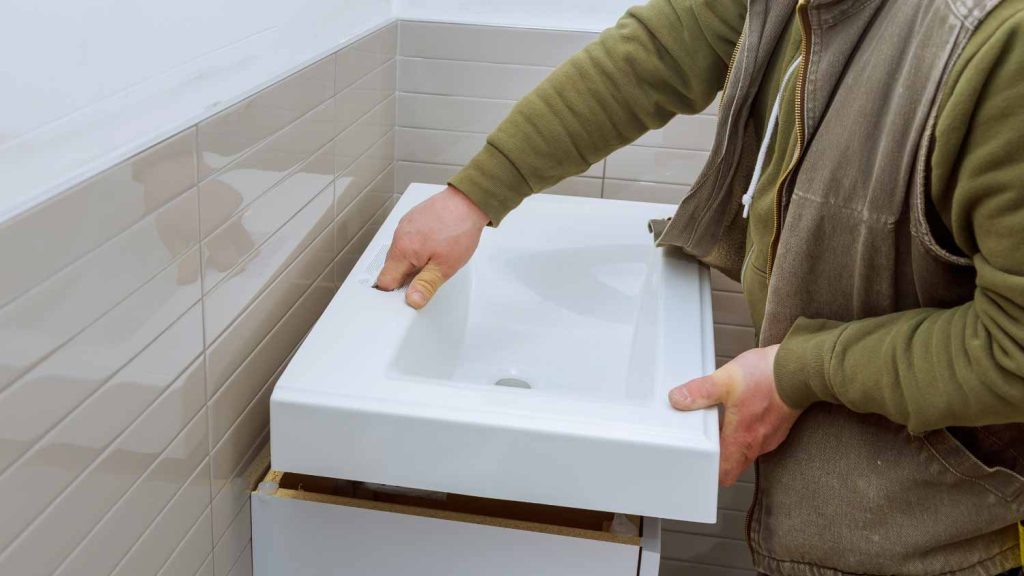
Installing The New Vanity
Installing a new bathroom vanity can improve your space’s look and function. This guide will help you set it up correctly.
Follow these steps to position, connect plumbing, and finish your vanity installation.
Positioning And Securing The Vanity
Place the vanity against the wall where it fits best. Check that it is level from side to side and front to back.
Use shims to adjust the height if the floor is uneven. Secure the vanity to the wall studs with screws through the back panel.
- Measure the space before placing the vanity
- Use a level to ensure even placement
- Insert shims to fix any gaps
- Screw the vanity into wall studs for support
Connecting Plumbing Fixtures
Attach the water supply lines to the faucet’s hot and cold valves. Tighten the connections carefully to avoid leaks.
Connect the drain pipe to the sink drain. Make sure all connections are secure and use plumber’s tape on threads if needed.
- Turn off water supply before starting
- Connect supply lines to faucet valves
- Attach drain pipe to sink drain
- Tighten all fittings and check for leaks
Sealing And Finishing Touches
Apply a bead of silicone caulk along the edges where the vanity meets the wall. This stops water from getting behind the unit.
Clean any excess caulk and wipe the vanity surface. Add any knobs or handles to complete the look.
- Use silicone caulk on vanity edges
- Remove extra caulk with a damp cloth
- Install knobs and handles
- Double-check all fittings and surfaces
Troubleshooting Common Issues
Changing a bathroom vanity can bring some common problems. Knowing how to fix them saves time and money.
This guide covers three typical issues you may face during the process. Learn simple ways to handle each one.
Dealing With Plumbing Leaks
Leaks can happen when you disconnect or reconnect pipes. Check all joints for water drips after installation.
Tighten loose connections carefully. Use plumber’s tape on threaded pipes to stop leaks.
- Turn off water before starting work
- Inspect pipes for cracks or damage
- Replace worn washers or seals
- Test water flow after fixing leaks
Fixing Alignment Problems
Sometimes the vanity does not line up with the wall or plumbing. Check the level before securing it.
Use shims to adjust the height or angle. Make sure the vanity sits flat and stable.
- Measure the space carefully
- Use a level tool on all sides
- Add shims under vanity corners if needed
- Re-check alignment after tightening screws
Handling Unexpected Repairs
Old vanities may hide damage like mold, rot, or broken pipes. Inspect the area before installing the new one.
Fix any issues right away to avoid bigger problems later. Replace damaged parts or call a professional if needed.
- Look for water damage behind the vanity
- Check wall studs for rot or weakness
- Replace broken or rusty pipes
- Seal gaps to prevent future damage

Credit: www.reddit.com
Tips For A Stunning Bathroom Look
Changing your bathroom vanity can transform your space. With the right touches, your bathroom will look stunning and inviting.
Follow these tips to ensure your new vanity complements the rest of your bathroom decor.
Choosing Complementary Fixtures
Your vanity fixtures should match your bathroom style. Choose handles and knobs that blend well with existing elements.
- Match metals like chrome or brass for a cohesive look
- Opt for sleek, modern designs in contemporary bathrooms
- Consider antique finishes for a vintage style
Adding Lighting Enhancements
Lighting plays a key role in bathroom aesthetics. It can highlight your vanity and create an inviting atmosphere.
Incorporating Storage Solutions
Maximize your space with smart storage options. A clutter-free vanity enhances the overall look of your bathroom.
| Storage Type | Benefit |
| Pull-out drawers | Easy access to toiletries |
| Open shelving | Display decorative items |
| Cabinet organizers | Keep items neatly arranged |

Credit: www.familyhandyman.com
Frequently Asked Questions
How Do I Remove An Old Bathroom Vanity?
Start by turning off the water supply. Disconnect plumbing and electrical connections carefully. Unscrew and lift out the vanity from the wall. Protect walls and floors during removal to avoid damage.
What Tools Are Needed To Change A Bathroom Vanity?
You will need a wrench, screwdriver, tape measure, level, and plumber’s putty. A utility knife and pry bar can help with removal. Safety gloves and goggles are recommended for protection.
How Do I Install Plumbing For A New Vanity?
Connect the water supply lines to the faucet. Attach the drain pipe to the sink’s drain. Use plumber’s tape to prevent leaks. Test connections by turning on the water and checking for leaks.
What Size Vanity Fits A Small Bathroom?
Choose a vanity between 18 to 24 inches wide for small bathrooms. Measure the available space carefully. Opt for a wall-mounted or narrow design to maximize floor space.
Conclusion
Changing your bathroom vanity can refresh your space quickly. Follow each step with care and patience. Take your time to measure and fit parts correctly. Small details make a big difference in the final look. Enjoy the satisfaction of a job well done.
Your new vanity will brighten your bathroom every day. Keep tools organized and work safely for best results. Remember, practice improves your skills with each project. Try this upgrade to add style and function easily.