Are you ready to add a spooky touch to your Halloween decorations? Making your own Halloween Bat Garland DIY is a fun and simple way to transform your space.
Imagine your walls or windows lined with cute, fluttering bats that you crafted yourself. It’s not only budget-friendly but also lets you get creative and personalize your Halloween vibe. Keep reading, and you’ll discover easy steps and tips to make a bat garland that will impress everyone who sees it.
Your Halloween setup is about to get a whole lot more exciting!
Materials Needed
Creating a Halloween bat garland is fun and easy. You only need a few supplies to start. Gather everything before you begin your project.
This list covers the basic items and some extra decorations to make your garland spooky and unique.
Basic Supplies
- Black construction paper or cardstock
- Scissors
- String or twine
- Glue or double-sided tape
- Hole puncher
- Pencil for tracing
- Bat template or stencil (optional)
These items form the foundation of your bat garland. Use the stencil to cut out bat shapes easily.
Optional Decorative Items
| Item | Purpose |
| Glitter | Add sparkle to bats |
| Googly eyes | Make bats look lively |
| Colored markers | Create details like fangs or wings |
| LED string lights | Light up the garland |
| Colored paper (purple, orange) | Add variety to bat shapes |
Use these to add fun and color to your garland. They make your decoration stand out.

Credit: www.againwesayrejoice.com
Preparing The Bat Templates
Making a Halloween bat garland starts with good templates. These templates help you cut the bats evenly.
Getting your templates ready saves time and makes your garland look neat and fun.
Choosing The Right Paper
Pick paper that is easy to cut but still holds its shape. Cardstock works best for bat templates.
Avoid very thin paper. It tears easily and does not look strong on a garland.
- Use black or dark gray cardstock for a spooky look
- Colored paper can add fun to your decoration
- Matte paper reduces glare and looks cleaner
- Choose paper that fits your printer if you print templates
Cutting Out Bat Shapes
Cut carefully around the bat shapes. Sharp scissors or a craft knife work best.
Cutting slowly helps keep the edges smooth and the bats look better.
- Fold paper if you want several bats of the same size
- Use a cutting mat to protect your work surface
- Keep your fingers clear of the cutting line
- Trace the template lightly before cutting for accuracy
Assembling The Garland
Creating a Halloween bat garland is a fun way to decorate your home. This guide will help you put the pieces together with ease.
Follow the steps below to arrange your bat shapes and attach them securely to the string.
Arranging Bat Pieces
Lay out all your bat cutouts on a flat surface. Arrange them in the order you want on your garland. Space them evenly for the best look.
- Mix small and large bats for variety
- Face bats in different directions
- Leave about 6 inches between each bat
- Use a ruler to keep spacing even
Attaching To String
Use strong string or twine to hang your bats. Attach each bat carefully to avoid damage.
| Attachment Method | Materials Needed | Tips |
|---|---|---|
| Hole Punch and Thread | Hole punch, needle, string | Make holes near bat wings for balance |
| Glue Dots | Glue dots, string | Use small dots to avoid mess |
| Mini Clothespins | Clothespins, string | Clip bats without piercing paper |

Credit: tonalitydesigns.com
Adding Extra Details
Adding extra details can make your Halloween bat garland stand out. Small touches bring more life and fun to the decoration.
Use simple ideas to add charm. This helps your garland look unique and festive for Halloween.
Painting And Decorating
Paint your bats with different shades of black and gray. This gives them depth and makes them look more real.
Use white or silver paint to add small dots or lines. These can look like eyes or wing veins.
- Use matte paint for a natural look
- Add glitter paint for a shiny effect
- Glue small paper eyes or stickers
- Draw tiny fangs or smiles with a fine marker
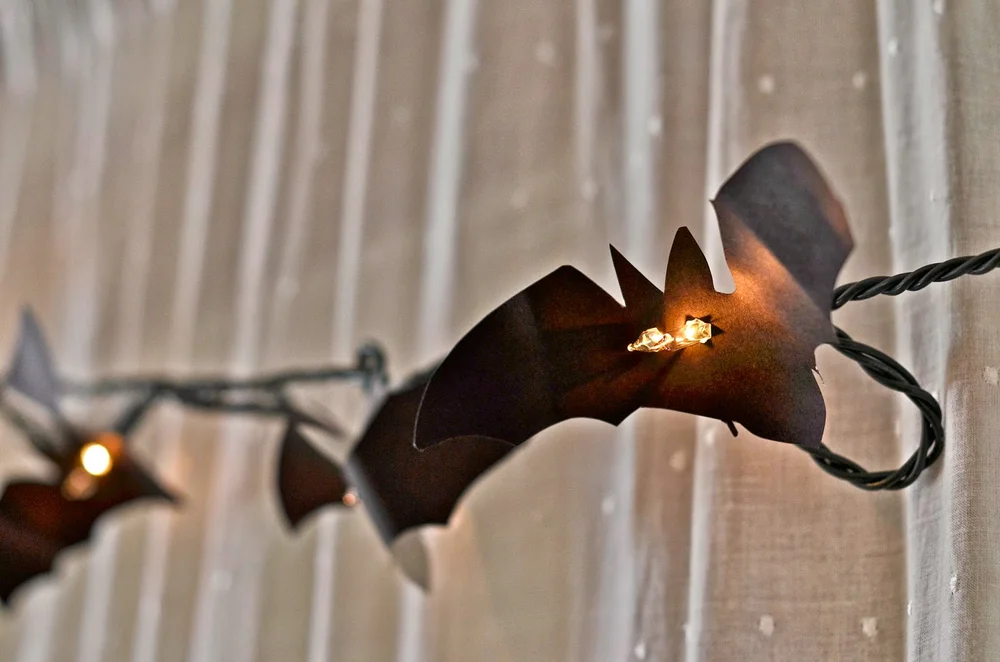
Incorporating Lights
Lights make your bat garland glow in the dark. Use small LED string lights to weave through the garland.
Choose orange or purple lights for a spooky Halloween feel. Make sure the lights are safe and battery-operated.
- Weave lights behind or around the bats
- Secure lights with tape or small clips
- Use flickering lights for a ghostly effect
- Hide batteries in a small pouch behind the garland
Hanging Your Garland
Hanging your Halloween bat garland can add a spooky touch to any space. It is important to choose the right spot and secure it well.
Proper placement and fastening will keep your garland looking great all night long. Let’s explore some ideas to help you hang it easily.
Best Placement Ideas
Choose places where your bat garland can be seen clearly. High spots catch the eye and add to the Halloween mood.
Look for spaces that are not too crowded. This helps the bats stand out and prevents the garland from getting damaged.
- Above door frames to welcome guests
- Along the mantel for a spooky centerpiece
- Across windows to catch moonlight
- On stair railings for a creepy effect
- Over party tables to decorate food areas
Securing The Garland
Use gentle tools to attach your garland without damage. Avoid strong adhesives that could harm surfaces.
Make sure the garland is tight enough to stay up but not stretched too much. This keeps it looking natural.
- Use removable hooks or clear tape for walls
- Tie garland ends with string or ribbon on railings
- Attach with small clothespins for easy removal
- Use push pins if surfaces allow and won’t be damaged
- Check the garland periodically to adjust if it sags
Creative Variations
Halloween bat garlands add spooky charm to any room. With some creativity, you can make unique variations.
Explore different designs and materials to craft a personalized bat garland. Let's dive into some creative ideas.
Different Bat Designs
Bat designs can vary in shape and style. You can create simple or detailed bats.
- Classic silhouette bats
- Cartoon-style bats with eyes
- Gothic bats with intricate details
Choose a design that suits your Halloween theme. Mix different styles for a diverse look.
Using Alternative Materials
Materials can change the appearance of your garland. Experiment with various options for a unique touch.
- Felt for a soft texture
- Glitter paper for sparkle
- Recycled cardboard for an eco-friendly option
Each material offers a different look and feel. Combine materials for added depth and interest.

Credit: awonderfulthought.com
Frequently Asked Questions
What Materials Do I Need For Halloween Bat Garland Diy?
You need black cardstock, scissors, string, glue, and a pencil. Optional items include a hole punch and tape. These basics help create sturdy, easy-to-hang bat shapes for your garland.
How Do I Make Bat Shapes For The Garland?
Fold cardstock in half, draw half-bat shape on the fold, then cut. Unfold to reveal symmetrical bat shapes. This method ensures uniform, neat bats for your garland.
Can I Customize The Bat Garland Colors?
Yes, you can use any color cardstock or paper. Glow-in-the-dark or glitter paper adds extra Halloween flair. Feel free to mix colors for a unique look.
How Long Does It Take To Make A Bat Garland?
Making a garland typically takes 30 to 60 minutes. It depends on the number of bats and crafting experience. This makes it a quick, fun Halloween project.
Conclusion
Creating a Halloween bat garland is simple and fun. It adds spooky charm to any room or party. You only need a few materials and some creativity. Kids and adults both enjoy making this craft together. Hang it on walls, windows, or doorways for instant decoration.
This DIY project brings a festive mood without much cost. Try different bat sizes and colors to make it unique. Enjoy your Halloween with this easy, handmade touch. Crafting brings smiles and makes memories. Happy decorating!